
User manual


8
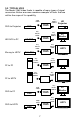
6.0 CONTROLLING THE SCALER
The Scaler is controlled via three
buttons and status is indicated by
on-screen-display (OSD).
• Menu Button: This button displays the menu options via the OSD
shown on the TV, projector or monitor.
• + and – Buttons: These buttons allow navigation within the menu
and adjustments of the parameters available.
• XGA Reset: Simultaneously depressing the + and – buttons returns
settings to factory defaults and sets the output to XGA.
• 480p Reset: Simultaneously depressing the MENU and – buttons
returns settings to factory defaults and sets the output to 480p.
6.1 Input Setup
When selected, a sub-menu of clock and phase adjustments appears:
Use + and – buttons to choose the parameter you want to adjust
and then press the MENU (Enter) to highlight your selection. Once a
parameter is highlighted, use + and – buttons to increase or decrease
the value of the setting. Press MENU again to leave the setting. Move
the arrow to EXIT, then press MENU/ENTER to exit.
6.2 Output Setup
When selected, the Output Resolution sub-menu appears.
Use the + and – buttons to choose the desired PC or HDTV output
resolution from the available selections in the sub-menu.
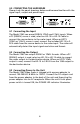
Clock 32/64
Phase 22/32
PC HDTV
SXGA 1280x768 @ 60/75Hz 720p-RGB 1280x720 @ 60Hz
1280A 1280x960 @ 60Hz 576p-RGB 720x576 @ 60Hz
XGA 1024x768 @ 60/70/75/85Hz 480p-RGB 720x480 @ 60Hz
WXGA 1280x768 @ 60Hz 1080i-RGB 1920x1080 @ 60Hz
SVGA 800x600 @ 60/72/75/85Hz 720p-YPbPr 1280x720 @ 60Hz
VGA 640x480 @ 60/72/75/85Hz 576p-YPbPr 720x576 @ 60Hz
VGA70 720x400 @ 70Hz 480p-YPbPr 720x480 @ 60Hz
VESA85 640x400 @ 85Hz 1080i-YPbPr 1920x1080 @ 60Hz
1152x864 @ 70/75Hz Pseudo Interlace - See note on Page 4