Motorola DCH6416 Display Channel Number, Time of Day, Video Mode, Tuner Usage, Status Message Cursor Menu navigation IR Select Selects menu options USB 2.
O PE RA T ION M A NUAL DCH6416 User Guide
IMPORTANT SAFETY INSTRUCTIONS • Read these instructions. • Keep these instructions. • Heed all warnings. • Follow all instructions. • Do not use this apparatus near water. • The apparatus shall not be exposed to dripping or splashing and no objects filled with liquids, such as vases, shall be placed on the apparatus. • Clean only with dry cloth. • Do not block any ventilation openings. Install in accordance with the manufacturers instructions.
During Installation • Do not place the cable terminal in an enclosed area where the cooling vents are blocked or impede the flow of air through the ventilation openings. • Install the terminal so that its position does not interfere with its proper ventilation. For example, do not place the terminal on a bed, sofa, rug, or similar surface that could block the ventilation openings. • Install the terminal away from heat sources such as radiators, heat registers, and stoves.
FCC DECLARATION OF CONFORMITY Motorola Inc., Connected Home Solutions, 101 Tournament Drive, Horsham, PA 19044, 1-215-3231000, declares that the DCH 6416 Series receiver complies with 47 CFR Parts 2 and 15 of the FCC rules as a Class B digital device. Canada Industry Canada (IC) This Class B digital device complies with Canadian ICES-003. Cet appareil numérique de la classe B est conforme à la norme NMB-003 du Canada.
Software License IMPORTANT: PLEASE READ THIS SOFTWARE LICENSE (“LICENSE”) CAREFULLY BEFORE YOU USE ANY SOFTWARE, FIRMWARE, AND RELATED DOCUMENTATION (“SOFTWARE”) PROVIDED WITH MOTOROLA’S DIGITAL CABLE RECEIVER OR HOME THEATER SYSTEM (EACH SHALL BE REFERRED TO IN THIS LICENSE AS A “RECEIVER”). BY USING THE RECEIVER AND/OR USING ANY OF THE SOFTWARE, YOU INDICATE YOUR ACCEPTANCE OF EACH OF THE TERMS OF THIS LICENSE. UPON ACCEPTANCE, THIS LICENSE WILL BE A LEGALLY BINDING AGREEMENT BETWEEN YOU AND MOTOROLA.
This License and your rights regarding any matter it addresses are governed by the laws of the Commonwealth of Pennsylvania, without reference to conflict of laws principles. THIS LICENSE SHALL TERMINATE AUTOMATICALLY if you fail to comply with the terms of this License. Motorola is not responsible for any third-party software that is provided as a bundled application, or otherwise, with the Software or that is downloaded to, or otherwise installed on, the Product. U.S.
CONTENTS 1 Introduction ......................................................................................................................................................1 Front Panel ...................................................................................................................................................2 Rear Panel ....................................................................................................................................................3 2 Operation ..
CONTENTS Connecting Your DCH6416 to an A/V Receiver, Stereo TV (SDTV), and Stereo VCR........................... 27 Connecting an A/V Receiver, TV, and VCR.............................................................................................. 28 8 Recording Your Connections......................................................................................................................... 29 Data Devices ............................................................................................
1 INTRODUCTION Congratulations on receiving a Motorola DCH6416 High-Definition Dual Tuner Cable Receiver, one of the most advanced interactive digital cable receivers available today.
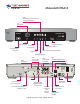
1 INTRODUCTION Front Panel 1 USB 2.0 High-Speed connector 2 Cursor — menu navigation 3 Select — selects menu options 4 Power — turns the receiver on and off (standby) 5 Menu — displays the menu 6 Guide — displays the program guide 7 Info — displays current channel and program information 8 Format * — change the video output format 9 Channel — changes channel up or down * Availability of certain features is dependent upon application support.
1 INTRODUCTION Rear Panel 1 Cable In — Connects to cable signal from your service provider 2 RF Out — Ch 3/4 modulated audio/video (SDTV) to DVD players or VCRs 3 M-Card — Inserted M-Card 4 Serial — Service only 5 S-Video — Connects to S-Video (SDTV) input of TV or VCR 6 Digital Audio (S/PDIF) — Provides Dolby® Digital 5.
2 OPERATION 2 OPERATION Turning Power On and Off Press POWER on the front panel or remote control to turn the DCH receiver on or off (standby). When using the remote control, be sure it is in cable mode by pressing CABLE before pressing POWER. Changing Channels You can change channels in three ways: • Press CHANNEL + or – on the front panel of the DCH receiver or the remote control to step through the channel selection.
2 OPERATION The Format button is intended to allow you to select a video output format that is compatible with a connected display device. Some televisions may not support all four video formats listed above. The Format button provides an easy method for selecting an output format that is compatible with your television. Operation The Format button is intended to complement the User Settings Menu (see User Settings). It is not intended to replace the User Settings Menu.
3 DIGITAL VIDEO RECORDER (DVR) What is a DVR? Depending on your model, the DCH6416 is equipped with an internal hard drive for DVR (Digital Video Recorder) functionality, which provides the ability to record both Standard-Definition TV (SDTV) and High-Definition TV (HDTV) programs. Storage time varies based on the video format and specific channel.
4 CONNECTIONS Video Note: Only (1) HDTV video connection needs to be made to an HDTV.
4 CONNECTIONS Audio The HDMI connection also provides audio. No additional audio connections are required if the TV speakers are used for audio. .
5 OPTIMIZING YOUR DCH RECEIVER FOR HIGH-DEFINITION TV The DCH6416 outputs HD video through its YPbPr (component), HDMI, or IEEE-1394 connectors. This section describes how to optimize Standard and HD video based on your HDTV and personal preferences. If you use the IEEE-1394 output, no adjustments to the settings are required. For a TV with an HDMI connection, be sure the TV is on and connected to the DCH receiver’s HDMI out connector before adjusting the settings.
5 OPTIMIZING YOUR DCH RECEIVER FOR HIGH-DEFINITION TV The HDMI/YPbPr OUTPUT setting is displayed as YPbPr OUTPUT if you are not using the HDMI video connection. The user settings will also be displayed on the front panel display whether your TV is off or on. If the on-screen display menu does not appear on your HDTV screen, your TV may not support the default video output setting. Use the DCH receiver front panel display to view and change your settings. 1. Use the FORMAT button to cycle video formats 2.
5 OPTIMIZING YOUR DCH RECEIVER FOR HIGH-DEFINITION TV Setting Description pixels). • Stretch — The DCH receiver will automatically stretch all StandardDefinition programs to a widescreen aspect ratio and present the video in the format designated by the HDMI/YPbPr Output setting. Note that the Stretch option is only available when the TV Type setting is 16:9.
6 ON-SCREEN GRAPHICS Your DCH receiver can generate graphics that overlay the video programming or fill the entire television screen. Common examples include on-screen menus (such as the User Setting menu), closed captions, and interactive program guides. The DCH receiver overlays these graphics whenever you open a menu, enable closed captions, or scroll through a program grid. • On-screen graphics are not available on all video output combinations.
7 CONNECTING YOUR DCH RECEIVER Instructions and diagrams are included for the following connections: • High-Definition Television (HDTV) • A/V receiver – Audio • Stereo TV (SDTV) • Stereo TV (SDTV) and Stereo VCR • A/V receiver, TV, and VCR Before you move or change components on your entertainment system, review the following: • For basic cable connections, use 75-ohm coaxial cables equipped with F-type connectors.
7 CONNECTING YOUR DCH RECEIVER Video Connection Options The DCH receiver offers several different video connection options. Component video, HDMI, and IEEE-1394 allow you to view both High Definition and StandardDefinition TV programming. Composite video, S-Video, and RF coaxial connections allow you to view only Standard-Definition TV programming. To determine whether your TV features component video, HDMI, IEEE-1394, S-Video, or composite video, check the manual supplied with your TV.
7 CONNECTING YOUR DCH RECEIVER Connecting Your DCH Receiver to an HDTV — Video Only Note: Only (1) HDTV video connection needs to be made to an HDTV.
7 CONNECTING YOUR DCH RECEIVER Connecting HDTV — Video Cable In Connect an RF coaxial cable to the cable wall outlet and the CABLE IN connector on the DCH receiver. Component Video (YPbPr) Connect the component video cables to the Y, Pb, and Pr connectors on your HDTV and DCH receiver. This connection supports only the High-Definition video connection between the DCH receiver and the HDTV. To connect the audio connections for your HDTV, proceed to the following page.
7 CONNECTING YOUR DCH RECEIVER Connecting Your DCH Receiver to an HDTV — Audio Note: Only (1) HDTV video connection needs to be made to an HDTV. Connecting HDTV — Audio Note: These connections are not required if you are using your TV’s speakers and HDMI or IEEE-1394 connections. If your TV does not have digital audio inputs: • Connect the stereo audio cable to the AUDIO L and R connectors on the DCH6416 receiver and the AUDIO LEFT and AUDIO RIGHT connectors on the HDTV.
7 CONNECTING YOUR DCH RECEIVER If your TV supports a digital audio input: • If your equipment supports it, use the digital audio OPTICAL S/PDIF or COAXIAL S/PDIF outputs instead of the AUDIO L and R outputs. In most cases, S/PDIF offers better audio quality, including support for Dolby® Digital 5.1 audio. For information on configuring your DCH receiver settings, see Optimizing Your DCH Receiver for High-Definition TV.
7 CONNECTING YOUR DCH RECEIVER Connecting Your DCH Receiver to an A/V Receiver — Audio Note: Only (1) HDTV video connection needs to be made to an HDTV.
7 CONNECTING YOUR DCH RECEIVER • Digital audio coaxial (S/PDIF) — Connect the digital audio cable to the digital audio connector on the DCH receiver and the DIGITAL INPUT COAX connector on the A/V receiver. • Stereo audio – Connect the stereo audio cable to the AUDIO L and R connectors on the DCH receiver and the AUDIO LEFT and AUDIO RIGHT connectors on the A/V receiver. • HDMI – Connect an HDMI cable to your A/V receiver and to the HDMI connector on your DCH receiver.
7 CONNECTING YOUR DCH RECEIVER Connecting Your DCH Receiver to a Stereo TV (SDTV) Depending on the TV’s inputs: 1. If possible, use the S-Video and audio connectors on the DCH receiver. 2. If the TV has no S-Video input, use the composite video and audio connectors on the DCH receiver. 3. If the TV has an RF input only, use the RF out connector on the DCH receiver. The RF connection carries video and audio. Connecting a Stereo TV (SDTV) 1.
7 CONNECTING YOUR DCH RECEIVER Connecting Your DCH Receiver to a Stereo TV (SDTV) and Stereo VCR Connecting a Stereo TV (SDTV) and Stereo VCR 1. Connect a stereo audio cable to the AUDIO OUT L and R connectors on the DCH6416 receiver and the INPUT AUDIO L and R connectors on the stereo VCR. 2. Connect a video cable to the VIDEO OUT connector on the DCH6416 receiver and the INPUT VIDEO connector on the stereo VCR. 3.
7 CONNECTING YOUR DCH RECEIVER Connecting Your DCH6416 to an A/V Receiver, Stereo TV (SDTV), and Stereo VCR 27
7 CONNECTING YOUR DCH RECEIVER Connecting an A/V Receiver, TV, and VCR 1. Connect a stereo audio cable to the AUDIO OUT L and R connectors on the DCH receiver and the INPUT L and R connectors on the A/V receiver. 2. Connect a video cable to the video out connector on the DCH receiver and the cable/TV video connector on the A/V receiver. 3. Connect a stereo audio cable to the VCR AUDIO OUT L and R connectors on the A/V receiver and the INPUT AUDIO L and R connectors on the stereo VCR. 4.
8 RECORDING YOUR CONNECTIONS Use this diagram to record connections between your home entertainment components. You can use this diagram to reconnect your system if you move the equipment or add new equipment. Disconnect the power from the DCH receiver before connecting or changing cable connections. Do not place another component or object on top of the DCH receiver.
8 RECORDING YOUR CONNECTIONS Data Devices Do not attempt to connect data devices without contacting your service provider. Advanced data features require the proper application and network infrastructure to operate. Data Features In addition to high-quality audio and video, the DCH receiver has the capability to deliver high-speed data services such as Internet access, e-mail, IP telephony, e-commerce, and home banking.
9 TROUBLESHOOTING Before calling your service provider, review this troubleshooting guide. This information is to help you quickly solve a problem. If your problem still exists, contact your service provider. Problem Possible Solution The DCH receiver will not power on The DCH receiver may have received a software update and may not power on while the new software is being installed. Try again in a few minutes.
9 TROUBLESHOOTING Problem Possible Solution audio mode (Dolby Digital, Dolby Pro Logic II®, Dolby Pro Logic®). There is no video on the TV screen • Verify that the receiver is properly configured to work with all connected speakers. • Verify that the TV is powered on and set to the appropriate input source for the DCH receiver. • Verify that the DCH receiver is powered on and tuned to an authorized cable channel.
9 TROUBLESHOOTING Problem Possible Solution below the picture. Some widescreen TVs offer a zoom feature that may be able to remove the black bars (see your TV manual for information about zooming 4:3 video). There are black bars on all four sides of the picture This may occur on a 4:3 TV if the 4:3 OVERRIDE setting is OFF. To set 4:3 SD programming to fill the screen, depending on the capabilities of the TV, set 4:3 OVERRIDE to 480i or 480p.
Motorola, Inc. 101 Tournament Drive Horsham, PA 19044 U.S.A. http://www.motorola.