Cinema Rhapsody Dolby Digital® & DTS® Audio•Video Preamplifier with THX® Enhancements 1200/19200 Baud Operations & Installation Manual For the Cinema Rhapsody with Version 2.00 Software © Copyright 2000, Audio Design Associates, Inc., All Rights Reserved. Audio Design Associates, Inc., 602-610 Mamaroneck Ave.
Contents Safety Instructions & Electrical Warning ..................................................... 1 AC Connections ............................................................................................. 2 Power Amplifier (& Powered Subwoofer) Connections ......................... 3 Introduction - Front Panel Controls & Displays .......................................... 4 Power On, Mute, Off, & Master Volume Control .....................................
Custom Setup A/V Linking ............................................................................................... 36 Auto Mode ................................................................................................ 37 Labeling Inputs ........................................................................................ 39 Turn-On Input ........................................................................................... 40 Default Mode ................................................
Safety Instructions & Electrical Warning READ INSTRUCTIONS - All the safety and operating instructions should be read before the appliance is operated. RETAIN INSTRUCTIONS - The operating instructions should be retained for future reference. HEED WARNING - All warnings on the appliance and in the operating instructions should be adhered to. FOLLOW INSTRUCTIONS - All operating and use instructions should be followed.
AC Connections Before You Begin As you remove the Cinema Rhapsody from its packaging, inspect the condition of the component prior to proceeding with the following steps for AC connection. In the event that the Cinema Rhapsody appears to have suffered cosmetic damage due to shipping, please contact your Authorized ADA Dealer immediately and do not proceed to plug the unit into an AC outlet.
Power Amplifier (& Powered Subwoofer) Connections Audio Connections The Cinema Rhapsody’s Audio Outputs are clearly marked in a white field on the back of the Cinema Rhapsody. ADA strongly suggests not using directional interconnects that lift the grounds. If you are connecting the audio outputs to a six channel power amplifier (which will also power the subwoofer), use the diagram below. This diagram includes ADA’s critically acclaimed PTM-6150 Six Channel THX Power Amplifier.
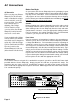
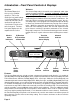
Introduction - Front Panel Controls & Displays Overview The Cinema Rhapsody is factory set for optimum operation. This section details the front panel features of the Cinema Rhapsody. All component functions can be operated through the five control knobs located on the units front panel. The three front panel displays are also explained in this section. Mode & Status Indicators Welcome The Cinema Rhapsody is the world’s most advanced audio video surround sound preamplifier.
Power On, Mute, Off, & Master Volume Control When the Cinema Rhapsody is off, turning any knob or pushing any knob other than the Volume knob will cause the Cinema Rhapsody’s center LCD display to indicate: Power On Press the Cinema Rhapsody’s Volume knob to engage power on. PUSH VOLUME FOR POWER ON Front Plate To turn on the Cinema Rhapsody, providing the unit is not in Mute, press the Volume knob once. Pressing of the Volume knob performs only three functions.
The Cinema Rhapsody permits you to scroll to the next input without having all of the components you are passing actively process through the Cinema Rhapsody. This prevents the clicking that is commonly associated with changing TV channels up and down. To best access another component from the front of the Cinema Rhapsody, turn the Input Selector knob.
Mode Indicators & How They Function The Cinema Rhapsody features six indicators on the left side of its front panel. They provide a visual indication of decoding mode, the presence of an LFE (“.1” of “5.1”), and if a digital input is accessed. While you can manually select modes, these indicators are an ideal way to determine status when the Cinema Rhapsody is in the “AutoMode Detection” state.
Mode Selection & Dolby Digital Mode Descriptions o Select Mo nT de r Tu MODE ENGAGE Front View 1. Dial In New Mode Turn the Mode Selector knob until the second line of the LCD display reads the mode you wish to select. As you turn the knob, you will notice that the top line of the display indicates the current source in play and the second line indicates the modes available. The Cinema Rhapsody will not engage the new mode until Step 2 is accessed. 2.
Dolby Digital Modes (AC-3) - cont. Normal Dynamic Range - This mode engages the AC-3 “Line Mode” coupled with the High Level (HDR) and Low Level (LDR) resolution factors preset to “255” or Full On. While the option of Line Mode is fixed, the HDR & LDR factors can be scaled. Maximum Dynamic Range - This mode uses the AC-3 Line Mode setting as found in AC3 Standard, however the HDR and LDR factors are fixed at “0” or Full Off.
DTS Modes DTS DIRECT Mode This mode is the standard DTS decoding mode without any delay and bass management level settings. DTS CINEMA Mode This is the enhanced DTS decoding mode coupled with the Delay and Bass Management Settings found under the Cinema Rhapsodys’s Pro Setup. DTS THX Mode This mode offers full THX Enhancements to DTS, in addition to the features available with the DTS Cinema mode.
Pro Logic & Auto Modes Dolby Pro Logic Mode - This mode is used for most film or TV source materials that are not encoded in either Dolby Digital or DTS. Pro Logic uses a 2-channel audio mix and plays back a center channel mix and surround channel mix in addition to the right and left audio channels. Pro Logic THX Mode - THX Processing includes several enhancements: Re-EQ, TImbre Matching, and Adaptive Decorrelation. These make the sound more like the original film sound experience..
Stereo, Phantom, & Music Modes STEREO Mode This mode offers two-channel stereo playback with the subwoofer active. The Subwoofer can also be deactivated. STEREO RE-EQ Mode This mode provides twochannel stereo playback with THX Re-Equalization. PHANTOM Mode This mode redirects the center channel information to the front right and left speakers and is used when no center channel speaker is used. PHANTOM ENH Mode This Phantom mode engages THX Enhancements.
3 Channel, Quad, Stereo Enhance, and Mono Enhance 3 Channel Mode- This mode only engages the front three speaker, providing Pro Logic steering across these channels with the surrounds completely muted. The subwoofer is active in this mode assuming it is set to be active for this input in the Bass Management section under Pro Setup. 3 Channel Re-EQ Mode- This mode is like the 3 Channels mode with the addition of THX Re-EQ.
Record Selector The Record Selector operates independently from the main output providing the ability to record, view, or play (in another room) a component other than the one selected in the home theater. To determine which device is currently selected, press the Record Selector knob. To change components: 1. Dial In New Device Turn the Record Selector knob until the second line of the LCD display reads the component you wish to select. 2.
All rear panel connections are clearly marked such that all inputs are situated in a black field which is bordered and labeled in white and all outputs are on a white field labeled in black. Once the source connections have been made, please do the following setup basics: Rear Panel Inputs & Outputs The Cinema Rhapsody’s rear panel connections provide ample component connectors (inputs) for a wide variety of equipment.
Out Of The Box Setup The “Out Of The Box” Setup uses the Cinema Rhapsody’s default setup program. Since not all source components have the same audio outputs, this section offers different connection possibilities to take into consideration the many component connections. To best proceed with the connection of your components, simply examine the units that you have and compare the component’s output jack to the illustration.
Page 17 4 5 6 MULTIROOM 15 PREAMP 14 COMPUTER 13 VIDEOGAME 12 CAMCORDER 11 AUXILIARY 10 CASSETTE 9 TUNER 8 CD PLAYER 7 CABLE/TV DSS/SAT VCR DVD PLAYER 3 LASERDISC 2 LASER/DVD 1 INPUT LABEL 6 7 8 1 3 3 3 3 CABLE BOX OR TV TUNER CD PLAYER RADIO TUNER CASSETTE DECK ANY DEVICE YOU WANT CAMCORDER VIDEO GAME COMPUTER INPUT 3 3 5 DSS OR SATELLITE RECEIVER AUDIO OR AUDIO/VIDEO PREAMPLIFIER MULTI-ROOM AUDIO OR AUDIO/VIDEO SYSTEM 4 VCR - - - - - - - - - - - - - - - -
Laser Disc or Combination Laser Disc/DVD Player The “Out Of The Box” setup presumes that your combination laser disc/DVD player has the following outputs: Digital Audio PCM/AC-3 For Both DVD and Laser Disc Playback Coax (RCA) Type Output Video Output (Composite RCA Type) Your combi-player may also include a super video output. Please note, the Cinema Rhapsody does not cross mix video signals.
Connection 2 Connection 3 Laser Disc or Combination Laser/DVD Player PCM/AC-3 Digital Out Video Out S-Video Output Optional S-Video Cable (Only functional if you connect your TV or Projector to the Cinema Rhapsody’s "Main" S-Video Output.) Video Cable 1 VIDEO INPUTS 3 5 1 7 VIDEO OUT 1 REC S-VIDEO OUT MAIN REC 1 1 "Dolby", "AC-3", "Pro Logic", & the double-D Symbol are trademarks of Dolby Laboratories. Confidential Unpublished Works. ©1992-1997 Dolby Laboratories, Inc. All rights reserved.
Laser Disc Player without a Digital Output (or 2nd Laser) The “Out Of The Box” setup presumes that for the LASERDISC input, you wish to connect a laser disc player that does not have either a digital coax or digital optical audio output. You can also use this input for a second laser disc player that has a digital audio output however you will need to custom program this input using the steps discussed on the bottom of the following page.
Connection 2 Connection 3 Laser Disc without Digital Audio Output (May have AC-3 RF Output) Stereo Video Audio Out Out R RF ¥ AC-3 Out (LD) L AC-3 RF Cable (Connect this cable if laser disc has an AC-3 RF output.) 2 DIGITAL AC-3 OUT OUTPUT RFD-1 DIGITAL AC-3 RF DEMODULATOR VIDEO INPUTS 3 5 1 7 RF AC-3 IN INPUT "DOLBY", "AC-3", AND THE DOUBLE-D SYMBOL ARE TRADEMARKS OF DOLBY LABORATORIES LICENSING CORP.
DVD Player The “Out Of The Box” setup presumes that your DVD player has the following outputs: Digital Audio PCM/AC-3 Coax (RCA) Type Output Video Output (Composite RCA Type) Your DVD Player may also include a super video output. Please note, the Cinema Rhapsody does not cross mix video signals. As such, if you wish to use a component’s SVideo output, you will need to connect an S-Video cable from the Cinema Rhapsody to the TV or Projector.
Connection 2 Connection 3 DVD Player PCM/AC-3 Digital Out Video Out S-Video Out Optional S-Video Cable (Only functional if you connect your TV or Projector to the Cinema Rhapsody’s "Main" S-Video Output.) Video Cable 3 VIDEO INPUTS 3 5 1 7 VIDEO OUT 1 REC REC (You must connect these three cables to a TV, linedoubler, or projector that is capable of processing component video) "Dolby", "AC-3", "Pro Logic", & the double-D Symbol are trademarks of Dolby Laboratories.
VCR The “Out Of The Box” setup for your VCR permits you connect R&L Stereo Audio as well as both composite video and super video. The Cinema Rhapsody is preprogrammed to permit you to easily connect a VCR. You will need to make only one audio connection to play video tapes. Standard RCA interconnects are used for the audio connection while a 75Ω coax cable is used for the video connection. Your VCR may also include a super video output. Please note, the Cinema Rhapsody does not cross mix video signals.
Standard RCA interconnects are used for the audio connection while a 75Ω coax cable is used for the video connection. For DSS or SAT Receivers that sport a Digital output, you may select to alter the Cinema Rhapsody’s “Out Of The Box” setup to switch the audio for the DSS/SAT Receiver to a digital input that is not used. Connection 1 - DSS Audio Output - You will need to connect the DSS’s audio output (stereo RCA type) to the Cinema Rhapsody’s Audio Input #5.
Cable or TV Tuner Your Cable Box or TV Tuner can be directly connected to the Cinema Rhapsody. In order for your cable box to be connected as a component to the Cinema Rhapsody, it will need to be a cable box which supports a stereo (R&L) analog audio output (RCA Type) as well as a composite video output. If your cable box or cable convertor does not support these outputs (it only has an RF output), you will need to modulate it through a tuner on either channel 3 or channel 4.
Standard RCA interconnects are used for the audio connection while a 75Ω coax cable is used for the video connection. For CD Players that sport a Digital output, you may select to alter the Cinema Rhapsody’s “Out Of The Box” setup to switch the audio for the CD Player to a digital input that is not used. Connection 1 - CD Audio Output - You will need to connect the CD’s audio output (stereo RCA type) to the Cinema Rhapsody’s Audio Input #7. 1 Turn the Input knob to CD PLAYER 7 and press the knob.
Tuner A Tuner can be directly connected to the Cinema Rhapsody’s #8 Analog Audio Input. The Cinema Rhapsody is preprogrammed to permit you to easily connect a Tuner. Standard RCA interconnects are used for the audio connection. Connection 1 - Tuner Audio Output - You will need to connect the tuner’s audio output (stereo RCA type) to the Cinema Rhapsody’s Audio Input #8.
Cassette A Cassette Player can be directly connected to the Cinema Rhapsody’s #1 Analog Audio Input. The Cinema Rhapsody is preprogrammed to permit you to easily connect a Cassette. Standard RCA interconnects are used for the audio connection. Connection 1 - Cassette Audio Output - You will need to connect the cassette’s audio output (stereo RCA type) to the Cinema Rhapsody’s Audio Input #1.
Auxiliary Input Your last available input on a Cinema Rhapsody can be automatically tied to one of the following device input labels: The Cinema Rhapsody is preprogrammed to permit you to easily connect a tenth component. ADA has provided the “Out Of The Box” setup with six input label that access Analog Input 3 and Video Input 8.
Record Output Connections The Cinema Rhapsody features a “Record Output” that can select a component independently from the main theater’s component selection. Thus it is possible to record from one component to another (i.e. DSS to VCR) while you are viewing a third component (i.e. DVD). Typically, you will use the diagram below to connect the Cinema Rhapsody’s Record Output to either a VCR or Cassette (or other type of) Recorder.
Connection To Your TV, Projector, or Line-Doubler The Cinema Rhapsody offers several video outputs. If your video display device (TV) or display system (projector, line doubler) offers a component or RGB type of input, you may connect the Cinema Rhapsody’s Component Video Output in addition to at the Composite Video and Super Video Outputs.
Audio Setup The Cinema Rhapsody has been calibrated in the factory for optimum operation. Thus you can at this time decide to run your system with just minor adjustments to the Master Volume Control (center knob). However, since not all speaker configurations and rooms are the same and for correct setup you should adjust the channel balance and delay settings (see page 46 for setting delays) to better suit your home theater system.
Audio Setup - Continued As you proceed to go through pink noise sweeps, the only knob you will need to work is the Cinema Rhapsody’s Channel knob. This knob not only selects noise modes but also noise channels and then the adjustment of the channels. Jumping to the master Volume control will take you out of the noise mode. 3 Turn the CHANNEL knob clockwise one click until the display reads NOISE RIGHT and then press the CHANNEL knob.
Audio Setup - Continued At this time you have programmed the Cinema Rhapsody’s Volume Preset #1 to levels that are consistent with the pink noise and this preset corresponds to a listening level comfortable with respect to your listening environment. Bass Volume Presets - While the five main channels should be set to the same level as you select from one source to another, ADA has experienced that the subwoofer level for different components and decoding modes can be significantly different.
Custom Setup - A/V Linking The Cinema Rhapsody can be custom configured, permitting you to link any Analog, Video, S-Video, Component Video, and LASER AC-3 RF (RF Inputs are discussed on the next page) input jack to a particular Input Label. You can also modify or completely change the name of an Input Label. And finally, under Pro Setup, you can even limit the number of Input Labels that appear as you turn the INPUT knob.
Custom Setup - Auto Mode As discussed on the previous page, the Cinema Rhapsody will typically apply an A/V Link to each Input Label. Thus, if you select the TUNER 8 input and leave your TV & VCR on, you will still see the VCR’s video image even though you are listening to the radio tuner. Each Input Label will have a video and S-video follower. The Cinema Rhapsody uses a unique circuit whereby it can autodetect an AC-3 or DTS signal.
Auto Mode On/Off For components that are not set to auto-mode on, the Cinema Rhapsody’s default mode for this input will return after re-selecting the input or during a restart, even if you alter the mode. For example, if your CD player is set for Quad Bypass as its Default Mode but for this one CD, you wish to listen to it in Stereo, turn the mode knob to Stereo. If you change inputs or turn the system off, the next time you access your CD player, it will default to the Quad Bypass mode.
Custom Setup - Labeling Inputs The Cinema Rhapsody permits you to alter the Input Labels. These are labels that appear for each component as you rotate the Input knob. This is quite useful if you have connected a component that does not appear on the Cinema Rhapsody (i.e. DAT Player). Altering Input Labels is also available when you don’t want the numbers to appear on the Cinema Rhapsody’s display (i.e. LASER/DVD 1, LASERDISC 2).
Custom Setup - Turn-On Input The Cinema Rhapsody provides you with the ability to select which device you want the Cinema Rhapsody to always turn on to. If you primarily use the Cinema Rhapsody for viewing DSS broadcasts, you will want to alter the Turn On Input. The Cinema Rhapsody is factory set to always turn on to the VCR 4 input. Thus, even if you were watching a movie on DVD last night, when the kids come to turn it on in the morning, the Cinema Rhapsody will always switch to the VCR.
Custom Setup - Default Mode COMPONENT "OUT OF THE BOX" DEFAULT MODE SETTING INPUT LABEL Each Input Label can have a mode automatically engaged whenever that input is accessed. This eliminates the confusion of having to figure out what mode to select every time that device is engaged. The “Out Of The Box Setup” has already programmed the Input Labels to engage the most appropriate decoding mode for the various devices.
Custom Setup - Turn On Volume The Cinema Rhapsody’s “Out Of The Box” Setup has the Cinema Rhapsody always turning on to VOLUME PRESET #1. Unless you have already locked in a new volume preset under Audio Setup, this level will be -25.0 dB. You can opt to alter the Turn On Volume to either VOLUME PRESET #2 or the LAST USED volume level. The steps described in the paragraph to the right detail how to change the Cinema Rhapsody’s Turn On Volume.
Custom Setup - Display Illumination Level The Cinema Rhapsody permits you to alter the intensity of the front panel LCD display as well as the six indicators located to the left side of the front panel. If you wish, you can lower the intensity from 100% to 0% (All Off). The Cinema Rhapsody’s Out Of The Box Setup is set to full intensity (100% On). There is also an Auto setting where the Cinema Rhapsody will automatically dim its display as the ambient light in the room is lowered.
Pro Setup The Cinema Rhapsody has additional parameters that can be set under the Pro Setup Mode. These parameters are set in the factory for optimum performance. To protect these factory settings, the ability to access the Pro Setup mode requires the turning of the MODE knob until SETUP MODE appears followed by pressing and holding of the MODE knob for a countdown of ten seconds. When in the Pro Setup Mode, you can still access functions typically limited to the standard Setup Mode.
Pro Setup - Delay Setup The adjustment of the Delay setting can be configured independently for each of the Cinema Rhapsody’s six channels (including the subwoofer channel). The goal of setting channel delays is to have the sound from each speaker reach the primary seating position at the same time or perhaps better put, the correct time.
Most home theaters have the front right and left speakers equal distance from the main seating area. The same is usually true of the surround left and right speakers as it is common that they are also of equal distance from the primary seating position. To proceed, you will first determine where your primary listening viewing seating position will be. Next you will want to measure the distance from the primary listening/viewing position each speaker using a tape measure.
Delay Setup - Continued You can use the diagram below to insert the distances you measured for your theater. FRONT LEFT CENTER FRONT RIGHT SUBWOOFER LEFT SURROUND RIGHT SURROUND MEASURED DISTANCE IN FEET ENTER DISTANCE OF FURTHEST FRONT SPEAKER (REFERENCE SPEAKER) ENTER DISTANCE OF SPEAKER SUBTRACT SPEAKER'S DISTANCE FROM REFERENCE SPEAKER'S DISTANCE 5 Turn the MODE knob clockwise until the display reads SETUP MODE and then press the MODE knob. Turn the MODE knob until the display reads PRO SETUP.
Pro Setup - Network Bus The Cinema Rhapsody can be set to one of 255 ADA Bus™ Address settings. The standard factory default address is “0”. This address permits the Cinema Rhapsody to be controlled by its infrared remote control. The Cinema Rhapsody has the ability to be controlled in a network with other ADA Bus™ components, including multiple Cinema Rhapsodys. As such, the Cinema Rhapsody has the ability to be set to as many as 256 addresses.
Pro Setup - Final Input The Cinema Rhapsody provides you with the ability to custom configure the way its display appears. Through the use of the Label Inputs option, you can rename an Input Label to appear as you wish it read. Through the Audio/Video Setup, you can alter the links to the Cinema Rhapsody’s input jacks for any Input Label.
Pro Setup - Speaker System Setup - Bass Management The Cinema Rhapsody’s “Out Of The Box” Setup is defaulted to the THX standard where the High Pass Filter is active on all speakers with their subwoofer information summed to with the LFE channel (Setting 0). If you are using full range speakers in your home theater system, you can alter the speaker system configuration aspect of the Cinema Rhapsody. Please note, that you have two options when setting up the Cinema Rhapsody for your speaker system.
To change the Speaker System Configuration for individual inputs: 1 While in the PRO SETUP mode, turn the MODE knob until the display reads SPKR SYS IND and then press the MODE knob. The display will read BASS CONFIG on the top line and the second line will read the IND CONFIG #. 2 Turn the INPUT knob (In the BASS CONFIG Setup Mode, turning the INPUT knob does not eject you from the Pro Setup) to select the input you wish to adjust.
Pro Setup - Bass Peak Limit Manager The Cinema Rhapsody permits you to engage a Bass Peak Level Manager which will prevent the subwoofer from distorting when playing the system at high volume levels that the subwoofer cannot properly process. The Cinema Rhapsody provides you with the ability to engage a Bass Peak Limit Manager that operates in a range from 0 dB (decibels) to -24 dB.
Pro Setup - HDR & LDR Scale Factors The Cinema Rhapsody offers several mode settings when decoding a Dolby Digital (AC-3) signal. One of these modes is AC-3 NIGHT mode which provides compression of the low level and high level signals, such that, the bangs and booms are reduced and the whispers are accentuated. This, in effect narrows the volume range to permit comfortable listening without the worry of disturbing others during an explosion or other loud dramatic sound effect.
Pro Setup - THX - Re-EQ, Timbre Match, & Decorrelate The Cinema Rhapsody permits you to selectively engage the Re-Equalization, Timbre Match, and Decorrelation filters individually. These enhancements, when all three are on, are equal to full THX. Thus, you can more simply turn all three enhancements to on by simply selecting either the AC-3 THX, DTS THX, or PROLOGIC THX modes using the MODE knob. You can also directly select the AC-3 RE-EQ, DTS RE-EQ or PROLOG RE-EQ modes using the MODE knob.
While these fixed modes permit instant access to certain THX enhancements, the Cinema Rhapsody also permits you to customize inputs set to either an AC-3, DTS, or Pro Logic mode. Thus, you can selectively turn the Re-EQ, Timbre Match, and Decorrelation enhancements to on or off, individually, when in the Pro Setup mode. If you are interested in adjusting the effects of Re-EQ, Timbre Match, and Decorrelation, you can do so following the steps below.
Pro Setup - Repeat Count The REPEAT COUNT is a function that is directly related to the Dolby Digital (AC-3) Surround Mode. The Repeat Count setting indicates the maximum number of consecutive block repeats before muting the output. The Out Of The Box setup for repeat count is set to 1. The maximum setting is 8. Page 56 The Repeat count is used on Dolby Digital (AC-3) modes and can be set independently per input, which is set to an AC-3 mode.
Pro Setup - Analog Gain Control The Cinema Rhapsody also permits you to adjust the gain individually for all analog inputs. The Cinema Rhapsody’s “Out Of The Box” Setup has all analog inputs set to 0 dB or no Analog Gain. You can raise the gain for the analog inputs from 0 dB to 3 dB, 6 dB, or as high as 9 dB of gain. This is quite useful for components that have lower gain drive such as radio tuners, VCRs, and phonographs (phono preamplified output).
Pro Setup - PCM Scale Factors The Cinema Rhapsody provides you with the ability to alter the PCM Scales for each input set to either an AC3 or Pro Logic mode. The effect of altering the PCM scale is the lowering of a devices audio level. This adjustment to the audio level does come with a drawback as the audio level is reduced by discarding bits of data. As such it is not ideal. The Cinema Rhapsody also permits you to adjust the PCM Scale for audio inputs.
Pro Setup - Input Format The Cinema Rhapsody is also prepared to decode other AC-3 formats, most of which are intended for AC-3 broadcast with HDTV by way of off-air or satellite reception. As these are future decoding formats, ADA strongly suggests not altering these settings. However, should you need to alter these settings, the following describes the procedure to do so. 1 While in the Pro Setup mode, turn the MODE knob until the display reads INPUT FORMAT and then press the MODE knob.
Pro Setup - Network Baud The Cinema Rhapsody has the ability to increase its baud rate from 1200 to 19200. When the unit is controlled from an infrared remote control, you must use the factory default of 1200 baud. However, when controlling this unit via either an RS-232 based control system or wireless RF ADA remote control, you will want to increase the baud rate to 19200. The Cinema Rhapsody allows you to set the baud rate between either 1200 Baud or 19,200 Baud.
Pro Setup - Auxiliary DC Triggers The Cinema Rhapsody has two low voltage outputs which can be used to trigger other components or devices. These triggers can be used to perform several different operations such as: a b Engaging a projector, screen, etc., for only video devices. Turning on a power amplifier using an external AC switcher (ADA ACC-3) if the amplifier will draw more than 10 amps current (Cinema Rhapsody’s Switched AC Outlet maximum). Alternate speaker drivers between music and film playback.
Pro Setup - Effect Delay The Cinema Rhapsody has two modes that are developed exclusively by ADA. The Stereo Enhance mode permits quality surround sound playback of two-channel mixes, even if the separation between the two channels is minimal. The Mono Enhance mode applies some of the same theories of Stereo Enhancement to mono-only signals, again providing a full surround sound array to a mono only signal.
Pro Setup - Effect Level The Cinema Rhapsody has two proprietary ADA modes, Stereo Enhance and Mono Enhance. These modes are applied to twochannel or one channel mixes respectively. These modes, when selected have two variables, one of which is the Effect Level. The Effect Level is best described as throttle for the decoding circuit. When the Effect Level is set to OFF, the decoding circuit is least active, providing the flattest surround sound field.
Appendix A - Solo Channel Test The Cinema Rhapsody is also capable of playing only one channel at a time when in the Solo Test mode. This is ideal for testing a particular channel’s output or an individual speaker. The Solo Test mode is also ideal if you wish to determine the information coming out of a particular channel. The Cinema Rhapsody has a unique channel test feature called Solo Test. When in the Solo Test mode, you can switch between channels while playing an audio track.
Appendix B - Resetting Factory Defaults The Cinema Rhapsody has two Factory Default recall options which will reset certain Cinema Rhapsody features to configurations programmed at the factory. Please note, neither of the two Default options will alter the audio and video links. Input Label Factory Default Recall To recall the Input Labels that are programmed by ADA: 1 Turn the MODE knob until the display reads SETUP MODE and press the MODE knob.
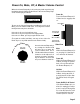
Appendix C - Master Reset Power Button (Vacation Switch) The Cinema Rhapsody has a hidden front panel feature which permits you to remove power from the Cinema Rhapsody, as if you were removing the Cinema Rhapsody’s power cord from the AC outlet. The button is located in the black plexiglass display window area, to the left side of the window (to the left of the mode indicator lamps). During operation, this button is depressed and it sits flush to the plexiglass surface.