! M3 Line ! ! PRE AMPLIFIER OWNERʼS INFORMATION !
CONTENTS ! 1) IMPORTANT SAFETY INFORMATION 2) CE DECLARATION OF CONFORMITY DISPOSAL POWER REQUIREMENTS 3) INTRODUCTION 4) OVERVIEW 5) UNPACKING AND INSTALLATION 6) CONNECTION 9) OPERATION 11) TECHNICAL SPECIFICATIONS 12) WARRANTY INFORMATION 13) CONTACT INFORMATION
! IMPORTANT SAFETY INFORMATION ! RISK OF SHOCK OR ELECTROCUTION! INTERNAL OPERATING VOLTAGES ARE LETHAL! Do not remove top cover, unless specifically instructed to do so in the user manual. This unit contains fuses and other safety components in accordance with BS60065 requirements. In the event of failure, replacement fuse or safety component must be of the same part type and value. ! SUCH REPLACEMENT MUST ONLY BE CARRIED OUT BY A QUALIFIED SERVICE TECHNICIAN.
CE DECLARATION OF CONFORMITY We declare under our sole responsibility that this product is in conformity with the following standards or standardized documents: BS EN 60065 in accordance with the regulations 73/23/EEC, 89/336/EEC (from 1 January 1997) CE 94 Peter Qvortrup, Director Audio Note (UK) Limited 25 Montefiore Road Hove East Sussex BN3 1RD United Kingdom Tel: Fax: +44 (0)1273 220 511 +44 (0)1273 731 498 ! DISPOSAL This product must not be disposed of as normal household waste.
INTRODUCTION Thank you for purchasing this Audio Note (UK) product. With the correct care it should give you many years of pleasure and enjoyment. Please take the time to read all of the information in this manual before connecting your new component to an electrical supply or your system, to ensure both your safety and satisfaction. Please note that due to our desire to continually improve products, specifications are subject to change without notice.
M3 LINE PRE AMPLIFIER Congratulations on your purchase of the Audio Note (UK) M3 Line Pre Amplifier. It has been specifically engineered for sonic performance rather than technical specification, and fulfills all Audio Note (UK) Level 3 criteria: Pure Class A operation Zero negative feedback Single Ended circuit topology Valve rectification Materials and component quality It is well known that the accurate reproduction of music, not just sound, requires the purity of the incoming signal to be preserved.
UNPACKING AND INSTALLATION Please take care when unpacking your M3 Line Pre Amplifier. Choose a clean, clear location to unpack your unit. Be aware that the Pre Amplifier is very heavy; before attempting to unpack or lift the unit, check the weight and if necessary use more than one person so that it can be moved safely and easily. We recommend that you retain and carefully store all of the original packing materials, in case transportation / shipping is required at a later date.
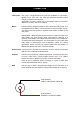
CONNECTION Line inputs Four RCA / Single Ended line inputs are available for connection, labeled ʻTunerʼ ʻAuxʼ ʻCD1ʼ and ʻCD2ʼ; any standard ʻline levelʼ source can be connected to these inputs. All sockets are colour coded; RED is for RIGHT channel connection, WHITE is for LEFT channel connection. Mains The M3 Line Pre Amplifier utilizes an IEC 320 mains inlet socket. Use the supplied mains cable to connect the unit to the local mains supply.
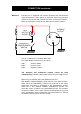
CONNECTION continued… Balanced The M3 Line is equipped with custom designed and manufactured output transformers, which utilize an improved output and grounding scheme to provide the best possible connection to the power amplifier.
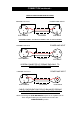
CONNECTION continued… CABLE CONFIGURATION OPTIONS POWER AMP INPUT PREAMP OUTPUT 2 1 3 2 XLR FEMALE 3 SCREEN 1 XLR MALE CONVENTIONAL: SCREEN CONNECTED AT BOTH ENDS POWER AMP INPUT PREAMP OUTPUT 2 1 2 1 3 3 XLR FEMALE SCREEN XLR MALE SCREEN CONNECTED AT PREAMP END ONLY, TO ELIMINATE GROUND LOOPS POWER AMP INPUT PREAMP OUTPUT 1 2 3 XLR FEMALE SCREEN RCA MALE CABLE CONFIGURATION FOR XLR BALANCED PREAMP OUTPUT TO RCA UNBALANCED AMPLIFIER INPUT When connecting the XLR / BALANCED outputs t
OPERATION Once all the connections are completed and checked, ensure that the volume controls are at the minimum setting (rotated all the way left). Ensure that all source components connected to the M3 Pre Amplifier are switched ON. Source components should always be the FIRST components to be switched on and the LAST components to be switched off. Ensure that all power amplifiers connected to the M3 Pre Amplifier are switched OFF.
OPERATION continued… Bedding in The new amplifier requires about 200 hours of initial use (called “bedding in”) before the circuitry becomes stable and optimum performance is realized. As the amplifier “beds in” the sound will become increasingly smoother, detailed and open. Once the amplifier has “bedded in” a warm up time of approximately 30 to 45 minutes is required each time the amplifier is switched on before optimum sonic performance is reached.
TECHNICAL SPECIFICATIONS INPUT IMPEDANCE 100 KOhms INPUT SENSITIVITY 126mV for 1V Output GAIN 18dB at 1KHz OUTPUT IMPEDANCE <10 Ohms OUTPUT NOISE <0.08mV unweighted (RMS) TUBE COMPLIMENT 1 x ECC82 1 x 5678WB 1 x 6X5 1 x ECL82 1 x OB2 FUSE RATINGS 1A anti-surge (110 / 120V supply) 500mA anti-surge (220 / 240V supply) MAX.
WARRANTY INFORMATION Audio Note (UK) warrants this product to be free from defects in materials and workmanship for two years from the original date of purchase from an appointed Audio Note (UK) dealer, and agrees to cover the cost of parts and associated labour required to correct such defects, subject to terms & conditions. This Warranty is offered to the first purchaser only. Any valves supplied with the unit are warranted for three months from the original date of purchase.
CONTACT INFORMATION If in the future your Audio Note (UK) product requires servicing, or if you require technical support or have any questions regarding this or any of our other products, please contact your local Audio Note (UK) dealer. Alternatively, please feel free to contact us directly: -! Audio Note (UK) Limited 25 Montefiore Road Hove East Sussex BN3 1RD United Kingdom Tel: +44 (0)1273 220 511 Fax: +44 (0)1273 731 498 e-mail: info@audionote.co.