
Owner`s manual


!
4!
Preface
Please take time to carefully read and
understand the following instructions
before you install or attempt to operate
this equipment. Becoming familiar with
the product and its correct operating
procedures will help assure you of
maximum musical enjoyment and
reliable operation. The effort you invest
now will be well rewarded in the years
ahead.
Packaging
Save all packaging accompanying this
product. You have purchased a
precision electronic instrument, and it
should be properly cartoned any time
shipment becomes necessary. It is very
possible that this unit could be
damaged during shipment if
repackaged in cartoning other than
that designed for it.
The original packaging materials help
protect your investment from
unnecessary damage, delay and
added expense whenever shipment of
this unit is required.
Accessories
1 – Phillips head screwdriver for cover
removal
1 – Plastic screwdriver for bias
adjustments
User replaceable spare line fuses
include:
1 – 7 Amp MDQ slo-blo with 120V units or
100V units
1 – T4A 250V slo-blo with 220V/240V units
Warnings
1. Do not touch hot tubes. Keep away
from children.
2. To prevent fire or shock hazard, do not
expose your Reference 150 to rain or
moisture.
3. This unit contains voltages which can
cause serious injury or death. Do not
operate with covers removed. Refer
servicing to your authorized Audio
Research dealer or other qualified
personnel.
4. The 12-gauge, 3-conductor power
cord on your Reference 150 is
equipped with a standard 3-prong
grounding plug. If used normally, it will
provide a safe earth ground
connection of the chassis. Refer to the
section on ‘AC Power Connections’ for
detailed information.
5. For continued protection against fire
hazard, replace fuses only with the
same type and rating of fuses
specified.
Warning
Read Owner’s Manual
before installing or
operating this product!
Do not attempt to install or remove any
vacuum tubes unless this unit is turned
off and disconnected from the A.C.
power outlet. Unit should be connected
to the A.C. outlet and turned on only
after all vacuum tubes have been
installed and appropriate panels have
been replaced and fastened. See
owner’s manual for installation
instructions.
Before replacing vacuum tubes, turn off
unit, disconnect from A.C. outlet and
allow installed tubes to cool before
attempting to remove them. Hot tubes
may cause burns or other injury if not
allowed to cool before removal.
When removing or installing tubes, do
not touch tube socket contacts or other
components as the circuit may retain
sufficient levels of voltage and current to
cause injury or death.
Contact your dealer or Audio Research
Customer Service (763.577.9700) if you
have any questions about installing or
replacing vacuum tubes in this unit.
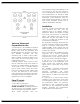
DO NOT ATTEMPT TO OPERATE THIS
EQUIPMENT BEFORE INSTALLING THE
NUMBERED VACUUM TUBES IN THEIR
RESPECTIVE SOCKETS (SEE NEXT PAGE
FOR CHART).