
Owner`s manual


!
6!
Connections
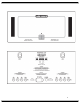
Input Connector: The Reference 150
uses a fully balanced circuit topology
and has a pair of balanced XLR input
connectors on the rear panel. It
therefore requires a balanced
preamplifier output, as provided by most
Audio Research preamplifiers. Connect
your preamplifier's output to the
Reference 150 before turning on the
amplifier.
Output Connectors: Proprietary, heavy-
duty output terminals are provided on
the rear panel for 4, 8,or 16-ohm speaker
impedance loads. Using high-quality
speaker cables, securely fasten the (-)
speaker lead to the appropriate (-)
terminal, then the (+) lead to the
matching (+) terminal. Following your
speaker manufacturer's impedance
specification. The Reference 150 puts
out the same amount of power whether
the 4, 8 or 16-ohm terminals are used.
Important: Use the best available
speaker wires and interconnects. Audio
Research cannot emphasize this
enough. As better components and
systems are developed, it becomes
increasingly important to avoid the
limitations of inferior system
interconnections.
It is important sonically that your entire
system be connected so that the audio
signal arriving at the speakers has
correct, or ‘absolute’ polarity (i.e., non-
inverted). Connect the black or ‘–‘
speaker terminal to the wire that
connects to the ‘0’ terminal on the
Reference 150. Connect the red or ‘+’
speaker terminal to the wire that
connects to the ‘4’ or ‘8’ terminal on the
Reference 150 and tighten the speaker
terminals securely to ensure best sonic
results.
Matching: It is important to use as close
as possible an impedance match
between the amplifier and speaker for
optimum transfer of power to the
speaker with minimum distortion. In the
case of speaker systems with significant
variations in impedance throughout the
frequency spectrum, such as most
electrostatic types, determine the best
impedance match empirically for best
overall sonic results.
Connect the Reference 150 input to the
preamplifier or electronic crossover,
using only the highest grade of audio
interconnect cables. To avoid sonic
degradation use the shortest practical
length of cables.
A.C. Power Connections: It is important
that the Reference 150 be connected
via its supplied 20 amp IEC 12-gauge
power cord to a secure, dedicated A.C.
power receptacle. Never connect to
convenience power receptacles on
other equipment. Only use the power
switch on the front of the Reference 150
for On/Off control of the amplifier, or the
12V start-up trigger for remote
installations.
The AC power source for the
Reference150 amplifier should be
capable of supplying 10 amperes for 100
or 120 volt units, or 5 amperes for 220 or
240 volt units.
For the very best performance on
domestic 100 or 120 volt circuits, the
Reference 150 should be connected to
its own AC power circuit branch,
protected by a 15 amp breaker. The
preamplifier and other audio equipment
should be connected to a different
power circuit and breaker.
The Reference 150 should be turned on
after the other components of your
system. If the Reference 150 is turned on
before other components, the amplifier
will amplify any extraneous turn-on
noises those components might
generate, which could potentially
damage the loudspeakers. Good
operating practice dictates that the
amplifier should be turned on last, and
turned off first in an audio system.
The Reference 150 uses a grounding
system that does not require a ground-
lifter adaptor plug on the A.C. power
cord to minimize hum. The power cord
supplied with the Reference 150 has a
standard grounding plug to provide
maximum safety when properly
connected to a grounded wall