AT-LP120-USB Direct-Drive Professional USB and Analog Turntable System Installation and Operation Pages 2-10 AT-LP120-USB Systeme de tourne-disque USB professionnel a entrai'nement direct Installation et utilisation Pages 11-20 AT-LP120-USB Sistema tocadiscos USB profesional con accionamiento directo Instalaci6n y funcionamiento Paginas 21-30 @audio-technica@
Direct-Drive Professional USB and Analog Turntable System Introduction A A A Warning: To prevent fire or shock hazard, do not expose this appliance to rain or moisture. CAUTION RISK OF ELECTRIC SHOCK DO NOT OPEN To prevent electric shock, do not remove the cover. There are no user-serviceable parts inside. Internal adjustments are for qualified professionals only. Refer all servicing to qualified service personnel.
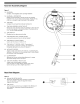
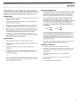
Main Features Figure 1 8--+------Il. o . .I-----+--w;:~---:;: ~ -, @audio-technica A~Dwoc
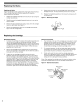
Rear View Diagram Figure 3 29. 30. 4 PRE-AMP SELECTOR SWITCH Allows the internal stereo phono pre-amp to be bypassed when the turntable is used with equipment having magnetic phono inputs. USB OUTPUT Use this output to connect your turntable to the USB input of your computer. Please see included software guide for instructions.
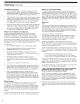
Initial Setup Unpacking Carefully unpack the turntable and verify that the following parts are included and intact: • Slip mat (above the dust cover) • Dust cover (above the turntable) • Platter (under the turntable) • Dust cover hinges (accessory section of the foam packaging) • 45 RPM adapter (accessory section) • Counterweight (accessory section) • Headshell with pre-mounted cartridge (accessory section) • Power cord (accessory section) • USB cable • Dual RCA (female) to 3.
Initial Setup (continued) Assembling the Dust Cover 1. Insert the T-shaped ends of the dust cover hinges into the two hinge receptacles located at the back of the turntable housing. When properly installed, the flat part of the cover hinges should be facing away from the turntable housing at about a 45 0 angle. 2. 3. Holding the dust cover over the turntable, carefully guide the cover hinges into the two slots molded into the rear of the dust cover.
Operation For best results, do not install or operate this unit near conditions of heat, moisture, dust, or heavy vibrations. (Note: Bright fluorescent lights may affect the visibility of the speed-indicating strobe dots. If this is a problem, simply cover the area with your hand, an album cover, etc.) Preparing to Play 1. Remove the stylus guard from the stylus assembly and unlock the tone arm rest if it is locked. 2. Turn the power dial to the ON position.
Replacing the Stylus Replacing the Stylus The AT-LP12Q-USB comes supplied with a high-quality Audio-Technica ATP-2 cartridge. The stylus should be replaced with a genuine Audio-Technica ATP-N2 stylus. 1. Release the headshell assembly from the tone arm by turning the locking ring clockwise. 2. Carefully remove the headshell assembly and turn it over so the stylus is visible. 3. Remove the stylus assembly by pulling it away from the cartridge body at a slight angle. [See Figure 7.1 4.
Troubleshooting Turntable operates but emits no sound or not enough sound. 1. The stylus guard is still in place. Remove the stylus guard. 2. The tone arm is in the lift position. Lower the tone arm. 3. Mixer/amplifier (system) controls are set incorrectly: wrong input selected, tape monitor on, speakers switched off, etc. Verify proper control settings. Record sounds too fast or too slow. 1. Turntable is set for wrong speed.
Specifications Turntable Specifications Type Motor Drive method Speeds Pitch variation Turntable platter Starting torque Braking system Wow and flutter Signal-ta-noise ratio Output level Pre-amp "PHONO" Pre-amp "LINE" Phono pre-amp gain USB function AID, D/A Computer interface Power supply requirements Power consumption Dimensions Weight Accessories included Replacement stylus 10 3-Speed, fully manual operation DC motor Direct drive 33-1/3 RPM, 45 RPM, 78 RPM +/- 10% or +/- 20% Die-cast aluminum >1.
Visit our Web Site: www.audio-technica.com One-Year Limited Warranty Audio-Technica brand products purchased in the U.S.A are warranted for one year from date of purchase by Audio-Technica U.S., Inc. (AT.U.s.) to be free of defects in materials and workmanship. In event of such defect, product will be repaired promptly without charge or, at our option, replaced with a new product of equal or superior value if delivered to AT.U.S.
Audio-Technica AT-LP60-USB & AT-LP120-USB Turntables Software Guide Pages 2-15 Tourne-disques USB Audio-Technica Guide /ogicie/ Pages 16-21 Tocadiscos USB de Audio-Technica Gufa de software Paginas 22-27 @audio-technica.
Audio-Technica USB Turntables A note about software Contents Your Audio-Technica AT-LP60-USB or AT-LP120-USB turntable is supplied with Audacity recording software for your convenience. Please note that other third-party recording software packages are also compatible with this turntable.
Installing Audacity software for MAC OSX and above 1. Before installing software, assemble the turntable, following directions in the 5. Turn your computer on. included Owners Manual. 6. Insert the included Audacity CD in your Mac's CD drive. Open the CD icon on your desktop. Drag the installation folder for Audacity to your applications folder. When the files have been copied, eject the CD. 2. Plug the AC cord on your turntable into an AC power outlet. 3.
Setting up your MAC (OSX and above) to work with your USB Turntable 1. Open the Audacity program. 2. Select Preferences from the Audacity menu. Audacity File Edit 3. Select Audio I/O tab at the top left. • Under Playback, Device, select Built-in Audio. • Under Recording, Device, select USB Audio CODEC. • Under Recording, Channels, select 2 (Stereo). • Check the box marked Software Playthrough. .... About. .. f Preferences...
Setting up your MAC (OSX and above) to work with your USB Turntable 5. Next, from the main Audacity window, select the drop-down box (arrow pointing down) next to the microphone at the right side of your screen. • If you don't see the drop-down box or the microphone pictured below, return to Preferences Menu (see step 2, page 17). Select the Interface tab. Check Enable Meter Toolbar. This will allow you to see the microphone with the drop-down box on your main screen. 4.
Additional MAC audio settings We have set the Audacity playback and record settings. Now it's time to set the separate Macintosh audio playback and record settings. 1. Go to Applications> Utilities> then select and open Audio MIDI Setup. 2. In the Audio Midi window under the tab Audio Devices, select the following: • Under System Settings, Default Input, select USB Audio CODEC. • Under System Settings, Properties For, select USB Audio CODEC.
Installing Audacity software for PC 1. Before installing software, assemble the turntable, following directions in the included Owners Manual. 5. Turn your computer on. 6. Insert the included Audacity CD. An Audacity window will appear. Click Audacity Setup icon to install. Follow the directions on the pop-up windows to install the software. 2. Plug the AC cord on your turntable into an AC power outlet. 3. Next, use the included USB cable to connect the turntable to your PC's USB port. 7.
Setting up your PC (with Windows XP) to work with your USB Turntable 1. Close programs operating on your computer. • Select (double-click) Sounds and Audio Devices. 2. Start menu> Control Panel> Sounds and Audio Devices • Begin at your Start menu. Select Control Panel. If:: Folders 6 ~'Internet ~ Internet Explorer [r(i:)..,~ ~ Microsoft Office Outlook ~ ,'7,~ i& My Pictures ~ Microsoft Office Excel 2003 I fjI My Computer fI!J ~~; Adobe Acrobat 7.0 Standard My Network Places r-:L. .
3. The following screen will pop up: mlX'l Sounds and Audio Devices Properties Volume Sounds Audio Voice Hardware 4. Select the Voice tab. • In the Voice playback area of the window, select your computer's internal sound card (not USB Audio CO DEC; not Microsoft Sound Mapper). • In the Voice recording area of the window, select USB Audio CODEC. Click Apply. NOTE: If the "USB Audio CODEC" option does not appear, check the USB cable to ensure it is properly connected to the USB port.
Setting up your PC (with Windows XP) to work with your USB Turntable 5. Next, select the Audio tab. • In the Sound playback area of the window, select your computer's internal sound card. • In the Sound recording area of the window, select USB Audio CODEC. • Check the following box: Use only default devices. • Click Apply; then click OK. i'?lrx Sounds and Audio Devices Properties Audio Volume Hardware SIqmaTel ,c.,udio [.......__ Vo_lu_m_e_ ... ~~.J [ Advanced...
Setting up your PC (with Windows Vista) to work with your USB Turntable 1. Start menu> Control Panel> Sound. Begin at your Start menu. Select Control Panel (classic view). 2. Select (double-click) Sound. ·I+t II Swch pi Name Categcrj 9 Hardware and Sound Clock, language, and Region Programs I Hardware and Scund; System and Maintenenti '-II Ease of Access; Appearance and Personaljutid A.ppearance lind Personali:atien ! Appearance and Personalization j j Hardware and Sound : Color Management _::~D.
Setting up your PC (with Windows Vista) to work with your USB Turntable 4. Select the Playback tab. Select your internal sound card speakers (these are usually the first listed). 5. Click Apply; then click OK. 6. Close your Control Panel. Speakers SigmaTel C-rvlajor Audio Working Speakers USB Audio CODEC \II/orking 4 .~_S_e_t_D._e_fa_u..
Setting up your PC to work with Audacity 1. Launch the Audacity program from your Start menu. 2. Select Preference from the Edit tab in the Audacity Menu. 3. Select Audio I/O tab at the top left. • Under Playback, Device, select your internal sound card. • Under Recording, Device, select USB Audio CODEC. • Under Recording, Channels, select 2 (Stereo). • Check the box marked Software Playthrough.
Setting up your PC to work with Audacity 5. Next, from the main Audacity window, select the drop-down box (arrow 4. Next, select Quality tab at the top. • Default Sample Rate: 44100 Hz. • Default Sample Format: 16-bit. • Real-time sample rate converter: Fast Sine Interpolation. • High-quality sample rate converter: High-quality Sine Interpolation. • Real-time dither: None. • High-quality dither: Triangle. • Select OK to save settings and exit Preferences menu.
Recording Albums with Audacity To get started with Audacity, follow the instructions below. For in-depth information on recording and saving projects, please visit the on-line Audacity manual at http:// audacity.sourceforge.netl manual-1.2Iindex.html 1. Saving a project • Audacity writes all the changed and recorded audio to a directory called Projectname_data, which is located right where you saved the project file itself.
@audio-technica Audio-Technica U.S., Inc. 1221 Commerce Drive, Stow, Ohio 44224 (330) 686-2600 audio-technica.com P52122 ©2009 Audio-Technica US., Inc.
USB RECORDING WAR under the GNU nse (GPL).