
Owner's Manual


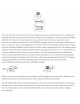

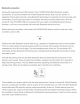


Table Of Contents
- User Manual
- Introduction
- Package contents
- Safety precautions
- Notes on use
- Part names and functions
- Preparation for use
- Placing the platter
- Setting up the turntable
- Assembling the tonearm
- Tonearm balance and tracking force
- Setting tonearm balance
- Setting tracking force
- Setting the anti-skate adjustment
- Installing/removing the dust cover
- Connecting the AC adapter
- Wireless/wired connection
- Connecting via Bluetooth wireless technology
- Setting pre-amplifier selector switch
- Connecting to connectable equipment (active speakers, amplifiers, etc.)
- Playing a record
- Care
- Replacing the stylus
- Replacing a cartridge
- When the turntable is moved
- Troubleshooting
- Dimensions
- Specifications
- How Do I Set Up the Turntable?

Next, assemble
the
tonearm. Remove
the
twist
tie
and
protective foam. Temporarily secure
the
tonearm
to
its rest
with
the
locking clamp.
Attach
the
headshe11
with
preinstalled AT-VM95E
cartridge
by
inserting
rt
into
the
tonearm
socket.
While
holding
the
headshell rotate
the
locking ring
counterclockwise.
As
the
ring rotates,
it
puHs
the
headshell into its seated position. Hand-tighten
carefully,
but
do
not
overtighten.
Install
the
counterweight, making certain
the
stylus force
gauge
dial is oriented
toward
the
front.
As
you rotate
the
counterweight,
it
wil
I thread
onto
the
tonearm.
Now
we
will balance
the
tonearm, set
the
tracking force, and adjust
the
anti-skate
for
the
AT-
VM95E
cartridge. This
important
process allows
the
cartridge
to
track
properly, and faiJure
to
perform
the
process correctly can cause
the
stylus
to
wear
prematurely and possibly damage your
records. First., set
the
anti-skate
adjustment
knob
to
"O."'
Remove
the
stylus's protective cover. Slide
it
straight
forward
off
the
front
of
the
cartridge, exposing
the
stytus. WhHe
gently
holding
the
headshell
to
stabihze
the
tonearm., re,ease
the
locking
damp.
At
this point, the
tonearm
is
unbalanced and can easily
swing.
Be careful
not
to
let
the
stylus drag across
the
platter.
While
gently
holding the headshelt rotate
the
counterweight
until
the
tonearm
is horizontally balanced
(floating}.
It
should hover freely
just
above
the
pJatter
and
not
touch
the
platter's surface. Once
the
tonearm
is balanced,.
without
touching
the
counterweight, carefully
move
the
tonearm
to
its rest
and secure it
with
the
locking
damp.