
User Guide

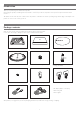

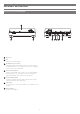


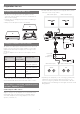

Table Of Contents
- Introduction
- Package contents
- Safety precautions
- Notes on use
- Part names and functions
- Preparation for use
- Placing the platter
- Setting up the turntable
- Assembling the tonearm
- Tonearm balance and tracking force
- Setting tonearm balance
- Setting tracking force
- Setting the anti-skate adjustment
- Installing/removing the dust cover
- Setting pre-amplifier selector switch
- Connecting to connectable equipment (active speakers, amplifiers, etc.)
- Connecting the AC adapter
- Playing a record
- Care
- Replacing the stylus
- Replacing a cartridge
- When the turntable is moved
- Troubleshooting
- Dimensions
- Specifications

4
1
Dust cover
2
Feet
Adjust the level of the product.
3
Pre-amplifier selector switch
If using an amplifier with a PHONO input jack, set this switch to
the PHONO position. If connecting to the AUX jack of an amplifier,
set this switch to the LINE position.
4
Stereo output terminals
Connect the RCA audio cable. Connect it to either the amplifier's
PHONO input jack or its line input jack. The red terminal is the
right channel and the white terminal is the left channel.
5
Ground (earth) terminal
Connect the amplifier's ground (earth) terminal to this terminal
using the RCA audio cable's ground line.
6
USB output
Use this output to connect your turntable to the USB input of your
computer.
7
Power input jack
Connect the AC adapter.
Part names and functions
Front and rear view diagram
2
3 4 5 6 7
2
1