
Full Product Manual


11
Playing a record
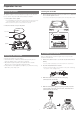
4. Lower the tonearm by moving the tonearm lift control lever to the
DOWN position. The tonearm descends slowly onto the record
and play begins.
• Alternatively, you can skip steps 2 to 4, and use your fingers to lift the
headshell, move the tonearm over the desired location on the record, and
then place the headshell down to begin playing the record.
• Do not subject the product to strong impact during playback.
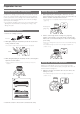
Checking and Adjusting Pitch
1. If desired, select an 8, 16 or 24% pitch adjustment range by
pressing the tempo range button. Then move the pitch adjust
slide control up or down to make pitch adjustments.
• The pitch adjust slide control has center detent position for 0% pitch
variation.
2. As illuminated by the blue light coming from beneath the power
dial, observe the strobe dots on the edge of the platter. If the
appropriate row of strobe dots appears to be stationary, the
plater is moving at the precise rated speed. If the dots appear to
be moving to the right, the platter is moving below rated speed; if
they appear to be moving to the left, the platter is moving above
rated speed.
AT-LP140XP
3. If the quartz button is pressed, the internal quartz lock will hold
the platter at precise rated speed regardless of the position of the
pitch adjust slide control.
Reversing the record
If desired, press the reverse control button to reverse the rotation of the
platter.
• The reverse control button will illuminate.
Pausing the record
1. After lowering the volume of the amplifier, speakers, etc.,
sufficiently, lift the tonearm with the tonearm lift control lever.
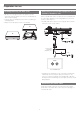
Stopping the record
1. Lower the volume of the amplifier, speakers, etc. sufficiently.
2. Lift the tonearm lift control lever.
3. Return the tonearm to the tonearm rest and fix it with the clamp.
4. If using the stylus target light, turn it off by pushing the stylus
target light.
5. Press the START/STOP button to stop the platter rotation.
• The platter slows down and rotation stops.
6. Turn the power dial to the OFF position.
7. Remove the record after the platter has come to a complete stop.
• To prevent the record from becoming scratched or warped, remove it
after use.
• Do not use a platter other than the one provided.