
Full Product Manual


4
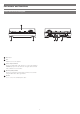
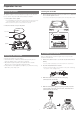
Part names and functions
Top view diagram
9
Stylus target light
Provides illumination directed at the stylus position for easier
cueing in low light.
10
Quartz button
Turns the pitch function on and off. When the quartz is activated
the platter will hold the RPMs at 0% pitch, regardless of the pitch
slider position and tempo range control settings.
11
Tempo range button
Select +/-8 or 16% tempo range.
+/-24% is selected by pressing both the +/-8% and 16% buttons
simultaneously; both buttons should be illuminated.
12
Pitch selection indicator
Shows blue for standard or locked RPM setting.
13
Pitch adjust slide control
Use in conjunction with pitch button to vary the platter’s rotational
speed. In the center detent position quartz lock is active.
14
Reverse control button
Controls platter’s rotational direction.
15
Tonearm
For details, refer to “Tonearm” on p.6.
16
Headshell receptacle
Storage receptacle for extra headshell (not included).
17
Dust cover hinge holders
Attachment points for dust cover hinges.
1
45-RPM adapter (shown in receptacle)
Adapts 7" records with large center holes to fixed center spindle.
2
Strobe dots (on platter edge)
Operate in conjunction with stroboscopic light located under the
power dial to provide visual indication of accurate platter speeds.
3
Spindle
4
Platter
Cast aluminum platter mounts directly to center spindle/motor
shaft.
5
Felt mat
6
Power dial
Controls power to the unit.
7
START/STOP button
Engages and disengages the motor/platter.
8
Platter speed buttons
Select 33 or 45 RPM platter speed. 78 RPM is selected by pressing
both the 33 and 45 buttons simultaneously; both buttons should
be illuminated.
AT-LP140XP
8
12
17
2
3
1
4
5
6
7
17
15
14
13
9 10 11
16