
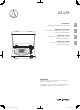
Full Product Manual


4
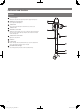
Part names and functions
Overall diagram
8 9
10
11
12 13
15
14
1
2
3
4
5
5
6
7
1
45 RPM adapter (shown in receptacle)
Select the platter speed (33-1/3 or 45 RPM).
2
Platter
3
Rubber mat
4
Spindle
5
Dust cover hinge holders
Attachment points for dust cover hinges.
6
Tonearm part
For details, refer to “Tonearm” on p. 5.
7
Size selector
Switch between 12" and 7", according to the size of the record.
8
Platter speed button
Select the platter speed (33-1/3 or 45 RPM).
9
START button
Spins the platter and moves the tonearm.
10
STOP button
Returns the tonearm to its original position and stops the platter.
11
Dust cover
12
Pre-amplifier selector switch
If using an amplifier with a PHONO input jack, set this switch to the
PHONO position. If connecting to the AUX jack of an amplifier, set this
switch to the LINE position.
13
MM (VM)/MC cartridge selector switch
If using an MM (VM) cartridge, set this switch to the MM position. If
using an MC cartridge, set this switch to the MC position.
14
RCA audio cable (with grounding wire)
Connect to PHONO input jack (grounding wire to ground terminal, if
available) or AUX (LINE) input jack of a receiver, amplifier or other
connectable equipment.
15
AC inlet
Insert the power cable here.
AT-LP3_UM_V2_ATUS_book.indb 4 2016/11/29 11:17