
Full Product Manual


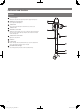


7
Preparation for use
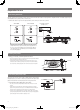
Assembling the tonearm
1. Insert the headshell into the locking ring.
•
Hold the right and left edges of the headshell so that you do not damage the
stylus or cut the cartridge’s wires.
2. With the headshell inserted, turn the locking ring
counterclockwise (to the left).
3. With the tracking force gauge ring facing forward, attach
the counterweight to the back of the tonearm, and slowly
turn it counterclockwise (to the left).
Tonearm balance and tracking force
In order for the cartridge to pick up sound correctly from the record’s grooves,
the tonearm’s balance and tracking force must be adjusted to fit the
specifications of the cartridge. If the tonearm’s balance and tracking force are
not properly adjusted, the record or the cartridge’s stylus may become damaged.
•
Do not drag the cartridge’s stylus across the record or rubber mat when
adjusting the tonearm’s balance or tracking force. Doing so may damage the
stylus.
Setting tonearm balance
1. Remove the cartridge’s protector.
2. While holding headshell, remove the cable tie used to
secure the tonearm at the time of delivery.
3. While still lightly holding the headshell, turn the
counterweight to adjust the tonearm’s balance.
•
Adjust the balance so that the tonearm is level when you release the headshell.
4. Return the tonearm to the tonearm rest.
Locking ring
Tonearm Counterweight
Adjust so that tonearm is level
AT-LP3_UM_V2_ATUS_book.indb 7 2016/11/29 11:17