AT-LP60XBT User Manual Automatic Wireless Turntable AT-LP60XBT
Introduction Thank you for purchasing this Audio-Technica product. Read through this user manual before using the product to ensure its correct use. Also, keep this manual for future reference. This product can be used only in the countries where the product is sold. Make sure that the operating voltage and the plug of AC adapter of the product are correct for the country you live in. Package contents Make sure that you have all the included items listed below before using this product.
Safety precautions Safety precautions Although this product was designed to be used safely, failing to use it correctly may result in an accident. To ensure safety, observe all warnings and cautions while using the product. RF Exposure Statement: This transmitter must not be co-located or operated in conjunction with any other antenna or transmitter used in other systems.
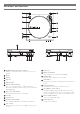
Part names and functions 7 7 1 2 8 9 3 10 4 5 6 11 12 AT-LP60XBT 13 AT-LP60XBT 14 15 16 17 18 19 12 Dust cover 1 45 RPM adapter (shown in receptacle) Adapts 7" records with large center holes to fit center spindle. 13 Platter speed button Select the platter speed (33-1/3 or 45 RPM). 2 Platter 14 START button Spins the platter and moves the tonearm. 3 Spindle 15 STOP button Returns the tonearm to its original position and stops the platter.
Preparation for use 2. Place the belt on the motor pulley (brass-colored). Installing the turntable • •• Mount the product on a level surface. avoid the effects of vibrations and acoustic pressure, do not mount the product next to such items as speakers. •• The product may pick up radio static if placed next to a radio. Therefore, try to keep the product away from radios. •• If the product is near equipment (cell phone, etc.) that emits strong radio waves, noise may occur.
Preparation for use Rotating the platter Wireless/wired connection You can connect to a speaker, etc. via Bluetooth technology or RCA audio cable. When using Bluetooth, refer to “Connecting via Bluetooth wireless technology” on p. 6. 1. Using your hands, rotate the platter ten times. • • Remove the tie that locks the tonearm and press the tonearm lift button to lift the tonearm. Slowly rotate the turntable ten times by hand in the direction of the arrow.
Preparation for use 3. When pairing is complete, the indicator LED lights in blue. Connecting via Bluetooth wireless technology The product supports Bluetooth wireless connection. It can be connected with Bluetooth-compatible headphones, active speakers and wireless stereo speakers (hereinafter referred to as Bluetooth receiver devices). Blue About pairing When connecting a new Bluetooth receiver device, you need to pair it with the product.
Preparation for use Setting pre-amplifier selector switch Connecting the device This product has a built-in phono equalizer function. You can use the product even if you do not have a phono amplifier or connectable equipment with a built-in phono amplifier. Use the pre-amplifier selector switch to set the output, as shown below.
Playing a record Before playing a record Manual operation Lower the volume of the amplifier, speakers, etc. sufficiently. 1. Remove the cartridge’s protector. • Pull the protector straight forward to remove it. • Applying a downward force may cause the stylus to come off the body. Only low volume is output if the stylus has come off, or is about to come off, so refer to “Replacing the stylus” on p. 10 to reattach the stylus correctly. 1. Press the tonearm lift button.
Playing a record Pausing the record How to use with Bluetooth connection 1. After lowering the volume of the amplifier, speakers, etc. sufficiently, press the tonearm lift button to lift the tonearm. •• To connect for the first time, pair the product and your device via Bluetooth wireless technology. •• Read the user manual for the Bluetooth receiver device. •• Note that Audio-Technica cannot guarantee the operation of displays, such as the battery level display, or applications via Bluetooth devices.
Care Replacing the stylus Turntable body Removing the stylus •• When the turntable body is dirty or dusty, first disconnect the AC adapter, and then wipe off the dirt and dust with a soft, dry cloth. •• Do not use benzenes, thinners, etc. •• When storing the product for a long time, disconnect the AC adapter from the outlet and wrap the product in plastic; do not allow it to become damp.
Replacing the belt Replacing the belt •• The 5. Place the belt on the motor pulley (brass-colored). belt is a consumable part. Replace the belt if the speed of playback slows down or irregular rotation occurs. As a rule of thumb, we suggest replacing the belt once a year. •• Before replacing the belt, be sure to disconnect the product’s AC adapter from the outlet. • Grasp the belt that was attached in step 3 and, while pulling it, place it on the brass motor pulley. Motor pulley (brass-colored) 1.
Troubleshooting Problem Solution The platter does not spin. •• Is the AC adapter connected to the outlet? Connect the AC adapter to the outlet. •• Has the belt slipped from the platter? Correctly place the belt on the platter. •• Is the belt placed on the motor pulley? Check that the belt is placed on the motor pulley (brass-colored) correctly. •• Has The platter spins, but there is no sound or the volume is not loud enough. the belt been damaged? Replace it with a new belt.
Dimensions Specifications Turntable 373.3 359.5 Type Belt-drive, fully automatic operation Motor DC servo-controlled Speeds 33-1/3 RPM, 45 RPM Turntable platter Aluminum Wow and flutter < 0.25% (WTD) at 3 kHz Signal-to-noise ratio > 50 dB (DIN-B) Cartridge Type VM Outputs levels “PHONO” “LINE” Phono pre-amp gain 2.5 mV nominal at 1 kHz, 5 cm/sec 150 mV nominal at 1 kHz, 5 cm/sec 36 dB nominal, RIAA equalized 97.5 Power supply requirements 100 to 240 V, 50/60 Hz, 0.6 A Max.
Audio-Technica Corporation 2-46-1 Nishi-naruse, Machida, Tokyo 194-8666, Japan www.audio-technica.com ©2019 Audio-Technica Corporation Global Support Contact: www.at-globalsupport.com 162501372-02-01 ver.1 2019.04.
@auclio-technica TURNTABLE QUICK START GUIDE AT-LP60XBT ~ INFORMATION 1&f&~SJ=I~ User Manual Manuel de l'utilisateur Bedienungsanleitung Manuale dell'utente Manual de usuario Manual do Usuario @ www.audio-technica.com ► PyKOBOACTBO nonb30BaTen51 FF.l .P -¥ ffl ~FF.l~~Bj:j~ J.
(I, PREPARATION e -c• CONNECTION '"_®n PHONOl !LINE [I] PHONO AUX W> W> W> W> L R c:::5t -t PHONOl !LINE E ~ , ◄ u·~ .. .....~.~;·' +GI] Amplifier/ Speaker )>))( 0 PAIRING ON e ~ ~ 2 SEC ! Blue O• Red e Q 0 ·----e----· ~ E3 .~.
► PLAY e 0 m DI -33 -- 45 33 SPEED 45 SPEED ,.
■ STOP e 0 •4 >)) ... •4 > tt,< 2:;j ► STOP 5') 0 Amplifier/ Speaker ~ CLEANING For details about turntable and cartridge care accessories, visit www.audio-technica.com. l;J§A-ii·I ►ffil'?◄ v X ~:i\:~tl;;t-7'-< ;;tT? =:t.1 •The Bluetooth• word mark and logos are owned by Bluetooth SIG, Inc. and any use of such marks by Audio-Technica Corporation is under license. All other trademarks are property of their respective owners.
AT-LP60XBT ,.,.,,J:lfif.i91J<>JIJii'ilci!i!l!f G,;.;, ,,< tca;c ,. -~~L~~------;:0)'5:;"r,:(;t rl&'Jffi:1.,t:ffl-:it.:tl.g-, fl!m.- 1:itff:C*t.:l.t••if·? iiJlllHttJ(~IJ iJ:"f J ID{t!Uta :t.r-
Thank you for purchasing this Audio-Technica product Before using the product, read through this caution guide to ensure that you will use the product correctly. Please keep this manual for future reference ■ Safety precautions - - - - - Although this product was designed to be used safely, failing to use it correctly may result in an accident.
-~~~~-------- '111'9\'!,t;c,!fol,JJlllffis,,.l!nti!lllH •!X!lei!ll*!!l'.Mlll ■ ltltlJD**.ll!IJ=i /J□ -;kI~gjlllB/l : CAN ICES-3 (B)/NMB-3(B) ,t;c,!!ili\!