Automatic Stereo Turntable System AT-PL50 Installation and Operation
Automatic Stereo Turntable System Installation and Operation Warning: To prevent fire or shock hazard, do not expose this appliance to rain or moisture. Attention: Pour prévenir feu ou choc électrique, ne pas exposé l’appareil à la pluie ou à l’humidité. CAUTION RISK OF ELECTRIC SHOCK DO NOT OPEN AVIS RISQUE DE CHOC ÉLECTRIQUE NE PAS OUVRIR Introduction Thank you for purchasing the AT-PL50. Audio-Technica has been a leading manufacturer of innovative stereo phonograph products for more than 40 years.
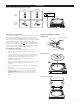
Initial Setup Figure 1 Inputs and pre-amp selector switch “AUX” PHONO Amplifier Input Jacks White Red AC Pre-amp Selector Switch AC Setting the Pre-amp Switch For increased flexibility of use, this turntable has an internal stereo phono pre-amplifier. The Pre-amp Selector Switch is located under the turntable platter, in the rear-center (Fig. 1). If the system amplifier you are using has a PHONO input, set the Pre-amp Selector Switch to the “OFF” position.
Connecting to Stereo System 1. Connect the red RCA-type pin-plug to the right channel input and the white RCA-type pin-plug to the left channel input of the amplifier. Fig. 1, page 3.) 2. With the tone arm still fastened to the tone arm rest, slowly turn the turntable platter clockwise ten times, to make certain the automatic mechanism is fully cycled. 3. Remove the vinyl tie that holds the tone arm on its rest. 4. Connect the power cord plug to an AC outlet.
Caution: When the tone arm reaches the end of the record, it will lift and return to the tone arm rest automatically. When this happens, do not interfere with the tone arm’s motion, or damage to the mechanism may occur. If the tone arm does not return automatically to the tone arm rest after the record has finished playing, simply press the STOP button to complete operation. Figure 5 Figure 6 Manual Operation 1. Remove the stylus guard from the stylus assembly (Fig. 3). (Out) (In) 2.
Troubleshooting Turntable does not operate 1. Make certain the turntable’s AC cord is plugged into an AC outlet, and that the AC outlet is “live.” 2. Figure 10 Checking the drive belt 10a Check the drive belt to make certain it is on correctly. (See Figure 10.) A) Remove the record mat from the turntable platter (Fig. 10a). Place the mat in the cardboard packaging sleeve for safekeeping. Through an opening in the turntable platter, visually inspect to see if the drive belt is around the motor pulley (Fig.
Troubleshooting, continued Specifications Turntable operates, but no sound at all 1. The stylus guard is still in place. 2. The tone arm Lift button is pressed in. 3. Amplifier controls set incorrectly: wrong input selected, tape monitor on, speakers switched off, etc. 4. Check the stylus on phono cartridge for correct placement. Refer to the instructions for replacing the stylus on page 5. Turntable operates, but no sound, or sound not loud enough 1.
Visit our Web Site: www.audio-technica.com One-Year Limited Warranty Audio-Technica brand products purchased in the U.S.A. are warranted for one year from date of purchase by Audio-Technica U.S., Inc. ( A.T.U.S.) to be free of defects in materials and workmanship. In event of such defect, product will be repaired promptly without charge or, at our option, replaced with a new product of equal or superior value if delivered to A.T.U.S.