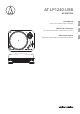
AT-LP1240-USB XP EDITION ES Manual de usuario Tocadiscos profesional con accionamiento directo FR Manuel de l’utilisateur Platine professionnelle à entraînement direct EN User Manual Direct Drive Professional Turntable
Introduction Thank you for purchasing this Audio-Technica product. Before using the product, read through this user manual to ensure that you will use the product correctly. Please keep this manual for future reference. This product can be used only in the countries where the product is sold. Make sure that the operating voltage of the product is correct for the country you live in. Package contents Make sure that you have all the included items listed below before using this product.
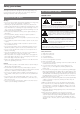
Safety precautions Although this product was designed to be used safely, failing to use it correctly may result in an accident. To ensure safety, observe all warnings and cautions while using the product. For customers in the USA UL/CSA notice Cautions for the product Caution: • Do not install the product on an unstable surface to prevent injury or damage from the product falling. • Do not install the product in a poorly ventilated place to prevent accident or fire by accumulated heat.
Safety precautions FCC Notice Warning: This device complies with Part 15 of the FCC Rules. Operation is subject to the following two conditions: (1) This device may not cause harmful interference, and (2) this device must accept any interference received, including interference that may cause undesired operation. Caution: You are cautioned that any changes or modifications not expressly approved in this manual could void your authority to operate this equipment.
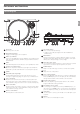
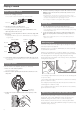
Part names and functions Overall diagram EN 14 2 13 12 1 2 3 4 5 6 7 8 9 10 11 15 16 17 18 19 20 15 1 Power dial Controls power to the unit. 2 Dual start/stop buttons Engages and disengages the motor/platter. 3 Platter speed buttons Select 33 or 45 RPM platter speed. 78 RPM is selected by pressing both the 33 and 45 buttons simultaneously; both buttons should be illuminated. 4 Platter Cast aluminum platter mounts directly to center spindle/motor shaft.
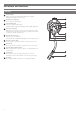
Part names and functions Tonearm 21 Counterweight Balances the tonearm and provides adjustment for proper downward tracking force on the stylus. 22 Tracking force gauge ring Use to adjust the tracking force. 23 Tonearm height lock Locks the tonearm height setting. • Always fully unlock before attempting to make a height adjustment. 24 Anti-skate control dial While the record is playing, a force acts on the stylus tip to pull it inward.
Preparation for use Placing the platter This product requires some assembly before using it for the first time. Do not connect the power cable until assembly is complete. 1. Set the platter on the spindle. 2. Place the slip mat on top of the platter. 1. Remove the cable tie used to secure the tonearm at the time of delivery. • Use the clamp to temporarily secure the tonearm to the tonearm rest. 2. Insert the headshell into the tonearm.
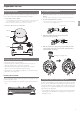
Preparation for use 2. Turn the counterweight and the tracking force gauge ring together counterclockwise (to the left) until the centerline value matches the recommended tracking force value for the cartridge you are using. Setting tonearm balance 1. Remove the cartridge's protector. 2. While lightly holding the headshell so as not to move the tonearm, unlatch the clamp. • The tonearm is tilted because the balance has yet to be adjusted.
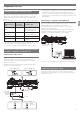
Preparation for use Setting pre-amplifier selector switch Connectable equipment being used Position of pre-amplifier selector switch Where to connect the RCA audio cable Device with phono input PHONO Phono input jack and ground (earth) terminal of connectable equipment Device without phono input LINE AUX or line input jack of connectable equipment PC sound card LINE Sound card's line input jack*1 Device with USB input LINE USB input of your computer*2 Connecting to computers with USB input
Playing a record 4. Lower the tonearm by moving the tonearm lift control lever to the DOWN position. The tonearm descends slowly onto the record and play begins. Before playing a record 1. Remove the cartridge's protector. • If the tonearm is fixed to the tonearm rest, unlatch the clamp. Protector • Alternatively, you can skip steps 2 to 4, and use your fingers to lift the headshell, move the tonearm over the desired location on the record, and then place the headshell down to begin playing the record.
Playing a record Reversing the record Care Turntable body If desired, press the reverse control button to reverse the rotation of the platter. • When the turntable body is dirty or dusty, first disconnect the power cable plug, and then wipe off the dirt and dust with a soft, dry cloth. • The reverse control button will illuminate. • Do not use benzenes, thinners, etc. After lowering the volume of the amplifier, speakers, etc. sufficiently, lift the tonearm with the tonearm lift control lever.
Replacing the stylus Replacing a cartridge Removing the stylus • In addition to the deterioration of sound quality, records may also be damaged as the cartridge’s stylus tip wears down. • As a rule of thumb, replace the stylus after 300 hours of use. Heavy scratching may shorten the life of the stylus. • Be sure to disconnect the product’s power cable plug from the outlet. 1. Release the headshell from the tonearm. • Fix the tonearm with the clamp and then remove the headshell gently. 2.
Adjusting the tonearm's height When the turntable is moved When installing a cartridge other than the one provided, you must maintain a suitable distance between the cartridge and the surface of the record. Place the stylus on the record and confirm that the tonearm is parallel to the record's surface. If it is not parallel, adjust the height of the tonearm. Using the product's original packing materials, wrap the turntable in the reverse order from when you unwrapped it.
Troubleshooting Problem Solution The platter does not spin. • Is the power cable connected to the outlet? Connect power cable to the outlet. • Has the power cable's plug come off? Check whether or not the plug is properly attached to the product. The platter spins, but there is no sound or the volume is not loud enough. • Is the cartridge's protector still in place? Remove the cartridge's protector. • Is the tonearm in the lift position? Lower the tonearm.
Visit our website www.audio-technica.com One-Year Limited Warranty Audio-Technica brand products purchased in the U.S.A. are warranted for one year from date of purchase by AudioTechnica U.S., Inc. (A.T.U.S.) to be free of defects in materials and workmanship. In event of such defect, product will be repaired promptly without charge or, at our option, replaced with a new product of equal or superior value if delivered to A.T.U.S.