
Owner's Manual


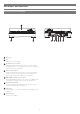
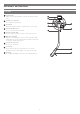
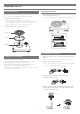

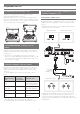

Table Of Contents
- Introduction
- Package contents
- Safety precautions
- Notes on use
- Part names and functions
- Preparation for use
- Placing the platter
- Setting up the turntable
- Assembling the tonearm
- Tonearm balance and tracking force
- Setting tonearm balance
- Setting tracking force
- Setting the anti-skate adjustment
- Installing/removing the dust cover
- Setting MM (VM)/MC cartridge selector switch
- Setting pre-amplifier selector switch
- Connecting to connectable equipment (active speakers, amplifiers, etc.)
- Connecting the AC adapter
- Playing a record
- Care
- Replacing the stylus
- Replacing a cartridge
- When the turntable is moved
- Troubleshooting
- Dimensions
- Specifications

5
Part names and functions
Tonearm
1
Counterweight
Balances the tonearm and adjusts to provide the proper tracking
force.
2
Tracking force gauge ring
Use to adjust the tracking force.
3
Tonearm lift
Moves the tonearm vertically to and from the face of the record.
4
Tonearm lift adjust screw
Use to set the amount of tonearm lift.
5
Tonearm rest with clamp
Use the clamp to secure the tonearm so that it does not move.
6
Anti-skate control dial
While the record is playing, a force acts on the stylus tip to pull it
inward. This force can be counteracted by setting the same values
for anti-skate and the tracking force.
7
Tonearm lift control lever
Operates the tonearm lift.
8
Locking ring
Rotate the ring to the left (counterclockwise) to secure the
headshell. To remove the headshell, rotate the ring to the right.
9
Headshell
The cartridge (AT-VM95E) is attached to the headshell (AT-HS6).
4
5
6
8
9
7
1
3
2