AT2005USB ON Instruction Manual AT2005USB Cardioid Dynamic USB/XLR Microphone Contents Introduction & features 3 Setting up your microphone with stand clamp & desk stand 4 Preliminary setup with Mac OS X 5 Preliminary setup with Windows XP 6 Preliminary setup with Windows Vista 9 Preliminary setup with Windows 7 10 Using headphones 13 Selecting software 13 Setting your software levels 13 Positioning your microphone 13 XLR operation 13 Protecting your microphone 13 Specifications 14
Compliance with FCC rules (USA only) This device complies with Part 15 of the FCC rules. Operation is subject to the following two conditions:(1) this device may not cause harmful interference, and (2) this device must accept any interference received, including interference that may cause undesired operation. FCC WARNING You are cautioned that any changes or modifications not expressly approved in this manual could void your authority to operate this equipment.
Introduction Thank you for buying the Audio-Technica AT2005USB cardioid dynamic USB/XLR microphone. Equipped with both USB and an XLR outputs, this digital/analog mic is designed both for live performance and digitally capturing music or any acoustic audio source using your favorite recording software. The AT2005USB offers high-quality articulation and intelligibility perfect for home studio recording, field recording, podcasting, voiceover, and on-stage use.
AT2005USB 6 3 9 8 2 1 4 5 10 ON 7 11 Windscreen–Multi-stage grille design offers excellent protection against plosives and sibilance without compromising high-frequency clarity 2. Capsule–Dynamic microphone element with cardioid polar pattern 3. Blue LED–Blue light shows mic is receiving USB power (Note: The blue LED is not affected by the on/off switch position) 4. ON/OFF switch–Functions for both USB and analog operation 5. Metal construction–Tough, durable, resilient design 6.
Preliminary setup with Mac OS X 1. Plug the free end of the provided USB cable into the USB port on your computer. The microphone’s blue LED will illuminate, indicating the microphone is receiving power.Your computer will automatically recognize the USB device and install a driver. 2. To select the AT2005USB as your audio input, first, open your System Preferences. 3. Next, click Sound to display the Sound preference pane. 4. Click the Input tab and select the AT2005USB as the device for sound input.
Preliminary setup with Windows XP (Service Pack 2; other operating systems may vary slightly) 1. Plug the free end of the USB cable into the USB port on your computer. The microphone’s blue LED will illuminate, indicating the mic is receiving power. Your computer will automatically recognize the USB device and install a driver. 2. In the lower right portion of your screen you may see a message that new hardware was found; or you may see a driver software installation notice. 3.
4. Select Sounds and Audio Devices.
Preliminary setup with Windows XP (continued) 5. Select the Audio tab, and choose AT2005USB as the default device. 6. Adjust computer volume by clicking on the Volume button beneath Sound recording Default device. AT2005USB 7. Through the Wave In window, you can set the computer volume or mute the microphone. AT2005USB Your preferences are now set to use the AT2005USB with Windows XP with the recording program of your choice.
Preliminary setup with Windows Vista 1. Plug the free end of the USB cable into the USB port on your computer. The microphone’s blue LED will illuminate, indicating the mic is receiving power. Your computer will automatically recognize the USB device and install a driver. 2. In the lower right portion of your screen you may see a message that new hardware was found; or you may see a driver software installation notice. 3. To select the AT2005USB as your default recording device, begin at your Start menu.
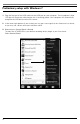
Preliminary setup with Windows 7 1. Plug the free end of the USB cable into the USB port on your computer. The microphone’s blue LED light will illuminate, indicating the mic is receiving power. Your computer will automatically recognize the USB device and install a driver. 2. In the lower right portion of your screen you may get a message that new hardware was found; or you may see a driver software installation notice. 3.
4. Select Sound. 5.
Preliminary setup with Windows 7 (continued) 6. Select the Recording tab, and choose AT2005USB as the default device. Microphone AT2005USB Default Device 7. Double click on the AT2005USB icon to open the Microphone Properties window. Select the levels tab to adjust microphone level (loudness). You may need to come back to this window to readjust the level after you begin recording. Your preferences are now set to use the AT2005USB with Windows 7 with the recording program of your choice.
Additional Information Using headphones The 1/8" (3.5 mm) headphone jack on the bottom of the microphone allows you to directly monitor your recording with a pair of headphones. When your preliminary setup is completed, and your USB microphone is connected to your computer’s USB port (the microphone’s blue LED is illuminated), plug your headphones into the headphone jack on the bottom of the microphone. While talking into the microphone, you should hear yourself in the headphones.
AT2005USB Specifications† Element: Dynamic Polar Pattern: Cardioid Frequency Response: 50 – 15,000 Hz Power Requirements: USB Power (5V DC) Bit Depth: 16 bit Sample Rate: 44.1 kHz/48 kHz Controls: On/off switch; headphone volume control Weight: 266 g (9.4 oz) Dimensions: 183.6 mm (7.23") long, 51.0 mm (2.01") maximum body diameter Output Connector: USB-type/XLR-type Headphone Output Power: 10 mW @ 16 ohms Headphone Jack: 3.
AT2005USB To reduce the environmental impact of a multi-language printed document, product information is available online at www.audio-technica.com in a selection of languages. Afin de réduire l’impact sur l’environnement de l’impression de plusieurs, les informations concernant les produits sont disponibles sur le site www.audio-technica.com dans une large sélection de langue.