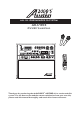
ALL - IN - ONE KARAOKE / PA SYSTEM AKJ780E OWNER’S MANUAL AKJ780E ALL - IN - ONE KARAOKE / PA SYSTEM VCD L R ® Thank you for purchasing the Audio2000'S AKJ780E all - in - one karaoke / PA system ! For the best results and the utmost satisfaction from your new unit, please read this manual thoroughly, and retain it for future reference.
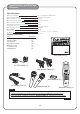
Connecting to the AC Outlet Connecting to a TV Video monitor with a RCA input Changing the Video Mode(PAL/NTSC) DVD disc
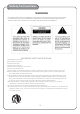
Safety Instructions WARNING * TO PREVENT FIRE OR SHOCK HAZARD,DO NOT EXPOSE THIS APPLIANCE TO RAINOR MOISTURE. *THIS APPLIANCE SHALL NOT BE EXPOSED TO DRIPPING OR SPLASHING WATER AND THAT NO OBJECT FILLED WITH LIQUIDS SUCH AS VASES SHALL BE PLACED ON APPARATUS. IMPORTANT SAFETY INSTRUCTIONS 1) Read these instructions. 2) Keep these instructions. 3) Heed all warnings. 4) Follow all instructions. 5) Do not use this apparatus near water. 6) Clean only with dry cloth. 7) Do not block any ventilation openings.
Safety Instructions 13 ) Unplug this apparatus during lightning storms or when unused for long periods of time. 14 ) Refer all servicing to qualified service personnel. Servicing is required when the apparatus has been damaged in any way, such as power-supply cord or plug is damaged, liquid has been spilled or objects have fallen into the apparatus, the apparatus has been exposed to rain or moisture, does not operate normally, or has been dropped.
Features Features 1 . The built-in USB and SD card readers play VCD, WMA, AVI, MP4, DAT, MPG, and JPG files in USB and SD card. 2 . A multi-format player with the direct track access supports DVD, CDG, DVD-R, DVD-RW, VCD,MP3+G MP4, DIVX, Photo-CD, CD, CD-R, and CD-RW formats. 3 . All-in-one design delivers 100W of power through a 4-speaker cabinet (4” X 2; 3” X 2). 4 . ¼-inch guitar and keyboard inputs with individual volume controls. 5 . Digital echo with repeat and delay controls for vocal enhancement.
Specifications and Package Contents Specifications ● AC Input Voltage ● Audio Output Power ● AV1 Audio Input Sensitivity ● Video Input Sensitivity ● Microphone Input Sensitivity ● Keyboard/Guitar Input Sensitivity ● Video Output Level ● Audio Output Level ● S/N Ratio ● Dimension ● Weight AC 115V 60Hz/AC 230V 50Hz 100 W (peak to peak) 500 mV 1 V (peak to peak) 8 mV 8 mV 1 V (peak to peak) 1000 mV 90 dB 18.3“ x 12.8” x 16.5” (L x W x H) 35.
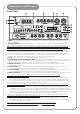
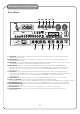
Descriptions and Functions Front Panel 3 5 4 7 6 8 AKJ780E ALL - IN - ONE KARAOKE / PA SYSTEM 2 1 9 VCD L R 10 11 12 1.INPUT - This button toggles through all the INPUT channels (Disc/USB/SD, AV 1/2/3) for available INPUT SOURCES. 2.POWER/STANDBY - This button is used to turn the AKJ780E 'ON' /'OFF'or place it in STANDBY mode. Note: When in STANDBY mode, the AKJ780E is not completely powered down and still contains residual power.
Descriptions and Functions Front Panel 13 14 15 16 17 18 19 20 21 AKJ780E ALL - IN - ONE KARAOKE / PA SYSTEM VCD L R 26 25 24 23 22 13.AUDIO button - Cycles through caption languages on a disc with multiple caption languages available. 14. PBC button- The PBC (play back control) button toggles the PBC mode ON/OFF. When in PBC mode, you can use direct access to tracks/scenes by using the NUMBER PAD on the REMOTE CONTROL. This feature is used primarily with VCD discs.
Descriptions and Functions Front Panel 27 28 29 30 31 AKJ780E ALL - IN - ONE KARAOKE / PA SYSTEM VCD 32 33 34 L R 35 36 37 27. MIC BASS - This control increases/decreases the amount of LOW frequency response applied to the MASTER VOLUME output. 28.MIC TREBLE - This control increases/decreases the amount of HI frequency response applied to the MASTER VOLUME output. 29.MIC ECHO - This control adjusts the level of ECHO applied to the MIC channels.
Descriptions and Functions Rear Panel 1 2 3 4 5 6 7 8 9 230 Serial Number Made in P.R.C. PRE-OUT 1.FUSE TERMINAL - This terminal houses the AKJ780E main system FUSE. 2 .VOLTAGE SELECTOR - This selector toggles between 110-120V and 220-240V power settings. Please make sure this toggle is set to the correct position, matching the receiving AC outlet's power supply before plugging it in and operating it. Doing so may cause severe damage to the unit and void your product warranty. 3 .
Descriptions and Functions Rear Panel 230 Serial Number Made in P.R.C. PRE-OUT 10 11 13 12 14 15 16 17 10.AC~IN TERMINAL - Connect AC MAIN POWER CORD from the wall outlet to this terminal. 11. AC POWER outlet - This outlet provides AC POWER to an external device. Note: Do not connect any device with a power consumption level higher than 200W. 12. PRE OUT jacks-Connect one end of ¼-inch cables to the left and right PRE-OUT jacks on the AKJ780E.
Descriptions and Functions Remote Control 1 3 2 4 5 6 7 10 9 8 11 12 13 15 14 17 16 18 19 ACC 780E-01 1.OPEN/CLOSE button - This button is used to OPEN/CLOSE the DISC tray. 2.POWER button - Turns the AKJ780E on or to Standby mode. To turn the AKJ780E completely off, use the power button on the front panel. Note: The main power must be on in order to use this power button. Turn on the main power with the power button on the front panel. 3.
Descriptions and Functions Remote Control 24 28 32 22 21 26 25 30 29 34 33 36 23 27 31 35 37 38 ACC 780E-01 38.V/C (Vocal Cancel) button - In order for this feature to work properly, the disc must be multiplex formatted. Press the VOCAL CANCEL button once to remove the lead vocal layer. Press a second time, and the lead vocal layer will be reestablished.
Basic Connections Connecting to the AC Outlet Since the AKJ780E contains built-in power amplifiers, speakers, DVD/CDG/CD player, USB player, and SD card player, the AKJ780E can be used as a self-contained sound system. Furthermore, the AKJ780E contains various audio video outputs to allow the AKJ780E to be connected to multiple TV sets, external sound systems, and/or multiple sound effect devices.
Basic Connections 3.¼ INCH PRE-Out Connections: ●Connect one end of the ¼ inch audio cables to the left and right PRE-OUT jacks on the AKJ780E. ●Connect one end of the ¼ inch audio cables to the left and right AUDIO/LINE/AUX INPUT jacks on the external device. PRE-OUT 5.CONNECTING EFFECTS USING THE EFFECT INSERT : 1.Connect one end of the ¼ inch stereo audio cables to the GUITAR EFFECT, KEYBOARD EFFECT, or MIC EFFECT inserts on the rear panel of the AKJ780E. 2.
DVD Output Connections DVD Output Connections 1.Connecting to a Dolby Pro Logic Amplifier The AKJ780E allows DVD audio output for 5.1 or 7.1 configurations. With a 5.1 amplifier, you will need six RCA patch cables. Connect the plug from one side of each cable to the ML, CEN, SL, MR, SW and SR outputs on the AKJ780E . Connect the plug from the other side of each cable to the corresponding ML, CEN, SL, MR, SW and SR inputs on your 5.1 amplifier. A 7.
Basic Connections 3.Connecting to a DTS Receiver/Decoder Using either a RCA-ended COAXIAL cable suited for digital audio use or an OPTICAL cable, connect one end to the appropriate jack on the AKJ780E (COAXIAL or OPTICAL) and the other end to the appropriate jack (COAXIAL or OPTICAL). If you have both coaxial and optical inputs on your DTS decoder/receiver, it is recommended to use an optical connection as those cables eliminate the possibility of EMI (electromagnetic interference). has 5.1 or 7.
Basic Operations Turning the AKJ780E On, Off and to Standby Press the power button on the AKJ780E to turn the unit on or off.
Basic Connections Adjusting the Master Music Volume The master Music Volume for the disc player, and AV input channels can be adjusted using the front panel control . ●Front Panel: Turn the MUSIC VOLUME control clockwise to raise the volume and counter-clockwise to lower the volume.
18
USB and SD Card Operations (Disc Mode) USB and SD Card Operations (Disc Mode) Use the DISC select button on the front panel or DVD select button on the remote control to directly select the desired DISC MODE,do not put DISC into the tray,when the graphic display on the front panel display ”NO DISC”,and then insert USB and SD CARD to the USB and SD CARD jacks,then begin to load the media sources from USB or SD CARD. 1.Using the USB Input ●Plug a USB thumb drive into the USB Input.
Microphone Operations Turning on the Microphones Each ADM1064B microphone has an On/Off switch. 1.Flip the microphone's On/Off switch UP to turn the microphone ON. 2.Flip the microphone's On/Off switch DOWN to turn the microphone OFF.
Microphone Operations Using Digital Echo Digital Echo gives vocals a more professional, studio-produced sound and is a great way to make any singer sound like a seasoned professional. There are three controls, located on the front panel, for adjusting the Echo effect: ●ECHO - This controls the amount of Echo effect that will be heard. Turn clockwise to increase the amount of echo and counter-clockwise to decrease it. Turn the ECHO control fully counter-clockwise to turn the echo effect off.
Descriptions and Functions Remote Control Using the Remote Control When operating the remote control, point the top of the remote control toward the AKJ780E 's remote sensor on the front panel and ensure that there is a clear line of sight between the remote control and AKJ780E void of obstacles in order to prevent signal deflection. When to Replace the Batteries The maximum operational distance between the remote control and the sensor is approximately 25 feet.
DVD System Setup Menu General Setup Page DVD System Setup Menu To access the System Setup Menu, Press MENU on the remote control. The menu will appear on the TV screen. Use the arrow buttons on the remote control to navigate through the menu and use the ENTER button to make selections. General Audio Dolby Video Preference - - General setup page - TV Display 4:3/ Ps Angle Mark On OSD Lang ENG Captions On Screen Saver Off Last Memory Off 1.
DVD System Setup Menu Audio Setup Page 1. Speaker Setup Dolby Audio Video General Preference Opens up the Speaker Setup page Audio Setup Page 1.1 Downmix ? LT/RT - Sound output is divided with the Left coming Speaker Setup out of the Left speaker and the Right coming out of the Spdif Setup Right speaker. CH EQ Setup ? STEREO - Sound output is in Stereo Mode. 3D Process ? V SURR - Virtual Surround Sound ?5.1 CH - For 5.1 Channel surround sound 1.
DVD System Setup Menu Video Setup Page 1.Component Select the digital video output ●If using the S-Video output ●If using the Component output and connected to a YUV ●If using the Component output and connected to a RGB 2.TV Mode Only accessible when YUV is selected in the COMPONENT option Select P-Scan for progressive scan or Interlace, depending on your TV. Consult your HD-TV's instruction manual tofind the correct setting. 3.Sharpness Adjust the sharpness of the picture 4.
Troubleshooting 29