
Installation manual

The factory default for the ALL output is as an emitter. To connect a
blaster-type IR emitter to the
ALL
jack do the following:
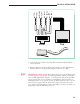
➤ Disconnect the AC power cord from the PX-700
➤ Remove the top cover of the PX-700.
➤ Find a small jumper with the words “
FLASHER” and “BLASTER” on
the IR Output board, directly in front of the
ALL jack at the right
end of the PCB.
➤ Remove the shorting plug and place on the side marked “
BLASTER”.
➤ Replace the cover.
This modification should be performed by qualified service
personnel only!
Zone Triggers (1-6)
The Zone Triggers are programmable to provide a constant 12VDC
voltage through each output any time the zone is on or only when the
Primary Room is on. The total load current on all six Zone Triggers and
the Trigger Out cannot exceed 200mA total. For example, you may want
to switch on a remote amplifier for a particular Zone or Primary Room,
or other creative application.
NOTE: When hooking up the
1
⁄
8
" (3.5mm) mini jack to the trigger outputs,
the tip is positive and the shield is ground.
Triggers (In, Out and Page)
Trigger In
The Trigger In is a means to tell the PX-700 that the source equipment
is shared with another audio system. Use the Trigger In when sharing
sources because the PX-700 needs to power up equipment in a known
state when the Audioaccess Installation comes on. In addition, when the
source equipment is shared with another audio system, the PX-700 needs
to control the equipment status so that it doesn’t stop transports or
power off equipment in use by the other audio system.
➤ If no Zones are on in the PX-700 Installation and the PX-700 detects
Trigger In voltage, the PX-700 executes the First Zone On macro.
➤ If the Trigger In is active when the first Zone is turned on, the
PX-700 does not execute the First Zone On macro, because it knows
that it already did that when the trigger became active.
➤ While the Trigger In is active, the PX-700 will not execute Source
Not in Use commands when a source is no longer in use by
any Zone.
PHYSICAL INSTALLATION
3.12