
Service manual


[logo]
[TITLE]
OCTOBER 27, 2000
[PART NUMBER]
PX-600 Field Repair Guide Page 7
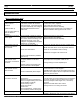
MRX main fuse blown
PX-600 main fuse blown
Check for shorted wiring.
Check for source input DC offset.
Check correct wall voltage.
Repair faulty wiring.
Change or repair source.
Connect to 110VAC.
No power on MRX
switched outlets.
Does the AC relay click on power up?
Check fuse on Power supply.
Change relay.
Change fuse w/ correct value
No power on PX-600
switched outlet.
Does the AC relay click on power up?
Check fuse on Power supply.
Check fuse link at location F1301
near power supply.
Change relay.
Change fuse w/ correct value
Install jumper wire 24 ga. To replace this fuse.
Problems encountered
after changing software.
Check the IC is seated correctly and
installed in the correct direction.
Reinstall software correctly.
Perform DATA reset to system.
IR emitter blows Check to make sure the emitter is
plugged into an emitter port and not
the All or Blaster port.
If using the ALL output on PX-600 then remove cover
and set jumper to emitter @ location P120. If using
an MRX Blaster output then install in line with the
emitter a 100Ohm ¼ watt %5 resistor to shunt the
voltage.
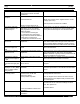
Page Doorbell Module
chimes constantly.
Check header settings.
Check trigger wiring.
Insure door station is powered.
If using one Panasonic door station only the si9ngle
trigger input should be configured for this device. The
other header should be set for contact closure or
voltage trigger.
MRX fan always runs. Check thermo couple on amplifier
heat sink.
If always closed then replace.
MRX fan never runs. Check thermo couple on amplifier
heat sink.
Check fan windings.
If always open replace.
LED source indicator
changes on keypad but
audio does not follow
change.
Check DIP Switch settings.
Check data bus wiring.
Use correct settings for system and zone.
Correctly connect wiring.
IR input on keypad does
not respond to
commands issued from
hand held IR remote.
Check DIP Switch 9
Does the remote have good
batteries?
To enable IR put DIP switch 9 in the down position.
Replace batteries in remote.
PX-603 room does not
come on.
Check DIP Switch settings on KPS or
PX-603.
Check data bus wiring.
Check PX-600 software
Use correct settings for system and zone and room.
Correctly connect wiring.
PX-600 software to work w/ PX-603 is Ver. 2.04.
PX-603 KPS keypad
controls main room (0)
and not the attached
room.
Check DIP Switch settings on KPS or
PX-603.
Check data bus wiring.
Check PX-600 software
Use correct settings for system and zone and room.
Correctly connect wiring.
PX-600 software to work w/ PX-603 is Ver. 2.04.
KP3 keypad does not
function.
Check data bus wiring. Data wires are 6 conductor and must be home run to
PX-603. This is a one to one connection.
KP3 keypad lights up but
controls the wrong room.
Check data bus wiring.
Check DIP switch settings on back
panel of PX-603
Use correct settings for system and zone and room.
Correctly connect wiring.
PX-600 software to work w/ PX-603 is Ver. 2.04.
PX-603 has no output. Check feed to PX-603 from PX-600.
Check speaker connection.
Check speaker continuity.
Check AC power.
Use Zone output from PX-600.
Check continuity of interconnects from PX-600 to PX-
603.
Connect speaker.
Replace speaker or wiring as necessary.
The PX-603 requires constant power and should not
be plugged into the PX-600 switched outlet.