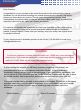
QUALITY, RELIABILITY, & PURE BLISS INTAKE SERIES CLASS D AMPLIFIER A6005DN / A8005DN / A12005DN OPERATING INTSTRUCTIONS PLEASE RETAIN MANUAL FOR FUTRE USE AND REFERENCE
The Audiobahn Way To bring the product to market that excites the consumer through sound and vision from an orientation of integrity and customer service. We make you look as good as you sound. We strive to take car audio to an extreme the world has never seen, and a world that never stops evolving.
Table of Contents Table of Contents Introduction 3 Features and Specifications 4 Control and Functions 5-11 High Level Input Wiring 12 Planning / Mounting Your System 13 Wiring Diagrams 14 Adjustments and Tunning 15 Trouble Shooting 16 Warrning / Disclaimer 17 Warranty 18-19 2
Introduction Dear Customer, Congratulations on your purchase of the worlds finest brand of car audio products. Here at Audiobahn Inc. we are devoted to making our musical reproduction the vert best, and we are pleased you have chosen our product. Through years of engineering expertise, hand craftsmanship, and critical testing procedures, we have created a wide range of products that reproduce music with all the clarity and richness you deserve.
Class D Power Amplifier 2 Ohm Stable RCA (Low Level) and Speaker (High Level) Inputs RCA Outputs Mono Output Input Sensitivity: 200mV ~ 8V THD: <0.
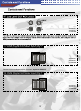
Patent: DES 423,503 5 REM 3 2 POWER 14 POWER GND 11 12 DVM REMOTE +18dB 4 BATT 13 0 BASS BOOST 50 7 150 LPF 6 LPF FULL X-OVER 15 60 8 1 ON SUB SONIC OFF 5 MIN 10 R R 9 L LOW INPUT LINE OUT REG AND WILSON ROCK +L-G-R- LEVEL INPUT L MAX LEVEL Controls and Functions A6005DN A8005DN A12005DN ��
Controls and Functions Controls and Functions 1. Speaker Terminals A6005DN A8005DN A12005DN These chrome plated connectors can accept from 16 to 8 gauge wire. Be careful to observe proper polarity when connecting the cables 2. B - Terminal (Chassis ground) POWER GND REM BATT A6005DN A8005DN A12005DN To avoid unwanted ignition noise caused by ground loops, it is essential that the amplifier be grounded to a clean, bare, metal surface of the vehicles chassis.
Controls and Functions Controls and Functions 4. B+ Terminal (Battery Positive) POWER GND REM BATT A6005DN A8005DN A12005DN Due to the power requirements of the amplifier, this connection should be made directly to the positive (+) terminal of the battery. For a safety measure, install an in-line fuse holder (not included) as close to the battery positive (+) as possible with an ampere rating not to exceed the total value of fuses in the amp. 5.
A6005DN A8005DN A12005DN SUB SONIC ON 15 60 OFF A6005DN A8005DN A12005DN 6 9 A6005DN A8005DN A12005DN 8
0 A6005DN A8005DN A12005DN 11. DVM (Digital Volt Meter Input) Fig 1 DVM REMOTE A6005DN A8005DN A12005DN Remote Control for Digital Display Voltmeter: Optional ADM100T 12.
Controls and Functions Controls and Functions Bass Boost Control (MIN / MAX) : Optional ABR100T 13. Bass Boost Switch and Variable Crossover BASS BOOST 0 +18dB Bass Boost Switch: ON and OFF A6005DN A8005DN A12005DN Bass Boost Variable: 0dB - 18dB 14. LED indicator (Status) POWER A6005DN A8005DN A12005DN -PWR (Power) : This BLUE LED will illuminate when the amplifier is turned "ON". If it fails to illuminate, check the power connections to the amplifier and fuses.
Controls and Functions Control and Functions Fig 1. LINE CORD Optional Remote Digital Volt Meter : ADM-100T Fig 2. LINE CORD Optional Remote Bass Boost Control : ABR-100T MIN DES.
High Level Input Wiring If the HIGH LEVEL INPUTS are used, do not use the low level RCA inputs at the same time A6005DN A8005DN A12005DN ����� � �� � � ��� ��� ���������� ������������ ����� ���������� HIGH INPUT +L-G-R+ ��� L+ LCHASSIS GND RR+ DES.
Planning and Mounting Your System Planning Your System Before beginning the installation, consider the following: a. If you plan to expand your system by adding other components sometime in the future, ensure that adequate space is left, and cooling requirements are met. If your radio/source is equipped with Pre-Amp outputs, it is possible to utilize them to drive an Amplifier and connecting (amplifier) to the 2 rear speakers. Then, use the built-in power of your radio to drive the 2 front speakers.
Wiring Diagrams A6005DN A8005DN A12005DN MONO MODE SUBWOOFER 2~8OHM : CAPACITOR HIGH PASS FILTER : INDUCTOR LOW PASS FILTER 14
Adjusting and Tuning TURNING ON THE AMPLIFIER The amplifier automatically turns on a few seconds after you turn your vehicle's ignition switch to ACC or turn on your auto sound system (depending on how you have wired the system). The POWER indicator on the top of the amplifier illuminates when the amplifier is on. Important: Your amplifier requires 30 amps or more of power from your vehicle's battery during operation.
16
���������������������������������������������������� Warning / Disclaimer WARNING Investigate the layout of your automobile thoroughly before drilling or cutting any holes. Take care when you work near gas tanks, gas lines, hydraulic lines, and electrical wiring. Do not use the power amplifier unmounted. Attach the system securely to the automobile to prevent damage, particularly in the event of an accident.
Warranty ���������������������������������������������������� Audiobahn Consumer Product Warranty Policy Audiobahn products are manufactured with the highest quality components and some of the most advanced technology available. Because of this, we recommend that you have your new products installed by an Authorized Audiobahn Dealer. (A list of Authorized Audiobahn Dealers can be found on our web page). Warranty Period: One year from the original date of purchase.
������������������������������������������������������� Warranty Continued How to receive warranty service: Contact your local Authorized Audiobahn Dealer, or call Audiobahn at (800) 488-8595 between the hours of 9:00 AM and 5:00 PM PST. If you are having problems with your system, we recommend you check the product carefully and thoroughly to confirm that the product truly has a manufacturer defect; as opposed to abuse, or other components in the system causing the failure.