By AMPP210H / AMPP212H OWNER’S MANUAL
Contents of Carton • • • • • • • Amplifier Enclosure Warranty Card Amplifier Wiring Kit Remote Bass Knob Sticker Operations Manual 1. Make sure to carefully read and understand the instructions before attempting to install your new Audiobahn tube. 2. Before making any electrical connection, make sure that you disconnect the battery’s ground cable to prevent the possibility of short circuit or damage to your electronic equipment. 3.
Mounting & HI LEVEL INPUTS The mounting position of your Party Pack will have a great effect on the sound performance produced. TRUNK MOUNTING Mounting the enclosure in the trunk provides a good overall performance. PASSENGER COMPARTMENT MOUNTING Mounting the enclosure in the passenger compartment provides optimum sound, but reduces the area for passenger seating. LOADING Facing the enclosure towards a wall will increase the low frequency sounds.
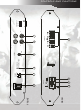
REAR FRONT 2 GND 3 REM POWER 10 REMOTE 4 BATT 9 ON OFF PHASE 8 FUSE PROTECTION POWER MIN 5 MAX LEVEL R L LCH LOW INPUT 1 SPEAKER 6 7 RCH R L LINE OUT RJP Designs +R- G - L+ HIGH INPUT Controls And Functions
Controls And Functions 1. Speaker Terminals SPEAKER These chrome plated connectors can accept from 16 to 8 gauge wire. Be careful to observe proper polarity when connecting the cables 2. B - Terminal (Chassis ground) POWER GND REM BATT To avoid unwanted ignition noise caused by ground loops, it is essential that the amplifier be grounded to a clean, bare, metal surface of the vehicles chassis. Note: GROUND WIRE SHOULD NOT BE EXTENDED MORE THAN 3 FT. (1 METER) 3.
Controls And Functions 5. Input Sensitivity Adjustment MIN MAX This control adjusts the amplifier's sensitivity to match the signal strength coming from the source unit. Input sensitivity is variable from 200 Millivolts to 8 volts. Clockwise increases sensitivity. Counterclockwise decreases sensitivity. THE KNOB IS NOT A VOLUME CONTROL. A lower signal level will require increased sensitivity for full power. A higher signal will require decreased sensitivity. 6.
Controls & Functions 9. Phase Shift control 10. Remote Bass Knob Port REMOTE Bass Boost Control (MIN / MAX) : Optional REMOTE BASS BOOST KNOB Mounting and Installation 1. Using the screws provided with the kit, find a location under the dash, center console, or a place that gives easy access to the remote bass boost knob. 2. Plug in the supplied cord into the back of the bass boost knob. Adjusting the Level To adjust the level setting, first turn the amplifier gain all the way down.
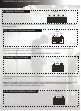
Specifications Model Number AMPP210H AMPP212H Power RMS 600 Watts 800 Watts Achievable Power 1200 Watts 1600 Watts Frequency Response: 28Hz-1kHz 26Hz-1kHz Enclosure Dual 10” Dual 12” Enclosure Dimensions: Height: 15.25” 15.5” Width: 28.25” 31.62” Length: 15.5” 15.
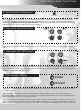
Troubleshooting SYMPTOMS NO SOUND AMP NOT SWITCHING ON Is the power LED illuminated ? ( NO ) Check fuses in amplifier. Be sure Turn-on lead is connected Check signal leads. Check gain control. Check Tuner/Deck volume level. Clean contacts on fuse holders. Is the Diagnostic LED illuminated ? ( YES ) Check for speaker short or Amplifier overheating. No power to power wire Repair power wire or connections. No power to remote wire with receiver on Check connections to radio.