TRAY LOADED MULITI-FORMAT DVD PLAYER WITH REMOTE AVDVD10P
Table of Contents Table of Contents INTRODUCTION 3 WARNINGS 4 INSTALLATION 5 FEATURES 6 SAFETY INFORMATION 6 CLEANING DISCS 6 CONTRASTS BETWEEN DISC TYPES 7 SUPPORTING FUNCTIONS OF DISC 8 OPERATION AND USE 8 FRONT PANEL DIAGRAM 9 BACK PANEL DIAGRAM 10 SYSTEM CONNECTIONS 10 REMOTE CONTROL DIAGRAM 12 BUTTON LOCATIONS AND FUNCTIONS 13 ADVANCED SETUP 16 PLAYING MP3 FILES 19 VIEWING KODAK PICTURE CDs 20 TROUBLESHOOTING 21 SPECIFICATIONS 22 WARNING / DISCLAIMER 23 WARRANTY
Warnings WARNING: DANGEROUS HIGH VOLTAGES ARE PRESENT INSIDE THE ENCLOSURE. TO REDUCE THE RISK OF FIRE OR ELECTRIC SHOCK, DO NOT OPEN THE CABINET. REFER SERVICING TO QUALIFIED PERSONNEL ONLY. ATTENTION: TO PREVENT ELECTRIC SHOCK, MATCH WIDE BLADE OF PLUG TO WIDE SLOT, FULLY INSERT. LASER: This Digital Video Disc Receiver employs a Laser System. To ensure proper use of this product, please read this owner ' s manual carefully and retain for future reference.
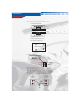
Installation The device has 2 Pcs mounting hardware and 4 Pcs screws. 1. Fix the unit horizontally. The device Fixed face 2. Hang the unit. Fixed face The device 3. Fix the 4 Pcs screws. NOTE: Must attach the device well. 4. The positions of rubber foot. Bottom of the device 5. Connecting with power. DC+ NOT USED DC+ GND˄-˅ Put the square plug into socket (note the direction of the lug when connecting) and connect RED cable with VBAT 'S +, black cable VBAT'S- or ACC'S- and yellow cable with ACC'S+.
Features / Safety / Cleaning Safety Information Features 10-bit video D/A converter, 96KHz/24bit audio D/A converter, Dolby AC-3 decoder, DTS digital Output. Do not expose the system to excessive moisture, rain, sand, or heat sources. Place the CAR DVD Player on a firm, flat surface. Keep the CAR DVD Player away from domestic heating equipment and direct sunlight. When placing the CAR DVD Player in a cabinet, allow about one inch of space all around the CAR DVD Player for ventilation.
Contrasts Between Disc Types DVD Recording Capacity Digital/MPEG2 One side, mono layer 4.7GB Double layer Mono layer, Mono side, 8.5GB double Side, Double sides, double layer, 9.
Supporting Functions / Operation Supporting function of disc DVD discs can support many functions, different makers, and different function support. Prevalent marks of a few functions as follows: ALL NTSC zone code & TV system N T S C DOLBY digital surround sound Numbers of sound language 2 16:9 R Numbers of subtitle language LB RESTRICTED Picture scale mode Parental lock 4 View angle CC Close caption (Only NTSC) Operation and Use 1ǃConnect the DVD Player directly to the LED or Monitor.
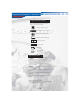
1 2 1. 2. 3. 4. 3 4 PLAY/PAUSE Power button Earphone output jack Infrared I.R. Play/pause button POWER EARPHONE 10 5. Stop button 6. Skip button 7. External A/V input 8. Eject button 5 STOP 9 6 SKIP 7 AUDIO 9. DVD disc holder 10.
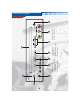
6. Power jack 3. Left and right surround output jack 5 5. RF input(option) 4 2. Video output jack 3 4. Coaxial output jack 2 1.
YELLO W VIDEO WHITE AUDIO R Connect with the A/V devices that have COAXIAL input. L RE D LCD or Monitor A/V input O 3.5mm STOP O 3.
Remote Control Diagram 14.Title 15.Mute 16.FB, FF 17.PREV, Next 18.Stop, Pause Play 19.Root 20.Zoom 21.A-B 22.Volume 23.Repeat 24.Angle 25.Subtitle 1. STANDBY 2. DVD 3. TV(option) 4. OSD 5. Shuffle 6. Numeral buttons 7.Goto 8. Clear 9. Step 10.Program 11.Slow 12.Setup 13.Curser Control/ ENTER 26.AV 27.PBC 28.Open/Close 29. Language 30 . Resume 31 . L/R 32 . N/P Using the Remote Control Unless stated otherwise, the remote control can operate all the features of the DVD Player.
Button Locations and Functions 1. STANDBY : Use this to turn the CAR DVD player on and off for normal use. 2. DVD˖Press DVD key, shuffle to DVD mode. 3. TV˖Press TV key, shuffle to TV mode. 4. OSD : When playing a DVD, p ress once to show an o nscreen d isplay of the current title and chapter, press again to dispaly the remaining time. Press a third time to display chapter elapsed time. Press a fourth time to display chapter remaining time. A fifth pess will turn the On Screen Display off.
Button Locations and Functions Press Play button to play in the turn that you program. Press STOP and PROGRAM button to exit program play. Press CLEAR button to last enter while programming. MP 3 programming refers to page 15. 11.SLOW: Press SLOW button continually, the playing mode will circle within SF 2X, SF 4X,SF 8X, SR 2X, SR 4X, SR 8X and normal play(for DVD disc). The playing mode will circle with in SF 1X, SF 2X, SF 3X and normal play(for SVCD/VCD disc). 12.
Button Locations and Functions 21.A-B: Repeats a user-defined section of a DVD, VCD, CD. Press the button once at the start of the section you wish to repeat, press it again at the end of the selection. Press the button again to cancel A-B repeat. 22.VOLUME: Press to adjust volume level from 00 (Minimum) to 16 (Maximum). The level is displayed on the OSD. 23.
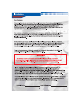
Advanced Setup 1. MAIN PAGE In STOP mode, press the SETUP key to display the MAIN PAGE of the setup menus. Use the UP(¡Ä ) and Down(¡Å ) buttons to move the cursor. Use ENTER buttons to enter the menu. Cho ose EXIT SETUP and exit setup menu. (Press the SETUP button at any time to exit the setup menu) SETUP M E NU--MAIN PAGE GENERAL SETUP SPEAKER SETUP AUDIO SETUP PREFERENCES EXIT SETUP 2. GENERAL PAGE Select your TV type, Pic Mode, turn angle mark on/off , and select the On Screen Display language.
Advanced Setup 3. GENERAL PAGE SPEAKER SETUP PAGE DOWNMIX MAIN PAGE LT/RT: Sends the Left and Right channels of the 5.1 channel surround mix to the main left and right outputs. STEREO: Stereo remixes all of the main channels to the two stereo channels. 4.AUDIO SETUP Select the input and output formats, SPDIF OUTPUT setting, and Compression options. AUDIO SETUP SPDIF OUTPUT DUAL MONO COMPERESSION LPCM OUTPUT MAIN PAGE SPDIF OUTPUT: Leave on Analog (default) to use the conventional 5.1 output.
Advanced Setup 4. PREFERENCES PAGE This is where you can select language options, TV or LCD standards, and Parental Controls. AUDIO SETUP TV DISPLAY TV TYPE AUDIO SUBTITLE DISC MENU MAIN PAGE TV DISPLAY: If you have a widescreen TV or LCD (16:9 Aspect Ratio) select WIDE . If you have a conventional 4:3 TV select either of the NORMAL options. Disc video normal TV set screen scale 4:3 pan scan letter box 16:9 4:3 16:9 TV TYPE: Set to match your TV. In the USA the TV standard is NTSC (default).
Playing MP3 Files 1.When figure below appears , you can use direction button + Enter button or numerical buttons to select the directory or MP3 song file. If you can select a directory, or can enter it, or select song file, you can play it. Also you can use direction button to set play mode. SMART NAVI ROOT MP3 PICTURE MP3 MP3 MP3 MP3 MP3 0 1 2 3 4 5 2.If you to want change directory or set new play Mode, please stop play , then select new directory or set new play mode.
Viewing Kodak Picture CDs When a directory is selected in the play mode window, each picture in the current directory will be displayed consecutively in a slide shpw fashion and will be scaled to fit in the TV screen. SMART NAVI ROOT MP3 PICTURE 0 1 2 3 4 5 Image Rotation There are four modes to rotate a picture: Invert, Mirror, Left, and Right. These operations are allowed only when a picture is being displayed normally and will be cancelled automatically when a new picture is displayed.
Troubleshooting If you meet the following problems, you can try the following methods first, if failure still exists, please resort to professionals for repairing: 1.Please confirm to firm connection between the unit & other systems such as amplifier & Tvor LCD set. 2.Please confirm that TV set & amplifier operate regularly. No picture 1. Please confirm a firm connection between the unit & other systems such as TV set etc. 2. Please confirm that TV set is operating regularly.
Specifications General Voltage: DC12-24V Power consumption: 10W Dimensions:215mmX180mmX50mm Weight:1.2Kg Operation Temperature: 5-40 C Operational relative humidity: 15-75% DVD Compatible with: DVD, SVCD VCD1.0/1.1/2.0, CDDA, MP3, CD-G(only audio) CD-R, CD-RW Kodark picture CD. Composite input: CVBS 1.0Vp-p 75 ohms Composite output: CVBS 1.0Vp-p 75 ohms Audio Input: 0.5-2V Audio output: 0.
23
24
Technical Assistance (800)488-8595 /tech@audiobahninc.com Warranty Continued How to receive warranty service: Contact your local Authorized Audiobahn Dealer, or call Audiobahn at (800) 488-8595 between the hours of 9:00 AM and 5:00 PM PST. If you are having problems with your system, we recommend you check the product carefully and thoroughly to confirm that the product truly has a manufacturer defect; as opposed to abuse, or other components in the system causing the failure.