
Owner's Manual


Quick Start
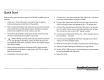
Here are a few general steps
to
get
your
ACM-4.300
amplifier up and
running:
1.
Undo
the+
12V and Ground connections
to
the car battery
before making any connections
to
the amplifier.
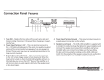
2.
Pick a
mounting
location
that
will provide
access
to
the
controls
and connections, provide plenty
of
good
ventilation, and also
protect the amplifier from heat, moisture, and dirt.
3.
The
ACM-4.300 amplifier needs
to
be securely mounted using
the
four
mounting
holes located in each corner.
4.
A\
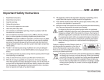
Before drilling any holes, take every precaution
to
prevent
~
any damage
to
fuel lines, power and other electrical wir-
ing, hydraulic brake lines, and other systems,
that
might
compro-
mise vehicle safety.
5.
When making connections, designate red
RCA
plugs
as
right,
and designate white, black, or grey plugs
as
left. This
is
a good
idea for consistency.
6.
Use
quality interconnect cables.
7.
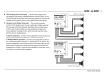
Connect
the+
12V
input
terminal
of
the
unit
to
the+
12V termi-
nal
of
the vehicle battery, using 8
to
4
AWG.
8.
Connect
the
Ground terminal
of
the
unit
to
the chassis
of
the
vehicle, using
the
same wire gauge
as
the+
12V
power wire.
9.
Connect
the
remote power terminal
of
the
unit
to
the
remote
turn-on switch
of
your source unit. Alternatively, you
can
skip
this connection and
use
the
GTO™
Signal sensing.
1
0.
Connect
your audio inputs
to
the
unit-
either speaker-level or
line-level
RCA
...
not
both.
11.
Connect
your loudspeakers (minimum impedance
of
2
Ohms
stereo, or 4
Ohms
bridged mono).
12.
When all connections are made, reconnect the vehicle battery.
13.
Adjust your gain settings
to
maximise your signal level.
14.
Set
the
ACM-4.300
crossovers
to
the
frequency recommended
by
the
loudspeaker manufacturer.
15.
Enjoy
the
drive!
AudioContiPOI®
Making Good Sound Great""
7