
User Manual


-----------------------------------------------10 ----------------------------------------------
5. Signal Delay Mode: This allows the user to put the DQDX into
Set-Up mode and adjust the signal delay sengs using the dash
control. See page 25 for details on seng this up.
6. Ground: Connect to a good, veried chassis ground (the baery
is the best possible locaon.) Since factory ground wires typically
have mulple devices connected to them and could cause ‘Noise’
in the audio system, we would recommend to NOT use factory
ground wires or locaons.
7. +12V Power: Connect to a good source of 12-Volt power. Be sure
to use a fused connecon that does not exceed 2 Amp. Doing so
may damage your DQDX.
8. Remote In: This is the ‘on’ and ‘o’ selector for your DQDX. Con-
nect this wire directly to your source unit 12Volt trigger wire. If
your source unit is not equipped with a 12 Volt trigger wire then
nd a reliable source in the vehicle that comes on when the key
is in the ‘On’ posion and turns o when the key is in the ‘O’
posion.
9. Remote Out: Connect the 12 Volt turn on lead for your aermar-
ket ampliers directly to this connecon and not to any other.
This is crical to eliminate any ‘clicks’ or ‘pops’ during power up
and power down cycles.
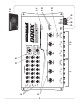
10. Maximized Indicators: These brightly colored LEDs indicate when
the signal level coming into and going out of your new DQDX
is just below clipping. When properly level matched with your
source unit these LEDs should just barely ‘icker’ occasionally
when your system is playing at its maximum volume level. Please
refer to the secon on Level Matching, page 24 for a more de-
tailed step by step process (trust us…. this one is important!)
11. Power: If you have connected all of your power wires correctly,
this LED should be bright red when your system is on and ready
to go!