
User Manual


----------------------------------------------- 5 -----------------------------------------------
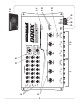
Quick Installation Information
If you are a seasoned audio enthusiast and are chomping at the bit
to begin your experience with the DQDX, we oer some Quick Install
Guidelines below to help maximize your experience. Please also refer
to the system diagram examples on page 14, 15, and 16.
1. Physically mount the DQDX in a locaon that keeps it away from
beverage spills, food crumbs, and curious ngers. You will want
to select a locaon that allows you access to the top panel con-
trols.
2. The DQDX needs to be installed in the signal path between
your source unit (or as some may call it, “Your Radio”) and an
aer-market amplier(s)..
Note: If your source unit has front, rear, and subwoofer RCA Line
Level outputs, connect them to the corresponding inputs on your
DQDX. If your source unit has only front and rear inputs fear not!
Just connect these to the front and rear inputs on the DQDX and
switch the “Sub to Front” jumper to the ON posion. There is a
more detailed descripon of the jumpers located under the cov-
er in the secon tled “Under The Cover”. Changing this jumper
to ON will route the low pass signal (as dened by your crossover
selecon) to the Sub outputs of the DQDX.
3. Use RCA connecng cables to connect the RCA outputs of the
DQDX to your aer market amplier(s). If this is not obvious to
you, quickly pack up your DQDX and run to your nearest autho-
rized AudioControl dealer to have them perform the installaon.
You will thank us later.
4. Connect +12 volt power, ground and turn-on wires as needed.
Don’t forget the fuse!