
Owner's Manual


9
Installation Manual
SAVOY G4
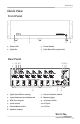
Front Panel
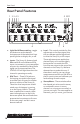
Front Panel Features
1. LED – On the far left of the heavy duty
brushed aluminum front panel, this
LED indicates the state of the Savoy
G4 amplier.
A Blue LED – shows that the amplier
is on and will drive your speakers when
the source is played.
A Red LED – shows that the amplier
is in standby mode, and will not drive
the speakers (hit the power button to
make it blue).
No LED illumination – means that it’s
either unplugged from wall power or
the back panel mains power switch is
turned o, or all the lights are out in
your town again.
Yellow LED – indicates initiation of
jump to hyperspace. You have ten
seconds to put the cat out, and leave
a note for the milkman. (Not yet
available in this galaxy.)
2. Light bar – This front panel blue
light bar is mined directly from
the R Coronae Australis Nebula.
The brilliance of this light can be
customized via a button on the back
panel.
3. Power Button – This large legendary
button allows for the on/standby mode
to be toggled. Press to turn the unit on
and press again to turn the unit into
standby mode. The rear panel Main AC
Power switch must be engaged for this
button to work.
4. RackMountEars– These optional
rack ears allow the unit to be rack
mounted in a standard 19” wide rack,
with a 3U height. Use standard rack
mount screws and washers to secure
the unit in a rack. The unit does not
have to be supported at the rear if the
rack is located in a xed location.
To remove the rack ears (making the
unit 17” wide), rst unplug the power
cord, and then locate and undo the
screws securing each ear to the side
of the chassis, and remove the ears.
Replace the screws securely back into
the chassis. Do not remove any of the
other screws from the chassis or top
cover. There are hazardous voltages
inside the unit. Keep the rack ears
safely tucked up in your sock drawer.
You can also remove the feet for rack
mounting, but remember to put them
back on if you are no longer in a rack.
12 43