TAM838 Digital answering machine User guide
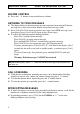
AUDIOLINE TAM838 CONTENTS LIST OF CONTENTS Connecting Location of controls . . . . . . . . . . . . . . . . . . . . . . . . . . . . . . . . . . . . . 1 Parts list . . . . . . . . . . . . . . . . . . . . . . . . . . . . . . . . . . . . . . . . . . . . . . . 2 Connecting . . . . . . . . . . . . . . . . . . . . . . . . . . . . . . . . . . . . . . . . . . . . 2 Switching ON/OFF . . . . . . . . . . . . . . . . . . . . . . . . . . . . . . . . . . . . . . 2 Setup Recording of outgoing message . . . . . . . . . .
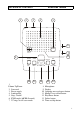
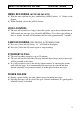
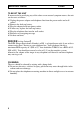
LOCATION OF CONTROLS 1 2 AUDIOLINE TAM838 3 5 4 6 ON/OFF STOP Volume 7 8 9 REPEAT MEMO DELETE SKIP PLAY/PAUSE ANNC/ DAY 10 2 WAY/ HOUR MIN 11 12 1 Volume Up/Down 2 Line cord 3 Power supply 4 Loudspeaker 5 Stop - On/off 6 ICM Length (60/300 Seconds) 7 2/7 rings or toll saver mode 8 9 10 11 12 13 14 TIME SET/CHECK 13 14 Microphone Display Outgoing message/repeat button Memo/2-way record button Play/Pause button Delete button Time set/skip button 1
AUDIOLINE TAM838 INSTALLATION PARTS LIST In the box you should find the following items: # # # # TAM838 (with line cord and power supply) Remote control card User guide Guarantee card Please contact your retailer, if an item is missing or damaged. CONNECTING # Plug Power supply into a 230/240 volt mains outlet. # Fit a 9V Alkaline backup battery (Display flashes “Lo” if battery is low or not fitted). # Connect telephone line cord to a telephone socket.
SETUP AUDIOLINE TAM838 OUTGOING MESSAGE (OGM) The system has a built in announcement message. “Hello please leave a message after the tone”. You can use this message or record your own. To record your own announcement message: # Ensure the machine is switched on. # Press and hold the [ANNC/DAY] button, display shows “A1”. # After a beep tone record your message (maximum: 30 seconds). # When finished, release [ANNC/DAY] button, your greeting will now replay.
AUDIOLINE TAM838 USING THE ANSWERING SYSTEM VOLUME CONTROL # Press the • – buttons to increase/decrease volume. LISTENING TO YOUR MESSAGES # # # The display flashes to show how many new messages have been received. If no new messages have been received the display shows total messages (old). Press [PLAY/PAUSE] to listen to your new messages (when NEW messages have been played, press [PLAY/PAUSE] again to play all messages).
USING THE ANSWERING MACHINE AUDIOLINE TAM838 MEMO RECORDING (NOTE PAD FACILITY) # With the unit switched on, press and hold the [MEMO] button, “r1" flashes in the display. # When finished, release the [MEMO] button. VOICE-CONTROL # The unit will record for as long as the caller speaks, up to the maximum time of 300 seconds per message (user selectable 60/300sec). If a caller stops talking or there is silence, the unit will disconnect the line after approximately 7 seconds.
AUDIOLINE TAM838 USING THE ANSWERING MACHINE REMOTE CODE # A three digit code is located on the bottom of the unit. Please make a note of this and keep it in a safe place. SWITCHING ON REMOTELY If you did not turn your TAM838 on prior to leaving home, you can do so remotely: # Call your telephone number (from a tone dialling telephone). # After 16 rings the machine will answer and beeps will be heard # Enter the 3-digit remote code. # Two short beeps will be heard, enter 7 # and the unit will switch on.
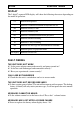
OTHER AUDIOLINE TAM838 DISPLAY The 2-digit/7 segment LED display will show the following characters depending on the mode of operation: Cr Initialisation process -- Indicates OGM not recorded or day/time not set Lo Indicates battery is low FL Indicates Memory full A1 Indicates Announcement/Record playback r1 Indicates Memo recording r2 Indicates 2-way recording 00 Indicates no message but announcement recorded P Indicates pause in playback mode No display Indicates answer off.
AUDIOLINE TAM838 OTHER TO RESET THE UNIT If unsuccessful in rectifying any of the above or an unusual symptom occurs, the unit can be reset as follows: # Unplug the power adaptor and telephone line from the power outlet and wall socket. # Remove the back-up battery. # Plug the adaptor back into power socket. # If necessary replace the back-up battery. # Plug the telephone line into the wall socket. # Record a new outgoing message # Set date and time.
OTHER AUDIOLINE TAM838 GUARANTEE If you believe your TAM838 is malfunctioning, please refer to the relevant section and/or consult the troubleshooting guide in this manual to ensure that you have followed the instructions carefully. The TAM838 is guaranteed for a period of 12 months from the date of purchase. In the unlikely event of a fault during this period, please contact us for assistance.
10