Schnurloses digitales DECT-Telefon Cordless digital DECT telephone Bedienungsanleitung Operating Instructions DECT 4500
DECT4500 Bedienungsanleitung _______3 User Instructions _________45 2
- Inhaltsverzeichnis 1 2 3 3.1 3.2 3.3 3.4 3.5 4 4.1 4.2 4.3 4.4 4.5 4.6 4.7 4.8 4.9 4.10 4.11 4.12 4.13 4.14 4.15 5 5.1 5.2 5.3 5.4 5.5 5.6 5.7 5.8 Allgemeine Hinweise ................................................................. 5 Bedienelemente ......................................................................... 7 Inbetriebnahme .......................................................................... 8 Sicherheitshinweise....................................................................
- Inhaltsverzeichnis 6 6.1 6.2 6.3 7 7.1 7.2 7.3 8 8.1 8.2 8.3 8.4 8.5 8.6 8.7 8.8 8.9 8.10 8.11 8.12 8.13 8.14 9 9.1 9.2 9.3 9.4 9.5 9.6 Rufnummernanzeige (CLIP) ....................................................22 Die Anruferliste.................................................................................... 23 Einzelne Rufnummer der Anruferliste in das Telefonbuch speichern.............................................................................................
- Allgemeine Hinweise - 1 Allgemeine Hinweise Bitte lesen Sie diese Bedienungsanleitung sorgfältig durch. Bei eventuell auftretenden Fragen, wenden Sie sich bitte an unseren Service unter der ServiceHotline 0180 5 00 13 88 (Kosten Telekom bei Drucklegung: 12ct/min). Öffnen Sie das Gerät in keinem Fall selbst und führen Sie keine eigenen Reparaturversuche aus. Bei Gewährleistungsansprüchen wenden Sie sich bitte an Ihren Fachhändler.
- Allgemeine Hinweise Aufstellort - Am Aufstellort muss sich eine Netzsteckdose 230Volt befinden. Stellen Sie die Basisstation nicht in die unmittelbare Umgebung von anderen elektronischen Geräten wie z. B. Mikrowellen oder HIFI-Geräten, da es sonst zu gegenseitiger Beeinflussung kommen kann. Der Aufstellort hat einen entscheidenden Einfluss auf einen einwandfreien Betrieb des Telefons. Stellen Sie die Basisstation auf eine ebene und rutschfeste Fläche.
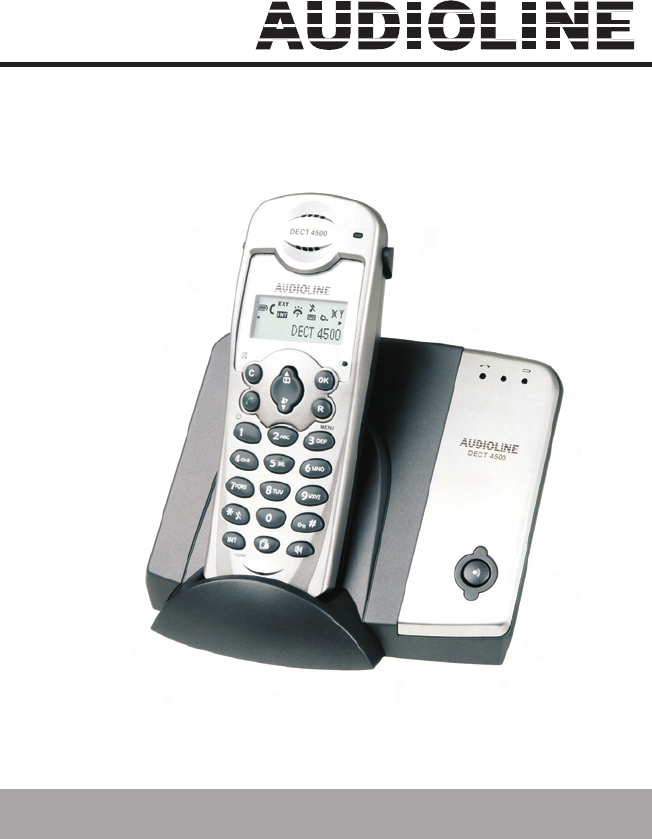
- Bedienelemente - 2 Bedienelemente 1 DECT4500 1. Ruf-, Gesprächsanzeige, blinkt bei neu aufgezeichneten Nachrichten 2. Telefonbuch/Auswahltaste 3. Wahlwiederholung/OK-Taste 4. Menü/R-Signaltaste 5. Anruferliste CLIP/Auswahltaste 6. Tastatursperre 7. Freisprechen 8. Sondertelefonbuch 9. Interne Gespräche/Konferenz 10. Klingel Ein-Aus 11. Gesprächstaste/Ein-Aus-Taste 12. Stummtaste/Abbrechen 2 12 3 4 11 5 10 6 9 7 8 1 1. 2. 3.
- Inbetriebnahme - 3 Inbetriebnahme 3.1 Sicherheitshinweise ACHTUNG! Lesen Sie vor der Inbetriebnahme unbedingt die allgemeinen Hinweise am Anfang dieser Anleitung. 3.2 Verpackungsinhalt prüfen Zum Lieferumfang gehören: eine Basisstation ein Mobilteil mit Gürtelclip ein Telefonanschlusskabel 3.3 ein Steckernetzteil zwei Standard-Akkus eine Bedienungsanleitung Basisstation anschließen Stellen Sie die Basisstation in die Nähe Ihrer Telefonanschlussdose und einer Netzsteckdose auf. 1.
- Inbetriebnahme Standard-Akkus einbauen AAA + AAA Um die mitgelieferten wiederaufladbaren Standard-Akkus in das Mobilteil einzulegen, drücken Sie auf den Batteriefachdeckel am oberen Rand und schieben Sie ihn nach unten. Legen Sie nun die Batterien ein und achten Sie auf die richtige Polung. Schließen Sie den Batteriefachdeckel. + 3.4 Wichtiger Hinweis: Stellen Sie das Mobilteil mit dem Display nach vorne für mindestens 16 Stunden auf die Basisstation.
- Bedienung - 4 Bedienung 4.1 Das Display 1 2 3 4 5 6 7 8 9 9 1 2 => => Entladen. 6 Blinkt: Sie erhalten ein externes Gespräch. Leuchtet: Sie führen ein externes Gespräch. Blinkt: Sie erhalten ein internes Gespräch. Leuchtet: Sie führen ein internes Gespräch. (Nur bei mehreren Mobilteilen) Eine neue Rufnummer wurde in der Anruferliste CLIP gespeichert oder Sie befinden sich gerade in der Anruferliste. Die Klingelmelodie ist ausgeschaltet. 7 Das Mikrofon ist ausgeschaltet.
- Bedienung 4.3 1. 2. 3. Anrufe führen Geben Sie die gewünschte Telefonnummer mit max. 18 Stellen über das Tastenfeld ein. Die gedrückten Zahlen werden im Display angezeigt. Werden mehr als 16 Zahlen gedrückt, erscheint die Anzeige am linken Displayrand und es werden die letzten 16 Zahlen angezeigt. und die gewünschte Verbindung wird Drücken Sie die Gesprächstaste hergestellt. Während eines Gesprächs wird die Gesprächszeit im Display in Minuten und Sekunden angezeigt.
- Bedienung 4.6 Wahlwiederholung Die Wahlwiederholung nutzen Sie, wenn der angerufene Teilnehmer besetzt ist oder sich nicht meldet. Ihr Telefon speichert die letzten 10 Rufnummern mit max. jeweils 18 Zahlen. Sobald die Liste voll ist, wird immer die älteste Rufnummer aus der Liste gelöscht. 1. 2. Drücken Sie die Taste und die zuletzt gewählte Telefonnummer wird im Display angezeigt. Wählen Sie mit den Auswahltasten die gewünschte Rufnummer und drücken Sie die Gesprächstaste 4.6.
- Bedienung LÖSCHEN? Sicherheitsabfrage Weitere Rufnummer der Wahlwiederholung Rufnummer ist gelöscht. Taste festhalten, um zum Hauptdisplay zurückzukehren. 4.7 Mobilteil ein-/ausschalten Mobilteil ausschalten: Halten Sie die Taste für 2 Sekunden gedrückt. für 2 Sekunden gedrückt. Mobilteil wieder einschalten: Halten Sie die Taste Sobald Sie das Mobilteil wieder auf die Basisstation stellen, schaltet sich dieser automatisch ein. 4.
- Bedienung 4.10 Klingelmelodie ausschalten Möchten Sie einmal nicht gestört werden, können Sie die Klingelmelodie am Mobilteil ausschalten. Klingelmelodie ausschalten Halten Sie die Taste für 2 Sekunden gedrückt. Im Display erscheint das Symbol . Eingehende Gespräche werden nun nur noch über die Basisstation und nicht mehr über das Mobilteil signalisiert. Klingelmelodie wieder einschalten Halten Sie die Taste Symbol wieder für 2 Sekunden gedrückt. Im Display erlischt das . 4.
- Bedienung 4.13 Babyruf Mit dem Babyruf können kleinere Kinder oder auch Senioren einfach eine vorher bestimmte Telefonnummer wählen. Der Druck auf eine beliebige Taste des Mobilteils (außer der Menütaste ). Taste Display FUNKTIONEN MONITOR BABYRUF 1x AUS EIN auswählen 1x Rufnummer eingeben, vorhandene Zahlen werden mit der Taste einzeln gelöscht. BABYRUF Festhalten Im Display blinkt BABYRUF Babyruf ausschalten Mit der Taste dann gelangen Sie direkt in die richtige Menüebene.
- Das Telefonbuch - 5 Das Telefonbuch Im Telefonbuch Ihres Mobilteils können Sie 50 Rufnummern mit jeweils 18 Stellen und einem zugehörigen Namen mit bis zu 10 Buchstaben speichern. 5.1 Rufnummern und Namen in das Telefonbuch eingeben Taste 1x Display HINZUFÜGEN Hinweis NAME? Namen eingeben. NUMMER? Rufnummer eingeben. HINZUFÜGEN Rufnummer ist gespeichert. Taste festhalten, um zum Hauptdisplay zurückzukehren.
- Das Telefonbuch 5.2 Taste 1x Gespeicherte Rufnummern aus dem Telefonbuch anwählen Display HINZUFÜGEN Hinweis Ausgewählter Telefonbucheintrag Gewünschten Telefonbucheintrag auswählen. Die Rufnummer wird gewählt. Um einen Telefonbucheintrag direkt alphabetisch anzuwählen, drücken Sie den entsprechenden Buchstaben. 5.3 Taste 1x Telefonbucheintrag ändern Display HINZUFÜGEN Hinweis Ausgewählter Telefonbucheintrag Gewünschten Telefonbucheintrag auswählen. ÄNDERN Name Rufnummer ÄNDERN 5.
- Das Telefonbuch 5.4.1 Direktwahltasten belegen Taste Display FUNKTIONEN Hinweis MONITOR 2x DIREKTWAHL TASTE 1 Wählen Sie mit den Auswahltasten die gewünschte Taste 1 bis 9. Taste 1 bis 9 AUS 1x EIN Telefonbuch Telefonbuch Rufnummer Es wird der erste Telefonbucheintrag angezeigt. Wählen Sie mit den Auswahltasten den gewünschten Telefonbucheintrag. Die entsprechende Rufnummer wird noch einmal angezeigt. DIREKTWAHL Taste festhalten, um zum Hauptdisplay zurückzukehren. 5.4.
- Das Telefonbuch 5.5 Taste 1x Gespeicherte Rufnummern aus dem Telefonbuch löschen Display HINZUFÜGEN Hinweis Ausgewählter Telefonbucheintrag Gewünschten Telefonbucheintrag auswählen. ÄNDERN 1x LÖSCHEN LÖSCHEN? Sicherheitsabfrage HINZUFÜGEN Telefonbucheintrag ist gelöscht. Taste festhalten, um zum Hauptdisplay zurückzukehren. 5.6 Taste 1x Telefonbucheinträge kontrollieren Display HINZUFÜGEN Hinweis Ausgewählter Telefonbucheintrag Gewünschten Telefonbucheintrag auswählen.
- Das Telefonbuch 5.7 Telefonbucheinträgen spezielle Klingelmelodien zuordnen (VIP-Klingelmelodie) Sollten Sie an Ihrem Telefonanschluss über die Rufnummernanzeige CLIP verfügen, können Sie jedem Telefonbucheintrag eine spezielle Klingelmelodie zuordnen. So können Sie schon an der Klingelmelodie erkennen, wer Sie gerade anruft. Weitere allgemeine Informationen über die Übertragung von Rufnummern erfahren Sie im Kapitel 6.
- Das Telefonbuch 5.8 Sondertelefonbuch einrichten Im Sondertelefonbuch Ihres Telefons können Sie weitere 7 Rufnummern speichern. Das Sondertelefonbuch dient zur Speicherung wichtiger Rufnummern, von z.B: Ärzten, Feuerwehr oder Polizei. Rufnummern die bereits im normalen Telefonbuch gespeichert sind, können nicht noch einmal in das Sondertelefonbuch eingegeben werden. Taste Display HINZUFÜGEN Hinweis NAME? Namen eingeben. NUMMER? Rufnummer eingeben. HINZUFÜGEN Rufnummer ist gespeichert.
- Rufnummernanzeige (CLIP) - 6 Rufnummernanzeige (CLIP) Mit der Rufnummernanzeige können Sie bei eingehenden Gesprächen erkennen, wer Sie anruft. Wenn diese Funktion an Ihrer Telefonleitung zur Verfügung steht, zeigt Ihnen das Display bereits die Rufnummer des Anrufers, wenn das Telefon klingelt. Ist diese Rufnummer bereits im Telefonbuch gespeichert, wird direkt der Name des Anrufers angezeigt.
- Rufnummernanzeige (CLIP) 6.1 Die Anruferliste Um die Rufnummern der Anruferliste im Display zu sehen, gehen Sie bitte wie folgt vor: Taste 1x Display Letzter gespeicherter Anruf Hinweis Ausgewählte Rufnummer Mit den Auswahltasten können Sie nun die gesamte Liste einsehen. Möchten Sie eine Rufnummer der Anruferliste direkt zurückrufen, drücken Sie einfach die und die Nummer wird Gesprächstaste sofort angewählt. Um die Anruferliste zu verlassen. 6.
- Rufnummernanzeige (CLIP) 6.3 Taste 1x Einzelne Rufnummer aus der Anruferliste löschen Display Letzter gespeicherter Anruf Hinweis Ausgewählte Rufnummer Gewünschte Rufnummer auswählen. SPEICHERN 1x LÖSCHEN LÖSCHEN? Sicherheitsabfrage Weitere Rufnummer der Anruferliste Rufnummer ist gelöscht. Taste festhalten, um zum Hauptdisplay zurückzukehren. .
- Nebenstellenanlagen/T-NET - 7 Nebenstellenanlagen/T-NET Die "R" Signaltaste Ihres Telefons können Sie an Nebenstellenanlagen und bei der Verwendung der T-Net Funktionen der DEUTSCHEN TELEKOM nutzen. 7.1 “R” Taste an Nebenstellenanlagen Haben Sie Ihr Telefon mit einer Nebenstellenanlage verbunden, können Sie alle Möglichkeiten, wie z.B. Anrufe weiterleiten, automatischen Rückruf usw. nutzen. Die „R“ Signaltaste verschafft Ihnen den Zugang zu diesen Möglichkeiten.
- Sonderfunktionen - 8 Sonderfunktionen Alle weiteren Einstellmöglichkeiten werden in den folgenden Abschnitten erklärt. Mit der Taste wird die Programmierung gestartet. Mit den Auswahltasten können Sie sich im Menü bewegen. Mit der Taste gelangen Sie in die nächste Menüebene. Mit der Taste höher. verlassen Sie die aktuelle Menüebene und gelangen eine Stufe Durch das Festhalten der Taste können Sie die Programmierung verlassen.
- Sonderfunktionen 8.2 Einstellen von Klingelmelodien und Klingellautstärken Am Mobilteil stehen 10 unterschiedliche Melodien als Klingelzeichen für das Mobilteil und die Basisstation zur Verfügung. Die Klingellautstärke kann separat für das Mobilteil und die Basisstation in 5 Stufen eingestellt werden. Klingelmelodie am Mobilteil für externe Gespräche Taste 1x 1x Display FUNKTIONEN RUFTÖNE Klingelmelodie am Mobilteil für interne Gespräche Taste 1x Display FUNKTIONEN RUFTÖNE HAND MEL. HAND MEL.
- Sonderfunktionen Klingelmelodie an der Basisstation Taste Display FUNKTIONEN Klingellautstärke an der Basisstation Taste RUFTÖNE 1x 1x BASIS MEL. 1x RUFTÖNE HAND MEL. HAND MEL. 1x Display FUNKTIONEN 1x BASIS MEL. LAUTSTÄRKE LAUTSTÄRKE MELODIE Lautstärke 1 bis 5 und LAUT. AUS.. Lautstärke oder LAUT. AUS. auswählen MELODIE 1 bis 10 Melodie aussuchen LAUTSTÄRKE MELODIE Taste festhalten Taste festhalten 8.
- Sonderfunktionen Taste Display FUNKTIONEN Hinweis MONITOR 4x WAHLSPERRE PIN ? PIN-Code der Basisstation eingeben (Werkseinstellung 0 0 0 0) HAND 1 HAND 1 bis 5 Gewünschtes Mobilteil auswählen, für den die Wahlsperren eingerichtet werden sollen. Aktuelle Einstellung AUS ALLE AUSSER SPERREN Wählen Sie die gewünschte Option. Bei AUSSER und SPERREN bestätigen Sie mit und geben Sie die gewünschte Vorwahl mit max. 5 Stellen ein. Bereits eingegebene Zahlen können mit der Taste einzeln gelöscht werden.
- Sonderfunktionen Beispiel: Der Rufnummer 0221 (in diesem Fall eine Ortsvorwahl) wird die Call-byCall Nummer 0xxxx zugeordnet. Hier wird bei jeder gewählten Rufnummer, die mit 0221 beginnt, automatisch die Call-by-Call vorangestellt. Haben Sie die Rufnummer 0221-987654321 gewählt, erkennt das Telefon die 0221 und wählt 0xxxx-0221987654321. Es können drei Rufnummern mit jeweils 5 Stellen gespeichert und zugeordnet werden. Die vorangestellten Zahlen werden nicht im Display angezeigt.
- Sonderfunktionen 8.5 Signaltöne ein- oder ausschalten Ihr Telefon verfügt über drei Signaltöne, die ein- oder ausgeschaltet werden können. Tastenklick: Jeder Tastendruck am Mobilteil wird mit einem kurzen Signalton bestätigt. Bestätigungston: Signalton, wenn eine Einstellung erfolgreich durchgeführt wurde. Ladekontrolle: Signalton, sobald das Mobilteil auf die Basisstation gestellt wird und der Ladevorgang beginnt. Taste 1x Display FUNKTIONEN RUFTÖNE HAND MEL.
- Sonderfunktionen 8.6 Anrufe automatisch entgegennehmen Eingehende Anrufe werden automatisch entgegengenommen, wenn Sie das Mobilteil von der Basisstation nehmen. Möchten Sie, dass Anrufe nur über die Gesprächstaste entgegengenommen werden, können Sie die automatische Annahme ausschalten. Taste 2x Display FUNKTIONEN BASIS AUTO ANTW. EIN oder AUS EIN oder AUS auswählen AUTO ANTW. Taste festhalten 8.
- Sonderfunktionen 8.8 Ton (MFV)- oder Impuls (IWV) – Wahlverfahren Dieses Merkmal ermöglicht Ihnen Ihr Telefon sowohl an den analogen Vermittlungsstellen (IWV/IMPULS) als auch an den neuen digitalen Vermittlungsstellen (MFV/TON) zu betreiben. Als Werkseinstellung ist das MFV/TON-Wahlverfahren eingestellt. Taste 2x Display FUNKTIONEN BASIS AUTO ANN. 2x WAHLMODUS TON (MFV) oder IMPULS TON (MFV) oder IMPULS auswählen WAHLMODUS Taste festhalten 8.
- Sonderfunktionen 8.10 Anzeige der Gesprächszeit ändern Während eine Gesprächs erscheint im Display die aktuelle Gesprächszeit. Ob die Gesprächszeit angezeigt wird, können Sie ein- oder ausschalten. Taste 3x Display FUNKTIONEN DISPLAY SPRACHE 2x GESPR-ZEIT EIN oder AUS EIN oder AUS auswählen GESPR-ZEIT Taste festhalten 8.11 Displaybeleuchtung abschalten Die Displaybeleuchtung kann hier aus- und wieder eingeschaltet werden.
- Sonderfunktionen 8.12 PIN-Code der Basisstation ändern Einige Funktionen des Telefonsystems werden mit einem PIN Code vor unerlaubter Benutzung geschützt. Der PINCode besteht aus bis zu acht Zahlen. Im Lieferzustand wurde der PIN-Code „0000“ eingestellt. Taste 4x Display FUNKTIONEN SYSTEM ANMELDEN 3x PIN ÄNDERN PIN? Zahlenfeld Alten PIN-Code eingeben. NEUE PIN ? Zahlenfeld Neuen PIN-Code eingeben. WIEDERHOL. Zahlenfeld Neuen PIN-Code erneut eingeben. PIN ÄNDERN Taste festhalten 8.
- Sonderfunktionen 8.14 Werkseinstellungen Taste Mit der Funktion Werkseinstellungen können Sie die Einstellungen des Mobilteils wieder auf die Werkseinstellungen zurücksetzen. 5x Display FUNKTIONEN RESET LISTEN 1x EINSTELL. PIN ? Zahlenfeld PIN der Basisstation eingeben. RESET ? Die Werkseinstellungen werden eingestellt.
- Mehrere Mobilteile - 9 Mehrere Mobilteile Es können bis zu vier weitere Mobilteile an Ihre Basisstation angemeldet werden. Hinweis: Über den international genormten GAP Standard können Mobilteile von AUDIOLINE und auch Fremdherstellern in das Telefonsystem integriert werden. Genauso können Sie ein AUDIOLINE Mobilteil an Basisstationen anderer Hersteller anschließen, sofern diese Geräte mit dem GAP Standard arbeiten.
- Mehrere Mobilteile A. Rücksprache / Makeln: Sie können nun mit dem internen Teilnehmer sprechen, und durch das Drücken der Taste zum externen Gesprächspartner zurückkehren. Sie können so beliebig oft, zwischen dem externen und internen Gespräch wechseln. am ersten B. Gespräch weiterleiten: Durch das Drücken der Gesprächstaste Mobilteil, wird das externe Gespräch an das gerufene Mobilteil weitergeleitet. 9.
- Mehrere Mobilteile 9.5 An- und Abmelden von Mobilteilen 9.5.1 Anmelden von DECT4500 Mobilteilen Taste 4x Display FUNKTIONEN SYSTEM ANMELDEN Zahlenfeld Zahlenfeld BS 1 2 3 4 Ist das Mobilteil bereits mit einer Basisstation verbunden, blinken die entsprechenden Nummern. Wählen Sie die Basisstation auf dem Zahlenfeld. PIN ? PIN-Code eingeben (Werkseinstellung 0 0 0 0). Taste an der Basisstation für 2 Sekunden drücken SUCHEN BS 1 Nach einiger Zeit ist das Mobilteil angemeldet.
- Mehrere Mobilteile Taste Display FUNKTIONEN SYSTEM 4x ANMELDEN HAND LÖSCH. 2x HAND 1 Wählen Sie, welches Mobilteil Sie anmelden möchten. PIN ? Zahlenfeld 9.6 PIN-Code eingeben (Werkseinstellung 0 0 0 0). Nach einiger Zeit ist das Mobilteil abgemeldet. Zusätzliche Basisstationen Bei der Verwendung von mehreren Basisstationen können Sie die Reichweite der Mobilteile vergrößern. Um diesen Effekt zu nutzen, müssen alle Basisstationen mit einem Telefonanschluss verbunden sein.
- Mehrere Mobilteile Taste 4x Display FUNKTIONEN SYSTEM ANMELDEN 1x BS WÄHLEN AUTO oder FEST Wählen Sie, ob Sie das Mobilteil automatisch oder fest mit einer Basisstation verbinden möchten. Bei der Auswahl FEST und wählen dann die gewünschte bestätigen Sie mit Basisstation über das Zahlenfeld. Ist das Mobilteil an verschiedenen Basisstationen angemeldet, blinken die entsprechenden Nummern.
- Fehlerbeseitigung - 10 Fehlerbeseitigung Haben Sie Probleme mit Ihrem Telefon, kontrollieren Sie bitte zuerst die folgenden Hinweise. Bei technischen Problemen können Sie sich auch an unsere Hotline unter Tel. 0180 5 00 13 88 (Kosten Telekom bei Drucklegung: 12ct/min) wenden. Bei Garantieansprüchen wenden Sie sich bitte an Ihren Fachhändler. Die Garantiezeit beträgt 2 Jahre.
- Wichtige Informationen - 11 Wichtige Informationen 11.1 Technische Daten Standard Stromversorgung Reichweite Reichweite Standby Max. Gesprächsdauer Aufladbare Standard-Akkus Wählverfahren Zulässige Umgebungstemperatur Zulässige relative Luftfeuchtigkeit Signaltastenfunktion DECT-GAP Basisstation 220/230V, 50 Hz Innen bis zu 50m Außen bis zu 300m bis zu 144 Stunden über 12 Stunden Typ AAA 1,2V 650mAh MFV (Tonwahl) 10°C bis 30°C 20 bis 75% 100ms und 300ms 11.
- Wichtige Informationen 11.3 Garantie AUDIOLINE - Geräte werden nach den modernsten Produktionsverfahren hergestellt und geprüft. Ausgesuchte Materialien und hoch entwickelte Technologien sorgen für einwandfreie Funktion und lange Lebensdauer. Ein Garantiefall liegt nicht vor, wenn die Ursache einer Fehlfunktion des Gerätes bei dem Telefonnetzbetreiber oder einer eventuell zwischengeschalteten Nebenstellenanlage liegt.
- Contents 1 2 3 3.1 3.2 3.3 3.4 3.5 4 4.1 4.2 4.3 4.4 4.5 4.6 4.7 4.8 4.9 4.10 4.11 4.12 4.13 4.14 4.15 5 5.1 5.2 5.3 5.4 5.5 5.6 5.7 5.8 General Information................................................................. 47 User controls............................................................................ 49 Setting up ................................................................................. 50 Safety Information ........................................................................
- Contents 6 6.1 6.2 6.3 7 7.1 7.2 7.3 8 8.1 8.2 8.3 8.4 8.5 8.6 8.7 8.8 8.9 8.10 8.11 8.12 8.13 8.14 9 9.1 9.2 9.3 9.4 9.5 9.6 Caller display (CLID) ................................................................64 The caller list ....................................................................................... 65 Storing individual numbers on the caller list in the phone book .......... 65 Deleting individual telephone numbers from the caller list ..................
- General information - 1 General Information Please read these operating instructions carefully. If you should have any questions, please contact our Service Department on the Hotline number 0180 5 00 13 88 (Telekom cost at the time of printing 12 cents/min). Under no circumstances open the unit yourself and do not try to carry out your own repairs. For any claims under the warranty, please refer to your dealer.
- General information Position - There must be a 230 Volt mains socket near to where the telephone is positioned. Do not set up the base station in the immediate vicinity of other electrical equipment such as microwaves or hi-fi systems, as this may result in mutual interference. The location has a decisive influence on the trouble-free operation of the telephone. Place the base station on a flat and non-slip surface. The feet of the base station do not normally leave any marks on the surface.
- User controls - 2 User controls 1 DECT4500 1. Call indicator, flashes for newly recorded messages 2. Phone book/Selection button 3. Redial/OK button 4. Menu/R signal button 5. Caller list CLID/Selection button 6. Keypad lock 7. Handsfree 8. Special phone book 9. Internal calls/Conference 10. Ringer On-Off 11. Call button/On-Off button 12. Mute button/Cancel 2 12 3 4 11 5 10 6 9 7 8 1 1. 2. 3. 2 Call indicator Charge monitoring lamp Paging button.
- Setting up - 3 Setting up 3.1 Safety Information NOTE Before setting-up, it is essential that you read the General Information at the beginning of this manual. 3.2 Check contents of pack The following items are supplied: one base station one handset with belt clip one telephone connecting cable 3.3 one mains power supply two standard batteries one instruction manual Connecting the base station Position the base station near to your telephone connection socket and to a mains socket.
- Setting up Fitting standard batteries AAA + AAA To fit the standard rechargeable batteries supplied into the handset, press on the upper edge of the battery compartment and slide it downwards. Now insert the batteries taking care to ensure that the polarity is correct. Close the battery compartment cover. + 3.4 Important note: Place the handset in the base station with the display to the front for at least 16 hours. The telephone may malfunction if the batteries are not properly charged.
- Operation - 4 Operation 4.1 The display 1 2 3 4 5 6 7 8 9 9 1 2 => => Discharged. 6 Flashing: You are receiving an external call. Lit: You are making an external call. Flashing: You are receiving an internal call. Lit: You are making an internal call. (with multiple handsets only) A new phone number has been stored in the caller list CLID or you are currently in the caller list. The ring tone is switched off. 7 The microphone is switched off.
- Operation 4.3 Making calls 1. Enter the required telephone number with a maximum of 18 digits using the number pad. The numbers pressed are shown in the display. If more than 16 digits are pressed, the indicator on the left-hand edge of the display will appear and the last 16 digits will be shown. 2. and the required connection will be made. Press the call button The call duration in minutes and seconds is shown in the display during a call.
- Operation 4.6 Redial facility Use Redial if the person called is engaged or does not reply. Your telephone remembers the last ten numbers, each with a maximum of 18 digits. When the list is full, the oldest number is always deleted from the list. 1. 2. Press the button and the last phone number dialled will be shown in the display. Select the required number using the selection buttons and press the call button. 4.6.
- Operation Further redial number Number is deleted. Hold button pressed to return to main display. 4.7 Switching the handset on and off Switching the handset off: Press and hold the button for 2 seconds. Switching the handset on again: Press and hold the button for 2 seconds. The handset will switch itself on automatically as soon as you replace it on the base station. 4.8 Mute button You can turn off the microphone in the handset by using the mute button.
- Operation 4.10 Switching off the ring tone If at any time you do not want to be disturbed, you can turn off the ring tone on the handset. Switching off the ring tone button for 2 seconds. The symbol will appear in the Press and hold the display. Incoming calls will now only be signalled at the base station and no longer at the handset. Switching on the ring tone again Press and hold the will go off. button again for 2 seconds. The symbol in the display 4.
- Operation 4.13 Baby call Small children or even older people can easily dial a previously defined telephone number using the baby call feature. Press any button on the handset (with the exception of the menu button ). Button Display FEATURES MONITOR 1x DIR DIAL OFF 1x Select ON Enter the number. Existing numbers can be deleted individually with the button. DIR DIAL Hold DIR DIAL will flash in the display. Deactivating baby call Press the button to enter the right menu level directly.
- The phone book - 5 The phone book You can store 50 phone numbers, each with 18 digits, and an associated name, with up to 10 letters, in the phone book of your handset. 5.1 Entering numbers and names in the phone book Button 1x Display ADD ENTRY Comment NAME? Enter name. NUMBER? Enter number. ADD ENTRY Number is saved. Hold button pressed to return to main display.
- The phone book 5.2 Dialling stored numbers from the phone book Button 1x Display ADD ENTRY Comment Selected phone book entry Select required phone book entry. The phone number will be dialled. Press the appropriate letter to directly choose an entry from the phone book alphabetically. 5.3 Changing a phone book entry Button 1x Display ADD ENTRY Comment Selected phone book entry Select required phone book entry.
- The phone book 5.4.1 Button Allocating direct dial buttons Display FEATURES Comment MONITOR 2x QUICK DIAL KEY 1 Select the required button 1 to 9 using the selection buttons. Key 1 to 9 OFF 1x ON Phone book Phone book Number The first entry in the phone book will be displayed. Select the required phone book entry using the selection buttons. The corresponding phone number will be displayed again. QUICK DIAL Hold button pressed to return to main display. 5.4.
- The phone book 5.5 Deleting stored numbers from the phone book Button 1x Display ADD ENTRY Comment Selected phone book entry Select required phone book entry. EDIT ENTRY 1x DELETE DELETE? Safety prompt ADD ENTRY Phone book entry is deleted. Hold button pressed to return to main display. 5.6 Checking phone book entries Button 1x Display ADD ENTRY Comment Selected phone book entry Select required phone book entry. Number will be displayed.
- The phone book 5.7 Assigning special ring tones to phone book entries (VIP ring tone) If your phone line has the caller display feature CLID, you can assign a special ring tone to each phone book entry. You will thus be able to tell who is calling you as soon as you hear the ring tone. You will find further general information on transmitting phone numbers in Chapter 6. Button 1x Display ADD ENTRY Comment Selected phone book entry Select required phone book entry.
- The phone book 5.8 Setting up the special phone book You can store a further 7 numbers in your telephone's special phone book. The special phone book can be used to store important numbers such as those of doctors, fire brigade or police. Phone numbers that are already stored in the normal phone book cannot be entered again into the special phone book. Button Display ADD ENTRY Comment NAME? Enter name. NUMBER? Enter number. ADD ENTRY Number is saved.
- Caller display (CLID) - 6 Caller display (CLID) Using caller display, you can see with incoming calls who is calling you. If this function is available on your telephone, the display will show you the caller's telephone number when the telephone rings. If this number has already been saved in the phone book, the name of the caller will be displayed directly. If the message PRIVATE appears instead of a phone number, the call is one where the caller has suppressed the transmission of the phone number.
- Caller display (CLID) 6.1 The caller list To view the phone numbers on the caller list, please proceed as follows: Button 1x Display Last call saved Comment Selected number You can now view the whole list using the selection buttons. If you want to call back a number on the caller and list directly, simply press the call button the number will be dialled immediately. To exit the caller list. 6.
- Caller display (CLID) 6.3 Deleting individual telephone numbers from the caller list Button 1x Display Last call saved Comment Selected number Select required telephone number. SAVE ENTRY 1x DELETE DELETE? Safety prompt Further numbers on the caller list Number is deleted. Hold button pressed to return to main display. .
- Private exchanges /T-NET - 7 Private exchanges/T-NET You can use the "R" signal button on your telephone on private exchanges and when using DEUTSCHE TELEKOM's T-Net functions. 7.1 "R" Button on private exchanges If you have connected your telephone to a private exchange, you can use all the facilities such as call transfer, automatic recall, etc. The "R" signal button gives you access to these facilities. The FLASH time "100ms" will be required on a private exchange (Adjustment, see 8.7).
- Special functions - 8 Special functions All further setting options are described in the following sections. Programming is started by means of the button. You can scroll through the menu using the selection buttons . Press the button to move to the next menu level. Press the button to exit the current menu level and to move one step higher. You can exit programming by holding the button pressed.
- Special functions 8.2 Setting ring tones and ringer volumes 10 different tunes are available on the handset as ring tones for the handset and the base station. The ringer volume can be adjusted separately for the handset and the base station in 5 steps.
- Special functions Base station ring tone Button Display FEATURES Base station ringer volume Button SOUNDS 1x HS RINGER VOLUME MELODY 1x MELODY 1 to 10 Select tune MELODY Press and hold button SOUNDS HS RINGER BS RINGER 1x 8.3 1x Display FEATURES 1x BS RINGER VOLUME Volume 1 to 5 and Vol Off. Select volume level or OFF VOLUME Press and hold button Setting up dialling blocks You can block specific phone numbers by using the dialling blocks.
- Special functions Button Display FEATURES Comment MONITOR 4x CALL BAR PIN? Enter the PIN Code for the base station (factory setting 0 0 0 0). HANDSET 1 HANDSET 1 to 5 Select the required handset for which the dialling blocks are to be set up. Current setting OFF ALL EXEMPT BAR Select the required option. With EXEMPT and BAR, confirm with and enter the required dialling code with max. 5 digits. Numbers already entered can be deleted individually with the button.
- Special functions Example: The number 0221 (in this case, an area dialling code) has the number 0xxxx assigned to it. Here, the call-by-call will automatically be placed in front of every number dialled that begins with 0221. If you have dialled the number 0221987654321, the telephone will recognise the 0221 and will dial 0xxxx-0221987654321. Three phone numbers, each with 5 digits, can be stored and assigned. The prefixed numbers will not be shown in the display.
- Special functions 8.5 Turning signal tones on or off. Your telephone has three signal tones that can be turned on or off. Key Beep: Each time a button on the handset is pressed, this is confirmed with a short signal tone. Confirm: Signal tone when a setting has been successfully completed. Charging: Signal tone when the handset is placed on the base station and the charging process starts.
- Special functions 8.6 Accepting calls automatically Incoming calls are accepted automatically when you lift the receiver from the base station. If you only want calls to be Button Display accepted by means of the FEATURES button, you can deactivate the automatic acceptance facility. SETTINGS 2x AUTO ANS. ON or OFF Select ON or OFF AUTO ANS. Press and hold button 8.7 Setting the flash time Two different flash times can be set by means of the R-signal button. Button 2x SETTINGS AUTO ANS.
- Special functions 8.8 Touch-tone (TTD) or pulse (PD) dialling This feature enables you to use your telephone both on analogue exchanges (PD) and on the new digital exchanges (TTD). The factory setting is TONE dialling. Button 2x Display FEATURES SETTINGS AUTO ANS. 2x DIAL MODE TONE or PULSE Select TONE or PULS DIAL MODE Press and hold button 8.9 Setting the display language Button The display messages can be set up in German and English.
- Special functions 8.10 Changing the call duration display The actual duration of the call will appear in the display while a call is being made. You can determine whether the duration of the call is displayed or not. Button 3x Display FEATURES DISPLAY LANGUAGE 2x CALL TIMER ON or OFF Select ON or OFF CALL TIMER Press and hold button 8.11 Switching off the display illumination The display illumination can be switched off and on again here.
- Special functions 8.12 Changing the PIN code on the base station Some functions of the telephone system are protected against unauthorised use by a PIN code. The PIN code consists of up to eight numbers. As supplied, the PIN code is set to "0000". Button 4x Display FEATURES SYSTEM REGISTER 3x CHANGE PIN PIN? Number pad Enter old PIN code. NEW PIN? Number pad Enter new PIN code REPEAT Number pad Enter new PIN code again. CHANGE PIN Press and hold button 8.
- Special functions 8.14 Factory settings You can reset the handset to the factory settings once more by means of the Factory Settings function. Button 5x Display FEATURES RESET RESET 1x SETTINGS PIN? Number pad Enter the PIN code for the base station SETTINGS The factory settings are reset.
- Multiple handsets - 9 Multiple handsets Up to four additional handsets can be logged on to your base station. Note: Handsets from AUDIOLINE and other manufacturers can also be integrated into the telephone system by means of the internationally adopted GAP standard. In the same way, you can use an AUDIOLINE handset on base stations from other manufacturers, as long as these units work using the GAP standard.
- Multiple handsets 9.3 Holding conference calls An external call can be connected to a further internal subscriber as a conference call. In this way, two handsets can talk to the external caller simultaneously. Establish the required connection with the external subscriber. Then press the button and the internal number of the second handset required.
- Multiple handsets 9.5 Logging on and logging off handsets 9.5.1 Logging on DECT4500/4501 handsets Button Display FEATURES SYSTEM 4x REGISTER Number pad Number pad BS 1 2 3 4 If the handset is already connected to a base station, the corresponding numbers will flash. Select the base station on the number pad. PIN? Enter the PIN Code (factory setting 0 0 0 0). Press the button on the base station for 2 seconds. SEARCH BS 1 After a short time the handset will be logged on.
- Multiple handsets Button Display FEATURES SYSTEM 4x REGISTER DELETE HS 2x HANDSET 1 Select the handset that you want to log off. PIN? Number pad 9.6 Enter the PIN Code (factory setting 0 0 0 0). After a short time the handset will be logged off. Additional base stations You can increase the range of the handsets by using multiple base stations. In order to use this effect, all base stations must be connected to one telephone line.
- Multiple handsets Button 4x Display FEATURES SYSTEM REGISTER 1x SELECT BS AUTO or FIXED Select whether you want the handset to be automatically or permanently connected to a base station. When selecting and then select the required base FIXED, confirm with station by means of the number pad. If the handset is logged on to different base stations, the appropriate numbers will flash.
- Troubleshooting - 10 Troubleshooting If you have problems with your telephone, please check the following points first. For technical problems, you can also contact our hotline on Tel. 0180 5 00 13 88 (Telekom cost at the time of printing 12 cents/min). For any claims under the warranty, please refer to your dealer. The warranty period is 2 years. No calls possible Connection is cut off or drops out The charging symbol does not come on while the handset is on the base station.
- Important information - 11 Important information 11.1 Technical data Standard Power supply Range Range Standby Max. call duration Standard rechargeable batteries Dialling method Permissible ambient temperature Permissible relative humidity Signal button function DECT-GAP Base station 220/230V, 50 Hz Indoors up to 50 m Outdoors up to 300 m up to 144 hours more than 12 hours Type AAA 1.2V 650 mAh Touch-Tone Dialling 10°C to 30°C 20 to 75% 100ms and 300ms 11.
- Important information 11.3 Warranty AUDIOLINE units are manufactured and tested in accordance with the most up-todate manufacturing procedures. Selected materials and highly developed technologies ensure trouble-free operation and long life. The situation, where the cause of a malfunction of the unit is due to the telephone network provider or any private exchanges that may be connected in between, is not covered by the warranty.
WICHTIGE GARANTIEHINWEISE Die Garantiezeit für Ihr AUDIOLINE - Produkt beginnt mit dem Kaufdatum. Ein Garantieanspruch besteht bei Mängeln, die auf Material- oder Herstellungsfehler zurückzuführen sind. Der Garantieanspruch erlischt bei Eingriffen durch den Käufer oder durch Dritte.