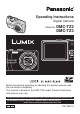
Operating Instructions Digital Camera Model No. DMC-TZ2 DMC-TZ3 Before connecting, operating or adjusting this product, please read the instructions completely. This manual is based on the DMC-TZ3 model. Product illustrations and screens may vary. For USA assistance, please call: 1-800-272-7033 or send e-mail to : digitalstillcam@us.panasonic.com For Canadian assistance, please call: 1-800-99-LUMIX (1-800-995-8649) or send e-mail to: lumixconcierge@ca.panasonic.
Dear Customer, Thank you for choosing Panasonic! You have purchased one of the most sophisticated and reliable products on the market today. Used properly, we’re sure it will bring you and your family years of enjoyment. Please take time to fill in the information below. The serial number is on the tag located on the underside of your Camera. Be sure to retain this manual as your convenient Camera information source. THE SOCKET OUTLET SHALL BE INSTALLED NEAR THE EQUIPMENT AND SHALL BE EASILY ACCESSIBLE.
THE FOLLOWING APPLIES ONLY IN THE U.S.A. FCC Note: (U.S. only) This equipment has been tested and found to comply with the limits for a Class B digital device, pursuant to Part 15 of the FCC Rules. These limits are designed to provide reasonable protection against harmful interference in a residential installation. This equipment generates, uses, and can radiate radio frequency energy and, if not installed and used in accordance with the instructions, may cause harmful interference to radio communications.
About the battery charger -If you see this symbolInformation on Disposal in other Countries outside the European Union This symbol is only valid in the European Union. If you wish to discard this product, please contact your local authorities or dealer and ask for the correct method of disposal. About the battery pack Battery pack (Lithium ion battery pack) • Use the specified unit to recharge the battery pack. • Do not use the battery pack with equipment other than the specified unit.
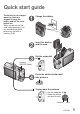
Quick start guide The battery is not charged when the camera is shipped. Charge the battery and set the clock before use. When you do not use the card (sold separately), you can record or play back pictures on the built-in memory (P.26). Charge the battery Insert the battery and the card Set the mode dial to Camera ON/OFF Switch Press the shutter button and take pictures To play back the pictures 1. Set the mode dial to 2. Select the picture you want to view. .
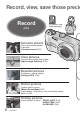
Record, view, save those precio Record (P.24) SD memory card (Sold separately) Zoomed-in pictures Close-up pictures of people in distance [10x optical zoom] (P.27) Clear pictures Prevents blurring from shaky hands [Optical Image Stabilizer] (P.39) Beautiful pictures Dark places, moving subjects [Intelligent ISO] (P.46) Motion pictures Capture moving scenes [Motion Picture Mode] (P.47) Create photos (still pictures) from your favorite motion pictures (P.
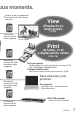
ous moments. Cards may be inserted directly into devices with SD memory card slots. View (Playback) on large screen (P.79) Alternatively, connect with AV cable (supplied) On TV screen Print at home, or at a digital photo center (P.68, 76) Alternatively, connect with USB connection cable (supplied) With your printer Connect directly to easily print pictures at home (P.76) Use a PictBridge-compatible printer. At digital photo center Give card to shop assistant to print pictures. (P.
Contents Before use Preparations Basics Applications (Record) 10 14 24 33 Before use .......................................... 10 Read first (10) To prevent damage and faults (10) Charging battery ............................... 14 Inserting battery and card ............... 15 Taking pictures .................................
Standard Accessories ....................... 11 Names of parts ................................... 12 Mode dial (13) Setting the clock and language....... 16 Know the different menus ............... 17 Using menus ..................................... 18 Using SETUP menu .......................... 20 Taking pictures with zoom ............... 27 Taking pictures with SIMPLE MODE 28 Viewing your pictures instantly (REVIEW) ........................................... 30 Viewing your pictures (Play) .......
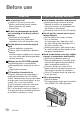
Before use Read first Do a test shot first! Check first to see if you can take pictures and record sounds (motion pictures/pictures with audio) successfully. We will not compensate for failed/ lost recording or for direct/indirect damage. Panasonic will not provide compensation even if damage is caused by faults with camera or card.
Standard Accessories Part numbers are as of January 2007 Camera ON/OFF switch Battery Pack CGA-S007A (P.14) (referred to in this manual as ‘battery’) Battery Charger DE-A45B (P.14) (referred to in this manual as ‘charger’) Battery Carrying Case Lens barrier Do not touch the lens barrier, as this may damage your camera. If lens is dirty Images may appear slightly white if lens is dirty (fingerprints, etc).
Names of parts Camera ON/OFF switch (P.18) Release lever (P.15) Tripod receptacle Optical image stabilizer button (P.39) Card/Battery door (P.15) Shutter button (P.24) Zoom lever (P.27) Self-timer indicator (P.35)/AF assist lamp (P.56) Flash (P.36) Lens barrel Lens (P.11) Strap eyelet Strap (supplied) Speaker (P.22) Microphone (P.47, 53, 70) LCD monitor ●Checking remaining battery/ memory capacity, etc (P.25) ●Changing display (P.33) ●Display contents list (P.80) Status indicator (P.
Mode dial Align to correct mode NORMAL PICTURE (Displayed on screen when mode changed) NORMAL PICTURE mode SCENE mode Take pictures (P.24). Take pictures according to scene (P.40). INTELLIGENT ISO mode Take pictures according to motion and brightness of subject (P.46). PLAYBACK mode CLIPBOARD mode Take/view pictures as memos (P.58). View/edit pictures previously taken (P.31, 61) PRINT mode SIMPLE MODE MOTION PICTURE mode For beginners (P.28). Take motion pictures (P.47). Print (P.76).
Preparations 1 Charging battery Always charge before first use! (not sold pre-charged) Battery (model-specific) Charger (model-specific) Indoor electrical outlet (charge at room temperature of 1035°C (50°F-95°F)) Fold out pins and plug into electrical outlet. Disconnect charger and battery when charging is complete. Connect to charger. (Ensure ‘LUMIX’ faces outwards.) plug Charging light (CHARGE) On: Charging in progress (approx. 120 min.
Preparations 2 Inserting battery and card Battery (check orientation) Card (check orientation) Do not touch connector Set the camera ON/OFF switch to OFF Slide to the ‘OPEN’ position and open the lid Completely insert battery and card (both click into place) Close lid Slide to the ‘LOCK’ position. OPEN LOCK To remove lever To remove battery, move lever in direction of arrow. Status indicator To remove card, press down in center.
Preparations 3 Setting the clock and language before turning on power. Set mode dial (P.13) to NORMAL PICTURE mode ‘PLEASE SET THE CLOCK’ will be displayed when power is turned on for the first time. While this message is displayed Press Adjust year, month, date, time CLOCK SET Select 0 : 00 JAN . 1 . 2007 M D Y SELECT Adjust Power SET CANCEL EXIT Select to change date format Set Press Turn on power again and check time display.
Preparations 4 Know the different menus to get more out of your camera This camera contains a range of menus to enable you to set your photography and playback preferences, and to make the camera easier and more fun to use. The ‘SETUP’ menu in particular contains important functions, such as for time and power source. Please check these settings before use. Making the camera more convenient to use (SETUP menu) (P.
Preparations 5 Using menus Here is explained an example of changing the ‘POWER SAVE’ setting from ‘5 MIN.’ to ‘2 MIN.’ from SETUP menu. (‘POWER SAVE’ is a function to extend battery life by automatically turning the camera off if no operations are performed for a certain period.) Turn on the power Zoom lever Set to Bring up the menu REC menu is displayed. MENU/SET 1/ 3 REC W.BALANCE SENSITIVITY ASPECT RATIO PICT.
Explanation of settings method for SETUP menu, REC menu, and PLAY menu. (Screen example: DMC-TZ3) Move across to the items Highlight ‘CLOCK SET’ 1 /4 SETUP CLOCK SET WORLD TIME MONITOR GUIDE LINE TRAVEL DATE SELECT ±0 OFF EXIT Select the correct item Page 2 displayed Press ▼ and move beyond the bottom item Move down to ‘POWER SAVE’ 1 /4 SETUP CLOCK SET WORLD TIME MONITOR GUIDE LINE TRAVEL DATE SELECT 2 /4 SETUP AUTO REVIEW POWER SAVE ZOOM RESUME ECONOMY BEEP ±0 OFF EXIT SELECT 1SEC. 5MIN.
Preparations 6 Using SETUP menu ‘CLOCK SET’, ‘AUTO REVIEW’, ‘POWER SAVE’ and ‘ECONOMY’ are important for clock setting and battery life. Be sure to check these before use. Item Uses, operations CLOCK SET 1, 2 WORLD TIME MONITOR 1, 2 1, 2 Change the pattern of the guide lines displayed when taking pictures. Display recording information or histogram together with guide lines (P.33). 1, 2 Record the number of days elapsed in your travels.
Make general camera settings such as adjusting the clock, extending the battery life, and changing the beep sounds. (Settings method → P.18) Default setting outlined: 1 Settings also reflected in SIMPLE MODE (P.28). Settings also reflected in CLIPBOARD mode (P.58). 3 DMC-TZ3 only. 2 Settings, notes Set the date/month/year and time (P.16). (DESTINATION) / (HOME) -3 · · ±0 · · +3 REC. INFO. (Recording information): OFF / ON HISTOGRAM: OFF / ON PATTERN: / ‘PATTERN’ cannot be selected in CLIPBOARD mode (P.
6 Preparations Using SETUP menu (Continued) Item BEEP Uses, operations 1, 2 Change or mute beep sounds. 1, 2 SHUTTER VOLUME 2 NO. RESET RESET Change or mute shutter sounds. Adjust volume of sound from speakers (7 levels). Reset image file numbers and start again from ‘0001’. File numbers and folder numbers (P.75) 1 Reset SETUP menu (P.20) and REC menu items (P.50) to their default settings. 2 VIDEO OUT Change the video output format when connected to a TV, etc.
Default setting outlined: 1 2 Settings also reflected in SIMPLE MODE (P.28). Settings also reflected in CLIPBOARD mode (P.58). Settings, notes Volume: (mute) / (low) / (high) Tone: / Volume: (mute) / (low) / (high) Tone: / / / 0 · · LEVEL3 · · LEVEL6 Cannot be used to adjust TV speaker volume when connected to TV. YES/NO Numbers cannot be reset once folder number reaches 999. In this case, save all necessary pictures to your computer, and format the built-in memory/card. (P.
1 Taking pictures Basics Turn on the power Status indicator illuminated for approx. 1 second. Set to (NORMAL PICTURE mode) NORMAL PICTURE Display on screen Adjust the focus Press halfway Take a picture Take care not to shake the camera. Zoom lever Status indicator Press fully Holding the camera Vertically Horizontally Flash When Lamp ●Do not block the flash or the lamp (P.12). Do not look at them from close range. ●Do not touch the lens.
Please set the clock before taking pictures (P.16). Adjusting the focus Press the shutter button halfway, ensuring that the subject is aligned with the AF area. Focus Focus display Focus display AF area (normal) F3.3 Aperture value 1/30 AF area (when dark or using digital zoom) In focus Not in focus On Flashing AF area Green Red/white Sound Double beep Multiple beep Images outside of the focus range may not be in full focus even if the light remains on.
1 Taking pictures Basics (Continued) Picture save destination Pictures will be saved to a card if one is inserted, or to the built-in memory if not. When in operation 300 are Illuminated red. Card Card Built-in memory Built-in memory This means that an operation is in progress, such as the recording, reading, or deleting of pictures. Do not turn off the power or remove the battery, card, or AC adaptor (DMWAC5PP, sold separately) (this may cause damage to or loss of data).
Basics 2 Taking pictures with zoom Subjects can be enlarged by ten times with ‘Optical zoom’ and up to 15 (13.8 ) times with ‘Extended optical zoom’. ‘Digital zoom’ can then be used to multiply this effect by four times further. (28-280 mm: 35 mm film camera equivalent) DMC-TZ2 Enlarge (Tele) Restore (Wide) Turn to T side Turn to W side Zoom types Type Optical zoom Extended optical zoom (EZ) 1 Digital zoom Max. enlargement 10x 15x 1, 13.8x 2, 13x 12.6x 1, 12x, 11.
Basics Taking pictures with SIMPLE MODE 3 Set to Adjust the focus Press halfway Take a picture Backlight compensation Green when focus aligned MENU/SET Press fully The settings for the following functions are fixed. Item SELFTIMER (P.35) POWER SAVE (P.20) STABILIZER (P.39) W.BALANCE (P.50) SENSITIVITY (P.51) METERING MODE (P.53) AF MODE (P.54) AF ASSIST LAMP (P.56) COL.MODE (P.57) 1 The following functions cannot be used. Setting OFF/10 SEC. 5 MIN.
This mode is designed for beginners to easily take pictures. Only major functions and menu items are displayed. ‘SIMPLE MODE’ menu Use the menu to change settings such as picture quality and beep sounds. Display SIMPLE MODE menu Select desired item (Screen shows beep setting change) SIMPLE MODE SIMPLE MODE PICT.MODE PICT.MODE AUTO REVIEW AUTO REVIEW OFF BEEP BEEP LOW CLOCK SET CLOCK SET SELECT EXIT Select desired setting SELECT HIGH SET Finish SIMPLE MODE PICT.
4 Basics Viewing your pictures instantly (REVIEW) Pictures can be checked while still in a recording mode ( ). Display picture REVIEW1X EXIT 4X DELETE Most recently taken picture will be displayed for about 10 seconds. To close: Press ▼ or press the shutter button halfway.
Basics 5 Viewing your pictures (Play) When there is no card inserted, the pictures played back from the built-in memory. (Clipboard pictures can only be played back in CLIPBOARD mode (P.59).) Set to Enlarge View as list (P.61) Scroll through pictures File number 100-0001 1/3 Previous Next 10:00 MAR.15.2007 Change information display (P.33) Picture number Delete (P.32) Returns to the first picture after the final picture.
6 Deleting pictures Basics Basics Set to PLAYBACK mode . Pictures deleted will be from card if card is inserted, or from built-in memory if not. To delete clipboard pictures, set to CLIPBOARD mode . To delete 1 picture While picture is displayed (P.
Applications Basics (Record) 1 Changing recording information display Change between different LCD monitor displays, such as histograms. Press to change display Histogram 3 Guide lines No display LCD monitor (DMC-TZ3 only) 3 Display in PLAYBACK mode Histogram 100-0001 1/3 3RD DAY 1 month 10 days 10:00 MAR.15.2007 Histogram 100-0001 1/3 F3.3 1/30 ISO 100 AWB 10:00 MAR.15.2007 No display During playback zoom (P.31), motion picture playback (P.62), slideshow (P.
Applications (Record) 2 Making LCD monitor easier to see Make it easier to see the LCD monitor when taking pictures from high positions or in bright outdoor conditions. Display ‘LCD MODE’ Hold down Select mode LCD LCD MODE OFF POWER LCD HIGH ANGLE SELECT SET LCD monitor POWER LCD Makes screen brighter than normal (for outdoor use). HIGH ANGLE Makes screen easier to see when taking pictures from high positions.
Applications (Record) 3 Taking pictures with self-timer This is also effective for correcting jitter when pressing the shutter button, by setting the self timer to 2 seconds. Display ‘SELFTIMER’ Select time duration SELFTIMER OFF 10 10SEC. 2SEC. 2 SELECT MENU/SET SET Displayed for approx. 5 sec. Can also be selected with ◄. Adjust focus Press halfway Focus will be automatically adjusted immediately before recording if shutter button is pressed fully here.
Applications (Record) 4 Taking pictures with flash Display ‘FLASH’ Select the desired type FLASH Flash Do not cover with hand. Do not look at from close range (few cm). Do not bring objects close (heat and light may damage object). AUTO AUTO/RED-EYE FORCED FLASH ON SLOW SYNC./RED-EYE FORCED OFF SELECT SET Displayed for approx. 5 sec. Can also be selected with ►.
Available types vary depending on the mode in use. Available types in each mode (◎: default setting) SCENE MODE ○ ー ○ ○ ○ ○ ○ ◎ ◎ ー ○ ー ー ー ○ ー ◎ ○ ○ ○ ○ ○ ー ◎ ◎ ○ ー ー ー ー ー ◎ ー ー ー ー ○ ー ○ ○ ○ ○ ○ ○ ○ ー ○ ー ー ○ ○ ◎ ○ ○ ー ー ー ー ー ー ー ー ー ー ー ○ ○ ー ー ー ー ー ○ ー ○ ○ ー ー ー ー ー ◎ ー ◎ ○ ー ー ー ー ー ○ ○ ○ ○ ○ ○ ○ ○ ○ ○ ◎ ○ ◎ ○ ◎ ○ ○ ◎ Cannot be used with MOTION PICTURE mode and scene modes , , , , , or .
Applications (Record) 5 Taking pictures with exposure compensation Corrects exposure when adequate exposure cannot be obtained (if difference between brightness of object and background, etc). Depending on the brightness, this may not be possible in some cases.
Applications (Record) 6 Optical image stabilizer Automatically detects and prevents jitter. Settings cannot be changed in SIMPLE MODE (P.28) or in ‘SELF PORTRAIT’ (P.42) and ‘STARRY SKY’ (P.44) scene modes. Hold down Select mode STABILIZER OFF MODE1 MODE2 SELECT MENU/SET Cases where optical image stabilizer may be ineffective: ●Heavy jitter ●High zoom ratio (digital zoom: P.27) ●Fast-moving objects ●Indoors or in dark locations (due to low shutter speed) SET DEMO.
Applications (Record) 7 Taking pictures according to the scene Set to ‘SCN1’ or ‘SCN2’ The same selection of 20 scenes is available for each. Select scene SCENE MODE 1 1/ 2 Page 1 of 2 currently displayed PORTRAIT DISPLAY SELECT DISPLAY SET SCENE MENU MENU/SET To see description of each scene: Select scene, and press ‘DISPLAY’. SCN1 and SCN2 When using SCENE MODE, the camera remembers the previously selected scene.
Using SCENE MODE enables you to take pictures with optimum settings (exposure, coloring, etc) for given scenes. Scene types PORTRAIT SOFT SKIN 3 SELF PORTRAIT 3 NIGHT PORTRAIT 3 PARTY 1/30 NIGHT SCENERY 3 CANDLE LIGHT 3 3 3 F3.3 SPORTS SCENERY FOOD 3 BABY 3 3 PET 3 3 OFF 9 months 10 days 10:00 MAR.15.2007 HIGH SENS. SUNSET OFF 3 3 STARRY SKY FIREWORKS 3 OFF 3 15 SNOW BEACH 3 AERIAL PHOTO 3 UNDERWATER 3 3 AF LOCK Functions, tips for each scene (P.
Applications (Record) 7 Taking pictures according to the scene (Continued) Scene PORTRAIT SOFT SKIN Smooths skin colors in bright, outdoor daylight conditions (portraits from chest upwards). Clarity of effect may vary depending on brightness. SELF PORTRAIT Take pictures of yourself. Press shutter button halfway → self-timer indicator illuminates → press shutter button fully → review (if self-timer indicator flashes, focus is not correctly aligned) To take pictures with audio (P.
Using flash in scene modes (P.37) Tips, notes Main fixed settings Stand as close as possible to object. Zoom: As telescopic as possible (T side) SENSITIVITY: ISO100 Stand as close as possible to object. Zoom: As telescopic as possible (T side) SENSITIVITY: ISO100 Focus: 30-70 cm (0.98-2.30 feet) (Max. W) Do not use zoom (harder to focus). (Zoom moved to max. W automatically) 2-second self-timer (P.35) recommended. STABILIZER: MODE2 AF MODE: 9 areas AF ASSIST LAMP: OFF SELFTIMER: OFF/2SEC.
Applications (Record) 7 Taking pictures according to the scene (Continued) Scene BABY Uses, functions Date of birth will be displayed as ‘0 month 0 day’. To reset: Select ‘RESET’ from SETUP menu (P.22). PET Record pet’s age when taking pictures. Settings method same as for ‘BABY’ (P.42-45). SUNSET Take clear pictures of scenes such as sunsets. HIGH SENS. Prevents blurring of subject in dark, indoor conditions. Pictures may appear slightly grainy due to high sensitivity.
Using flash in scene modes (P.37) Tips, notes Main fixed settings Age cannot be added after recording. Age may be printed from a computer using the supplied software (P.11). Age can be stamped onto picture using ‘DATE STAMP’ (P.66). (P.43) AF ASSIST LAMP default setting is ‘OFF’. Others same as ‘BABY’ (P.42-45) Same as for ‘BABY’ (P.43) — FLASH: FORCED OFF AF ASSIST LAMP: OFF SENSITIVITY: ISO100 Focus: Max. W: 5 cm (0.16 feet) and above Max. T: 1 m (3.
Applications (Record) 8 Avoiding subject blurring Taking close-up pictures (Intelligent ISO) (MACRO mode) Avoiding subject blurring in darker conditions or with fastmoving subjects Detects movement of the subject and sets the optimum ISO sensitivity and shutter speed according to the brightness. Take a picture (P.24) Set to For moving subjects indoors… For stationary subjects indoors… sensitivity and shutter speed raised to avoid subject blurring. sensitivity lowered to avoid interference. F3.
Applications (Record) 9 Taking motion pictures Record motion pictures and sound (motion pictures cannot be recorded without sound). Microphone (voice recording) Set to Start recording Available recording time (approx.) Press halfway (align focus) R20S Press fully Elapsed time (approx.) Finish Estimated recording time Ends automatically if memory is full. (P.92) Note Zoom and CONT.AF (P.55) functions cannot be used during movie recording. Not compatible with MultiMediaCards.
Applications (Record) 10 Useful features for travel (TRAVEL DATE, WORLD TIME) Recording holiday duration (TRAVEL DATE) Select ‘TRAVEL DATE’ from SETUP menu (P.18, 20) Select ‘SET’ Recording 1 /4 SETUP 3 CLOCK SET WORLD TIME MONITOR GUIDE LINE TRAVEL DATE SELECT ±0 OFF SET SET Set departure date TRAVEL DATE 1ST DAY 10:00 MAR.15.2007 displayed Displayed for approx. 5 sec when switching from PLAYBACK to recording mode PLEASE SET THE DEPARTURE DATE MAR . 15 .
Record holiday day number or local time at overseas destination. Can be displayed during playback or stamped onto picture. (P.66) Clock must be set in advance (P.16). Registering local time at your overseas destination (WORLD TIME) Select ‘WORLD TIME’ from SETUP menu (P.18,20) ‘PLEASE SET THE HOME AREA’ will be displayed when setting for the first time. In this case, press ‘MENU/SET’ and skip to step .
Applications (Record) 11 1/ 3 REC W.BALANCE SENSITIVITY ASPECT RATIO PICT.SIZE QUALITY SELECT AWB AUTO Using REC menu REC menu settings (P.18) Default setting outlined: ‘Quick setting’ (P.57) is useful to easily call up frequently-used menus. EXIT W.BALANCE The same color may appear more blue or more red depending on the light source (sun, lamps, etc). Colors can be adjusted to their natural appearance by adjusting the white balance.
Detailed settings can be made for recording, such as coloring, sensitivity, aspect ratio, and picture size. Items vary depending on mode. ‘ ’, ‘ ’, ‘ ’, ‘ ’, and ‘ ’ can be adjusted independently. Settings are remembered even if power is turned off. Settings remain applied when using flash photography. Even though the ‘AWB’ setting is fixed in ‘UNDERWATER’ scene mode (P.44), fine adjustments may still be made. Fine adjustments cannot be made when ‘COL.MODE’ (P.
Applications (Record) 11 Using REC menu (Continued) PICT.MODE Set picture quality for motion pictures (P.47). Applicable modes: Settings: Aspect ratio (P.51) : 30fps VGA / 10fps VGA / 30fps QVGA / 10fps QVGA : 30fps 16:9 / 10fps 16:9 ‘30fps’: smoother movement; ‘10fps’: longer recording time PICT.SIZE Set size of picture. Number of pictures which can be recorded depends on this setting and on ‘QUALITY’ (see right). (P.
QUALITY Set compression ratio for saving. Number of pictures which can be recorded depends on this setting and on ‘PICT.SIZE’ (see left). (P.92) Applicable modes: Settings: : Fine (priority to picture quality) : Standard (increases recording capacity by limiting standard picture size and picture quality) AUDIO REC. Sounds can also be recorded with pictures. This is useful for conversation or memo recording. Applicable modes: Settings: OFF : No sound recording ON : Record approx.
Applications (Record) 11 Using REC menu (Continued) AF MODE Method of aligning focus can be changed according to position and number of subjects. Applicable modes: Settings: / / / / ( : High-speed focus) Subject not in center of picture (AF area displayed after focuses completely aligned) 9-area-focusing 3-area-focusing (High speed) Automatically focuses on either side or center.
Settings: BURST setting OFF (High speed) (Low speed) 3 , 4 Speed 1 No. of pictures 2 No burst 3 3 (Free) 3 pictures/sec Fine: Max. 5 Standard: Max. 7 2 pictures/sec Approx. 2 pictures/sec 5 Until card/built-in memory is full 1 : Depends on shutter speed and ‘SENSITIVITY’ settings. : When using self-timer: Fixed at 3 pictures 3 4 : DMC-TZ3 only. : DMC-TZ2 only. 5 : DMC-TZ3: Becomes progressively slower. (Delayed timing depends on card type, picture size, and QUALITY.
Applications (Record) 11 Using REC menu (Continued) AF ASSIST LAMP Illuminates lamp when dark to facilitate focus alignment. Applicable modes: Settings: OFF : Lamp off (taking pictures of animals in dark, etc) ON : Lamp illuminated with halfway press of shutter button ( and larger AF area displayed) Do not cover or look at lamp from close range Fixed to ‘ON’ when using SIMPLE MODE . Effective distance: 1.5 m (4.
COL. MODE Set color effects. Applicable modes: Settings: STANDARD / NATURAL (soft) / VIVID (sharp) / COOL (more blue) / WARM (more red) / B/W / SEPIA If interference is noticeable in dark locations: Set to ‘NATURAL’. MOTION PICTURE mode: ‘NATURAL’ and ‘VIVID’ cannot be selected. White balance fine adjustment cannot be used when using ‘COOL’, ‘WARM’, ‘B/W’, or ‘SEPIA’. Settings for still pictures and motion pictures are made separately. CLOCK SET Set the clock. Same function as that in SETUP menu (P.16).
Applications (Record) 12 Taking/viewing clipboard pictures (CLIPBOARD) Taking clipboard pictures (clipboard recording) Set to Select ‘REC’ CLIPBOARD PLAY MENU/SET Functions unavailable: BURST, D.ZOOM, AUTO BRACKET(DMC-TZ3 only), WB ADJUST, CONT.AF The settings for the following functions are fixed. ASPECT RATIO: QUALITY: SELFTIMER: OFF/2SEC. SENSITIVITY: AUTO Functions other than those above are the same as fixed in SIMPLE MODE (P.28). (However, STABILIZER (P.39) settings may be made.
Useful for taking pictures of timetables and maps instead of taking memos. Regardless of presence of card, pictures will always be saved to clipboard folder of built-in memory, so that they can be distinguished from normal pictures and viewed immediately. Viewing clipboard pictures (clipboard playback) Select ‘PLAY’ in step on left View 1 picture at a time Previous View 9 pictures on screen Select a clipboard picture and press ‘MENU/SET’ to display single screen.
Applications (Record) 12 Taking/viewing clipboard pictures (Continued) CLIPBOARD menu Press ‘MENU/SET’ while recording or viewing to display menu. REC ON CLIPBOARD menu Select item REC ON CLIPBOARD GO TO PLAY PICT.SIZE AUDIO REC. INITIAL DISP. CLOCK SET SELECT OFF ON EXIT Default setting: GO TO PLAY: View clipboard pictures. PICT.SIZE: Change picture size. (2M EZ / 1M EZ ) Select picture size with ▲▼ and press ‘MENU/SET’. AUDIO REC.: Record sound (5 seconds) simultaneously.
Applications (View) 1 Viewing as list (Multi playback/Calendar playback) You can view 9 (or 25) pictures at once (multi playback), or view all pictures taken on a certain date (calendar playback). (To view clipboard pictures as a list → P.59) Set to Set to multiple screen display Date recorded Picture no. MAR.15.2007 1/14 Scroll bar Turn to W side W Delete MENU/SET Note Pictures edited on a computer may not be displayed correctly or may show incorrect dates.
Applications (View) 2 Viewing motion pictures/ pictures with audio Set to Select and play picture Motion pictures Motion picture icon PLAY MOTION PICTURE 100-0001 1/3 25s 10:00 MAR.15.2007 Operations during motion picture playback Hold to rewind (single frame step while paused) Pause (play, when already paused) Hold to fast forward (single frame step while paused) Recording time Elapsed time displayed while viewing Pictures with audio Audio icon PLAY AUDIO 100-0001 1/3 Stop 10:00 MAR.15.
Applications (View) 3 Creating still pictures from motion pictures (DMC-TZ3 only) During playback, pause at desired moment (see left for playback method) To continue playback: ▲ To advance single frame: ◄► SAVE W To make single picture from single frame when paused (go to step ) To make single picture from 9 surrounding frames Frame step: To advance by 3 frames:▲▼ To advance by 1 frame: ◄► Turn to W side SELECT W T SAVE To change no.
Applications (View) 4 Using PLAY menu DUAL DISPLAY SLIDE SHOW FAVORITE ROTATE DISP. ROTATE SELECT PLAY menu settings (P.18) Pictures will be selected from built-in memory (not clipboard) if no card is inserted. 1/ 3 PLAY OFF ON EXIT (Screen example: DMC-TZ3) DUAL DISPLAY (DMC-TZ3 only) Displays 2 pictures vertically. Useful for comparing pictures. Select ‘DUAL DISPLAY’ from PLAY menu (P.17, 18) View pictures Selected pictures outlined in orange Select picture 2007.3.
Various playback and editing features for your pictures. Set mode dial to . Select ‘START’ ALL SLIDE SHOW START DURATION EFFECT AUDIO 2SEC.
Applications (View) 4 Using PLAY menu ROTATE DISP. (Continued) ROTATE Automatically rotate portrait pictures, manually rotate pictures by 90°. ROTATE DISP. ROTATE Display with automatic rotation Display with manual rotation Select ‘ROTATE DISP.’ from PLAY menu (P.17, 18) Select ‘ON’ 1/ 3 PLAY DUAL DISPLAY SLIDE SHOW FAVORITE ROTATE DISP. ROTATE SELECT Select ‘ROTATE’ from PLAY menu (P.
Select ‘DATE STAMP’ from PLAY menu (P.17, 18) Select ‘SINGLE’ or ‘MULTI’ DATE STAMP DPOF PRINT PROTECT AUDIO DUB. RESIZE SELECT SINGLE 100-0001 1/13 SELECT SET EXIT Select items and make settings for each MULTI SET MULTI (up to 50 pictures) DATE STAMP setting DATE STAMP displayed where DATE 7 8 9 STAMP already set To release setting: ▼ 10 11 12 To complete settings: Press CANCEL SELECT SET/CANCEL SET ‘MENU/SET’.
Applications (View) 4 Using PLAY menu (Continued) DPOF PRINT Picture/picture no./date printing settings can be made for when printing with DPOF printcompatible shops or printers. (Ask at shop to check compatibility) For more information visit: http://panasonic.jp/dc/dpof_110/white_e.htm Select ‘DPOF PRINT’ from PLAY menu (P.17, 18) Select ‘SINGLE’ or ‘MULTI’ 2/ 3 PLAY DATE STAMP DPOF PRINT PROTECT AUDIO DUB.
PROTECT Set protection to disable picture deletion. Prevents deletion of important pictures. Select ‘PROTECT’ from PLAY menu (P.17, 18) Select ‘SINGLE’ or ‘MULTI’ 2/ 3 PLAY DATE STAMP DPOF PRINT PROTECT AUDIO DUB.
Applications (View) 4 Using PLAY menu (Continued) AUDIO DUB. Add audio to previously taken pictures. Select ‘AUDIO DUB.’ from PLAY menu (P.17, 18) Select image and start recording AUDIO DUB. 100-0001 1/13 SELECT START EXIT Recording will automatically end after 10 seconds, even if ▼ is not pressed. Stop recording To complete For files already with audio, select whether or not to overwrite existing audio with ▲▼, and press ‘MENU/ SET’. Press ‘MENU/SET’ twice.
TRIMMING Enlarge your pictures and trim unwanted areas. Select ‘TRIMMING’ from PLAY menu (P.17, 18) Select picture TRIMMING 100-0001 1/3 SELECT SET EXIT Select area to trim Expand Reduce Change position Trim Select whether to delete original picture TRIMMING DELETE ORIGINAL PICTURE ? YES NO CANCEL SELECT To complete YES’: Trim (Original picture deleted) Select ‘NO’ for protected pictures (P.69). ‘NO’: Create new, trimmed picture (Original picture remains) SET Press ‘MENU/SET’ twice.
Applications (View) 4 Using PLAY menu (Continued) ASPECT CONV. Convert pictures taken in to or (Cannot be used with pictures not taken in Select ‘ASPECT CONV.’ from PLAY menu (P.17, 18) for printing. (P.51) .) Select or 3/ 3 PLAY TRIMMING ASPECT CONV. COPY FORMAT SELECT Select picture ASPECT CONV. SELECT (Screen example: DMC-TZ3) SET Select horizontal position and convert 100-0001 1/19 SET ADJUST. SET : SHUTTER EXIT EXIT Changes to outlined size Move portrait pictures using ▲▼.
Select picture (for and ) Select ‘YES’ (Screen shown is example) COPY COPY 100-0001 1/13 SELECT SET To complete COPY PICTURES FROM BUILT-IN MEMORY TO MEMORY CARD? To cancel during : Press ‘MENU/SET’. YES NO SELECT EXIT SET Press ‘MENU/SET’ twice. To copy to a card, use a card with a capacity of at least 12.7MB. Copying pictures may take several minutes. Do not turn off power or perform other operations during copying. DPOF settings (P.
Connecting with other devices 1 Using with computer Preparations: Ensure that you have a sufficiently-charged battery, or an AC adaptor attached (DMW-AC5PP, sold separately). Remove memory card if wishing to use built-in memory. Turn on power of both camera and computer Set to any mode except (Do not move the mode dial while connected to computer.) Displayed during data transmission.
Connect to your computer to save, print, and e-mail your pictures. (Using the supplied software is recommended. (P.11).) Folder and file names on computer Windows Drives are displayed in ‘My Computer’ folder. Macintosh Drives are displayed on the desktop. (Displayed as ‘LUMIX’, ‘NO_NAME’, or ‘Untitled’.) Folder structure Built-in memory Card DCIM (Still/motion pictures) 100_PANA (Up to 999 pictures/folder) P1000001.JPG P1000002.JPG P1000999.
Connecting with other devices 2 Printing Preparations: Ensure that you have a sufficiently-charged battery, or an AC adaptor (DMW-AC5PP, sold separately). Remove memory card to use pictures in built-in memory. Adjust settings on your printer (print quality, etc) as required.
You can connect directly to a PictBridge-compatible printer for printing. Printing single pictures Printing multiple pictures Select picture to print Select ‘MULTI PRINT’ PictBridge PictBridge 100-0001 1/3 PLEASE SELECT THE PICTURE TO PRINT SELECT MULTI PRINT 100-0001 1/3 PLEASE SELECT THE PICTURE TO PRINT SELECT MULTI PRINT PRINT Select ‘PRINT START’ Select item PictBridge SINGLE SELECT PRINT START PRINT WITH DATE NUM.
Connecting with other devices 2 Printing (Continued) Print settings Item PRINT WITH DATE NUM. OF PRINTS Settings OFF/ON Set number of pictures PAPER SIZE (printer takes priority) L/3.5”×5” (89 × 127 mm) 2L/5”×7” (127 × 178 mm) POSTCARD (100 × 148 mm) A4 (210 × 297 mm) CARD SIZE (54 × 85.6 mm) 10×15cm (100 × 150 mm) 4”×6” (101.6 × 152.4 mm) 8”×10” (203.2 × 254 mm) LETTER (216 × 279.
Connecting with other devices 3 Viewing on TV screen You can view pictures on a TV screen by connecting your camera to your TV with the supplied AV cable. Preparations: Turn off both camera and TV. Set the TV aspect (P.22). Connect camera to TV Turn on TV Set to auxiliary input. Turn on camera Set to AV cable (always use cable supplied) Yellow: To video socket White: To audio socket Align marks and insert Hold here Check socket direction and insert straight in.
1 List of LCD monitor displays Others In recording 1 2 3 4 5 6 7 8 14 13 12 F3.3 9 10 11 1/30 Recording mode (P.13) 1 Flash mode (P.36) Optical image stabilizer (P.39) AF area (P.54) Focus (P.25) Picture size (P.52) Quality 2 (P.53) Battery capacity (P.25) Number of recordable pictures 3 (P.92) Save destination (P.26) Recording state Histogram (P.33) 1 2 3 4 5 6 7 8 1 2 9 Travel date (P.48) 4 10 Aperture value (P.25) Shutter speed (P.25) Intelligent ISO mode (P.46) Elapsed recording time (P.
In playback 1 13 12 2 3 4 PLAY AUDIO 5 11 10 9 8 7 3RD DAY F3.31/30 10:00 MAR.15.2007 AWB 6 5 Histogram (P.33) Cable disconnection warning icon (P.76) 6 Favorites settings 3 (P.65) 7 Recorded date and time 8 Destination settings (P.49) 9 Recording information 4 1 month 10 days Age in years/months (P.42) 10 Power LCD (P.34) 11 Travel elapsed days (P.48) 12 Audio playback 5 (P.62) 13 Date stamp display 6 (P.66) Favorites (P.65) PLAYBACK mode 1 (P.13) Number of DPOF prints (P.
Others 2 Message displays THIS MEMORY CARD IS LOCKED Release using the write-protect switch on the SD memory card or SDHC memory card. (P.26) NO VALID PICTURE TO PLAY Take pictures, or insert a different card already containing pictures. THIS PICTURE IS PROTECTED Release the protection before deleting, etc. (P.69) SOME PICTURES CANNOT BE DELETED/THIS PICTURE CANNOT BE DELETED Non-DCF images (P.90) cannot be deleted. → Save all necessary data to computer (or other device), and ‘FORMAT’ (P.
Meanings of and required responses to major messages displayed on LCD monitor. MEMORY CARD ERROR PLEASE CHECK THE CARD Access to card has failed. → Insert card again. MEMORY CARD ERROR MEMORY CARD PARAMETER ERROR Card is not of SD standard. Only SDHC memory cards can be used for capacities of 4GB or greater. READ ERROR PLEASE CHECK THE CARD Data read has failed. → Check whether card has been inserted correctly (P.15). WRITE ERROR PLEASE CHECK THE CARD Data write has failed.
3 Q&A Others Troubleshooting FAQ Memory Card Which cards can I use? See (P.15) for types, and (P.92) for recording capacities. Using Panasonic cards is recommended. Pictures How can I easily send pictures to my computer? Connect the camera to your computer using the supplied USB cable (P.74) to copy (drag & drop) picture files to your computer hard disk. (You can also use the supplied software ‘LUMIX Simple Viewer.) Use a USB reader-writer.
Try checking these items (P.84-89) first. (Restoring menu settings to default values may solve certain problems. Try using ‘RESET’ in SETUP menu (P.22).) Battery, power Camera does not work even if power is turned on. Battery is not inserted correctly (P.15), or needs recharging (P.14). LCD monitor shuts off even if power is turned on. Camera is set to ‘POWER SAVE’ or ‘ECONOMY’ (P.20). → Press shutter button halfway to release. Battery needs recharging (P.14).
Others 3 Q&A Troubleshooting (Continued) Recording (continued) Recorded pictures appear coarse, or there is interference. ISO sensitivity is high, or shutter speed is low. (Default SENSITIVITY setting is ‘AUTO’ – interference may appear with indoor pictures.) → Lower ‘SENSITIVITY’ (P.51). → Set ‘COL. MODE’ to ‘NATURAL’ (P.57) → Take pictures in brighter locations. Camera set to ‘HIGH SENS.’ scene mode (P.44).
LCD monitor (continued) Date/age is not displayed. Current date, TRAVEL DATE (P.48), and ages in ‘BABY’(P.42) and ‘PET’ (P.44) scene modes are only displayed for approx. 5 sec after start-up, setting changes, or mode changes. They cannot be always displayed. Flash No flash emitted. Flash set to ‘FORCED OFF ’ (P.36). When set to ‘AUTO ’, flash may not be emitted in certain conditions. Flash cannot be emitted in MOTION PICTURE mode , or the ‘SCENERY’, ‘NIGHT SCENERY’ (P.
Others 3 Q&A Troubleshooting (Continued) TV, computer, printer No image appears on TV. Image blurred or not colored. Not connected correctly (P.79). TV input setting not set to auxiliary input. ‘VIDEO OUT’ not set to ‘NTSC’ (P.22). TV screen display different to LCD monitor. Aspect ratio may be incorrect or edges may be cut off with certain televisions. Cannot play motion pictures on TV. Card is inserted into TV. → Connect with AV cable (supplied) and play on camera (P.79).
Others Menu not displayed in desired language. Change ‘LANGUAGE’ setting (P.22). Camera rattles if shaken. This sound is made by the lens movement and is not a fault. Cannot set ‘AUTO REVIEW’. Cannot be set when any of the following are in use: ‘AUTO BRACKET’ (DMC-TZ3 only) (P.38), ‘BURST’ (P.54), ‘SELF PORTRAIT’ scene mode (P.42), MOTION PICTURE mode (P.47), or ‘AUDIO REC.’ (P.53). Red lamp illuminated when pressing shutter button halfway in dark locations. ‘AF ASSIST LAMP’ set to ‘ON’ (P.56).
Others 4 Usage cautions and notes When in use Camera may become warm if used for long periods of time, but this is not a fault. To avoid jitter, use a tripod and place in a stable location. (Especially when using telescopic zoom, lower shutter speeds, or self-timer) Keep the camera as far away as possible from electromagnetic equipment (such as microwave ovens, TVs, video games etc.).
Memory cards To prevent damage to cards and data ●Avoid high temperatures, direct sunlight, electromagnetic waves, and static electricity. ●Do not bend, drop, or expose to strong impacts. ●Do not touch connectors on reverse of card or allow them to become dirty or wet. When disposing of/transferring memory cards ●If using the ‘format’ or ‘delete’ functions on your camera or computer, this only changed the file management information, and does not completely delete the data from within the memory card.
5 Recording picture/time capacity Others Recording picture capacity (still pictures) Varies according to following settings. ASPECT RATIO PICT.SIZE 6M∗2 5M EZ∗1 3M EZ 2M EZ 1M EZ 7M∗1 (3072 × 2304) (2816 × 2112) (2560 × 1920) (2048 × 1536) (1600 × 1200) (1280 × 960) 0.
Figures given are estimates. May vary according to conditions, card type, and subject. Recording capacities/times displayed on LCD monitor may not be reduced regularly. ASPECT RATIO ( ) (P.51) PICT.SIZE (0.3MEZ-7M) (P.52) QUALITY (picture quality : high : standard) (P.53) 1 2 : DMC-TZ3 : DMC-TZ2 7M∗1 6M∗2 4.5M EZ 2.5M EZ 6M∗1 5.5M∗2 3.
6 Specifications Others Digital Camera: Information for your safety Power Source Power Consumption Camera effective pixels Image sensor Lens Digital zoom Extended optical zoom Focus Focus range Normal Macro/Simple/Motion picture/ Intelligent ISO/Clipboard Scene mode Shutter system Motion picture recording Burst recording Burst speed Number of recordable pictures ISO sensitivity Shutter speed White balance Exposure (AE) Metering mode LCD monitor Flash 94 VQT1B61 DC 5.1 V When recording: 1.
Microphone Speaker Recording media Picture size Still picture Motion pictures (*Only when using an SD Memory Card) Quality Recording file format Still Picture Still pictures with audio Motion pictures Interface Terminal Dimensions (excluding the projection part) Mass Operating temperature Operating humidity Monaural Monaural Built-in Memory (Approx. 12.
Others 7 Optional accessories Product name: Battery Pack Product no.: CGA-S007A Product name: AC adaptor Product no.: DMW-AC5PP Performance identical to supplied battery pack. Recommended for taking on holiday, etc. Product name: Leather Case Product no.: DMW-CT3 Product name: Marine Case Product no.: DMW-MCTZ3 Product name: Semi Hard Case Product no.: DMW-CHTZ3 Product name: SDHC Memory Card Product no.: 4 GB: RP-SDR04GU1K Product name: SD Memory Card Product no.
Digital Camera Accessory Order Form (For USA Customers) Please photocopy this form when placing an order. 1. Digital Camera Model # 2. Items Ordered Accessory # Description Price Each Quantity Total Price Subtotal Your State & Local Sales Tax Shipping & Handling 6.95 Total Enclosed 3.Method of payment (check one) Check of Money Order enclosed (NO C.O.D.
Request for Service Notice (For USA Only) Please photocopy this form when making a request for service notice. In the unlikely event this product needs service. Request for Service Notice: (USA Only) • Please include your proof of purchase. (Failure to do so will delay your repair.) • To further speed your repair, please provide an explanation of what wrong with the unit and any symptom it is exhibiting.
Limited Warranty (For USA Only) PANASONIC CONSUMER ELECTRONICS COMPANY, DIVISION OF PANASONIC CORPORATION OF NORTH AMERICA One Panasonic Way, Secaucus, New Jersey 07094 PANASONIC PUERTO RICO, INC. Ave. 65 de Infantería, Km. 9.
Carry-In or Mail-In Service For Carry-In or Mail-In Service in the United States call 1-800-272-7033. For assistance in Puerto Rico call Panasonic Puerto Rico, Inc. (787)-750-4300 or fax (787)-768-2910. This warranty ONLY COVERS failures due to defects in materials or workmanship, and DOES NOT COVER normal wear and tear or cosmetic damage.
Customer Services Directory (For USA Only) For Product Information, Operating Assistance, Literature Request, Dealer Locations, and all Customer Service inquiries please contact: 1-800-272-7033, Monday-Friday 8:30am-8pm EST. Web Site: http://www.panasonic.com/consumersupport You can purchase parts, accessories or locate your nearest Service Center by visiting our Web Site.
Merci d’avoir choisi Panasonic! Vous avez acheté l’un des appareils les plus perfectionnés et les plus fiables actuellement sur le marché. Utilisé selon les directives, il vous apportera ainsi qu’à votre famille des années de plaisir. Veuillez prendre le temps de remplir la fiche cicontre. Le numéro de série se trouve sur l’étiquette située sur le dessous de votre appareil photo. Conservez le présent manuel afin de pouvoir le consulter au besoin.
Éloignez l’appareil le plus possible de tout dispositif émettant un champ électromagnétique (tel un four à microondes, un téléviseur, une console de jeux vidéo, etc.). ●Si vous utilisez l’appareil sur le dessus ou à proximité d’un téléviseur, les images ou le son pourraient être déformés par son champ électromagnétique. ●N’utilisez pas l’appareil à proximité d’un téléphone cellulaire car l’interférence pourrait perturber les images et le son.
Index List of LCD monitor displays (P.80) A E AC Adaptor ................................. 74, 76, 90 Aerial Photo Mode .................................. 44 AF Assist Lamp....................................... 56 AF Lock .................................................. 44 AF Mode ................................................. 54 Aspect Ratio ........................................... 51 Audio Dubbing ........................................ 70 Audio Recording .....................................
O Operational Sound............................ 22, 29 Optical Image Stabilizer.......................... 39 Optical Zoom .......................................... 27 P PAL ......................................................... 23 Party Mode ............................................. 42 Pet Mode ................................................ 44 PictBridge ............................................... 76 Picture Quality Setting (Motion Picture Mode) ...............................................
MEMO 106 VQT1B61
MEMO VQT1B61 107
QuickTime and the QuickTime logo are trademarks or registered trademarks of Apple Computer, Inc., used under license therefrom. Panasonic Consumer Electronics Company, Division of Panasonic Corporation of North America One Panasonic Way, Secaucus, NJ 07094 Panasonic Puerto Rico, Inc. Ave. 65 de Infantería, Km. 9.5, San Gabriel Industrial Park, Carolina, Puerto Rico 00985 Panasonic Canada Inc. 5770 Ambler Drive, Mississauga, Ontario, L4W 2T3 © 2007 Matsushita Electric Industrial Co., Ltd.