
System information


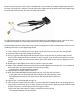


52. Put the black washer on the RCA connecter followed by the gold nut.
53. Place the 1.5” X 0.755 nylon washer over the outside of the double “D” nut and use the ½” open end
wrench to tighten the nut on the RCA connector; do not over tighten, it only needs to be snug, about
½ turn.
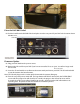
Changing the Fuses
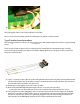
54. Lift o the fuse cover and fuse with the back of the tweezers shown below left.
Note: Both of the fuses are the same so you don’t need to worry about mixing them up.
55. Locate the fuse F1 and F2 on the power supply board near the AC inlet module.
56. Remove the old fuse by twisting it out from under the latches and insert the gold fuse by snapping it
into the fuse cover latches as shown below right.
57. Replace the fuse by snapping the fuse cover and fuse back into the socket.
Replacing the Top Cover
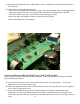
58. If your DAC has a top cover ground wire, reconnect it to the ground block in the rear corner of the
chassis near the AC inlet. See photo at the center of page 5.
59. Press the EMI foam back onto the rear ange of the top cover if it has lifted. See photo below on the
right.
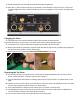
60. Flip the top cover over and lower it into the chassis rear rst to ensure the EMI foam on the rear of the
top cover gets captured inside the chassis as shown below.
61. Press back and down to drop the front of the top cover in place as shown below.
62. Carefully ip the unit over on its top and secure the top cover in place with the four 4-40 at head
screws in locations shown in the center photo on page 4.
63. It is now ok to remove the wrist strap from your wrist and the DAC.
Use ½” open end Wrench, Snug