
Owner's Manual


13
Dear Customer,
Congratulations on your purchase of this innovative
and high-qual ity HELIX product.
The HELIX M ONE X highlights best quality, excel-
lent manufacturing and state-of-the-art technology.
Thanks to more than 30 years of experience in re-
search and development of audio products this am-
plier generation sets new standards.
We wish you many hours of enjoyment with your
new HELIX amplier.
Yours,
AUDIOTEC FISCHER Team
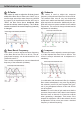
General installation instructions for HELIX
components
To prevent damage to the unit and possible injury,
read this manual carefully and follow all installation
instructions. This product has been checked for
proper function prior to shipping and is guaranteed
against manufacturing defects.
Before starting your installation, disconnect the
battery’s negative terminal to prevent damage
to the unit, re and/or risk of injury. For a proper
performance and to ensure full warranty coverage,
we strongly recommend to get this product installed
by an authorized HELIX dealer.
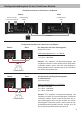
Install your M ONE X in a dry location with sucient
air circulation for proper cooling of the equipment.
The amplier should be secured to a solid mounting
surface using proper mounting hardware. Before
mounting, carefully examine the area around and
behind the proposed installation location to ensure
that there are no electrical cables or components,
hydraulic brake lines or any part of the fuel tank lo-
cated behind the mounting surface. Failure to do so
may result in unpredictable damage to these com-
ponents and possible costly repairs to the vehicle.
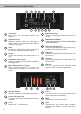
General instruction for connecting the HELIX
M ONE X amplier
The HELIX M ONE X amplier may only be installed
in vehicles which have a 12 Volts negative terminal
connected to the chassis ground. Any other system
could cause damage to the amplier and the electri-
cal system of the vehicle.
The positive cable from the battery for the complete
system should be provided with a main fuse at a
distance of max. 30 cm from the battery. The val-
ue of the fuse is calculated from the maximum total
current input of the car audio system.
Use only suitable cables with sucient cable
cross-section for the connection of the HELIX
M ONE X. The fuses may only be replaced by
identically rated fuses (3 x 40 A) to avoid dam-
age of the amplier.
Prior to installation, plan the wire routing to avoid
any possible damage to the wire harness. All
cabling should be protected against possible crush-
ing or pinching hazards. Also avoid routing cables
close to potential noise sources such as electric
motors, high power accessories and other vehicle
harnesses.
Congratulations!
General instructions