
Owner's Manual


Connection of HELIX M ONE X to the head unit /
car radio:
Caution: Carrying out the following steps will re-
quire special tools and technical knowledge. In or-
der to avoid connection mistakes and / or damage,
ask your dealer for assistance if you have any ques-
tions and follow all instructions in this manual (see
page 11). It is recommended that this unit will be
installed by an authorized HELIX dealer.
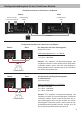
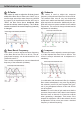
1. Connecting the lowlevel line inputs
Use the correct cable (RCA / Cinch cable) to
connect these inputs to the lowlevel line outputs
of your car radio. It is mandatory to use both
lowlevel line inputs.
The automatic turn-on circuit does not work
when using the lowlevel line inputs. In this case
the remote input (REM) has to be connected to
activate the HELIX M ONE X .
Important: It is strictly forbidden to use the
Highlevel Input and lowlevel Line Input at the
same time. This may cause severe damage to
the lowlevel line outputs of your car radio.
2. Connecting the highlevel speaker inputs
The highlevel loudspeaker inputs can be con-
nected directly to the loudspeaker outputs of an
OEM or aftermarket radio using appropriate ca-
bles (loudspeaker cables with 1 mm² / AWG 18
max.).
It is mandatory to use both highlevel speaker
inputs. Make sure that the polarity is correct.
If one connection has reversed polarity it may
aect the performance of the amplier. If this
input is used the remote input (REM) does not
need to be connected as the amplier will au-
tomatically turn on once a loudspeaker signal
is applied.
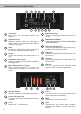
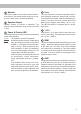
3. Adjustment of the input sensitivity
Attention: It is mandatory to properly adapt
the input sensitivity of the M ONE X to the
signal source in order to avoid damage to
the amplier.
If you want to change the input sensitivity use
the Gain control (see page 15, item 3). The set-
ting of the control aects both the lowlevel line
inputs (Line Input) and the highlevel speaker
inputs ( Highlevel Input)!
If the High level Input is used in combination
with a standard car radio we recommend an in-
put sensitivity of roughly 9 Volts. For this pur-
pose, turn the control from max. CCW position
to 9 o’clock position.
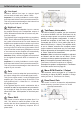
4. Connection to power supply
Make sure to disconnect the battery before
installing the HELIX M ONE X !
Connect the +12 V power cable to the positive
terminal of the battery. The positive wire from
the battery to the amplier power terminals
needs to have an inline fuse at a distance of
less than 12 inches (30 cm) from the battery.
The value of the fuse is calculated from the
maximum total current draw of the whole car
audio system (M ONE X = max. 120 A RMS
at 12 V power supply). If your power wires are
short (less than 1 m / 40”) then a wire gauge of
10 mm² / AWG 8 will be sucient. In all other
cases we strongly recommend gauges of 16 -
25 mm² / AWG 6 – 4!
The ground cable (same gauge as the +12 V
wire) should be connected to a common ground
reference point (this is located where the neg-
ative terminal of the battery is grounded to the
metal body of the vehicle), or to a prepared met-
al location on the vehicle chassis, i.e. an area
which has been cleaned of all paint residues.
18
Installation