
Owner's Manual


30
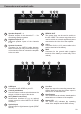
Initial start-up and functions
1
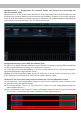
Speaker Output E - J
These outputs are used for connecting speaker
systems. The impedance must not be lower than
4 Ohms for channels E - H and 2 Ohms for channel
I & J.
Important: We highly recommend to make the gen-
eral settings in the DSP PC-Tool software before
the rst start-up. Especially if the UP 10DSP will be
used to drive fully active speaker systems, a wrong
setup can destroy your tweeters right away.
Attention: Solely use the connection cable with the
12-pole connector and ying leads which is includ-
ed in delivery or an optional available cable harness
from the MATCH accessory assortment!
2
Highlevel Input E - H
4-channel highlevel loudspeaker input of the chan-
nels E - H to connect the amplier directly to loud-
speaker outputs of OEM / aftermarket radios or
OEM ampliers that do not have any pre-amplier
outputs. Input sensitivity is factory-set to 11 Volts.
It is possible to optimally adapt the input sensitivity
to the signal source using the DSP PC-Tool soft-
ware (DCM menu → Signal Management). The
control range of the highlevel inputs is 4 - 16 Volts
for channels A - F and 4 - 16 Volts or 8 - 32 Volts for
channels G & H (see page 35, point 4).
Attention: Solely use the connection cable with the
8-pole connector and ying leads which is included
in delivery or an optional available cable harness
from the MATCH accessory assortment!
3
System Connector
This connector is used as signal input from the OE
radio or factory installed amplier and as signal
output of the amplier channels A to D for connect-
ing the loudspeakers. The impedance per channel
must not be lower than 4 Ohms. Input sensitivity
is factory-set to 11 Volts. It is possible to optimally
adapt the input sensitivity to the signal source using
the DSP PC-Tool software (DCM menu → Signal
Management). The control range of the Highlevel
Input is 4 - 16 Volts (see page 35, point 4).
Solely use this terminal in combination with the
connection cable that is included in delivery of the
amplier or an appropriate cable harness from the
MATCH accessories program.
Caution: The use of other harnesses may cause
severe harm to the amplier, your head unit / car
radio and your loudspeakers. In any case the war-
ranty will be void!
4
REM IN / OUT
This input is used for connecting the remote in- and
output.
IN: The remote input has to be used to turn on / o
the amplier if the signal source which is connected
to the System Connector or Highlevel Input E - H is
not activating the “automatic turn-on” function (Auto
Remote) or if the amplier shall only be activated /
deactivated by a remote signal applied to the re-
mote input.
The remote lead should be connected to the remote
output / automatic antenna (aerial positive) output
of the head unit / car radio. This is only activated
if the head unit / car radio is switched on. Thus the
amplier is switched on and o together with the
head unit / car radio.
Note: This input needn´t to be assigned if the Sys-
tem Connector or the Highlevel Input E - H are used.
OUT: We strongly recommend to use this output for
turning on / o additional ampliers that are con-
nected to the Line Out of the MATCH UP 10DSP.
This is essential to avoid any interfering signals.
This output is activated automatically as soon as
the boot process of the DSP is completed. Addition-
ally this output will be turned o during the “Power
Save Mode” or a software update process.
5
+12 V
Connect the +12 V power cable to the positive ter-
minal of the battery. Recommended cross section:
min. 6 mm² / AWG 10.
6
GND
The ground cable should be connected to a common
ground reference point (this is located where the
negative terminal of the battery is grounded to the
metal body of the vehicle) or to a prepared metal lo-
cation on the vehicle chassis i.e. an area which has
been cleaned of all paint residues. Recommended
cross section: min. 6 mm² / AWG 10.
7
USB Input
Connect your personal computer to the UP 10DSP
using the provided USB cable. The required
PC software to congure this amplier can be
downloaded from the Audiotec Fischer website