Operating Instructions Model No.: FPE1080 8” LCD TV/DVD Player For assistance, please call: 1-800-645-4994 Or Visit us at http://www.audiovox.com 128-7656 PDF created with FinePrint pdfFactory Pro trial version http://www.fineprint.
Thank you. . . . . . for choosing this tablet DVD player. For your own safety and in order to learn all about the functions available, please read this manual and keep it for future reference. Note: An LCD panel and/or video monitor may be installed in a motor vehicle and visible to the driver if the LCD panel or video monitor is used for vehicle information, system control, rear or side observation or navigation.
Table of Contents A. Cautions and Warnings...........................................................................04 B. About This Manual............................................................................06 C. Desktop Base Installation............................................................................08 D. Mount the unit on the wall..........................................................................09 E. Prior to Operation...........................................................
A. Cautions and Warnings All operation and maintenance instructions must be followed and warnings adhered to. • Do not expose the unit to excessive moisture. • Do not place objects filled with liquids, such as vases, on the unit. • Do not use the unit where there are temperature extremes (below 41°F, 5°C or exceeding 95°F, 35°C). • Adjust the volume to prevent damage to speakers. • Sudden changes in the ambient temperature may cause condensation to form on the optical lens inside the unit.
• When replacement parts are required, be sure the service technician has used replacement parts that are specified. Unauthorised substitutions may result in fire, electric shock or other hazards. • Upon completion of any service or repairs to the unit, ask the service techni- cian to perform operational checks to determine that the product is operating correctly. Handling the LCD panel Do not press hard or jolt the LCD panel. It may cause the LCD panel glass to break and injury may occur.
B. About This Manual The operations described mainly refers to the use of the remote control. Buttons with same or similar marking on the main unit have the same function as those on the remote control. If the symbol occurs on the screen during operation, the function requested is not supported by the media type inserted in the DVD player.
• In this manual, the language in the on-screen display is English. If you change the language, please follow the selected language in the on-screen display. • The screen shown as an example in this manual may be different from the actual screen. • On-screen displays subject to change without notice. Note: The types of functions and operations that can be used for a particular disc vary depending on the features of that disc.
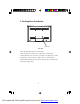
C. Desktop Base Installation Screw Hole Unit Base 1. Place the tablet DVD player base on flat surface. 2. Align the thumb screw with the hole on the back of the DVD player. 3. Thread the thumb screw into the hole on the back of the DVD player and turn the thumb screw counter-clockwise to tighten the base to the DVD player. 4. While holding the DVD player and the base, adjust the unit’s swivel angle for a comfortable viewing position. 8 PDF created with FinePrint pdfFactory Pro trial version http://www.
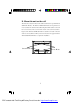
D. Mount the unit on the wall The unit can be easily be mounted on the wall. You will need an optional VESA75 Wall Mount Bracket. The VESA75 Wall Mount Bracket can be purchased at most local electronic retailers. The wall bracket plate which attaches to the wall has four screw holes. The rear of the unit contains four screw holes (Refer to Figure 1).The VESA75 Wall Mount Bracket is attached to the back of the unit with four screws (M4x6 or M4x8).
E. Prior to Operation Place in Position For setting up the unit please choose a location with sufficient air circulation to prevent overheating. The product must be positioned horizontally only. Do not place heavy objects on its housing. To protect the laser unit avoid dusty surroundings. If necessary, please use a cleaning disc carefully following its operating instructions.
Cleaning a Disc To clean a disc use a soft cloth without any cleaning agents. Only wipe from the center hole towards theouteredge,never in toward the center. Using the Remote Control Handset 1. The remote control uses a pre-installed Li-ion type battery. To prevent the battery from discharging, we’ve inserted an insulating strip. Please pull it out prior to first use. If the remote control should begin to operate unreliably replace the battery with a new battery of the same type.
F. The Remote Control Numeric Buttons Starts play or pauses the playback Navigation keys to operate the menu. ENTER confirms the selection Stops DVD playback Selects next or previous channel while in TV mode Selects the TV receiving mode (TV, IRC, HRC, STD) Skips channels that the user wishes not to view. Automatically searches for TV channels Used with “PICTURE” function to increase or decrease the item you select or the volume up or down Selects the picture adjust setting 10.
G. DVD Player + P ROG 1 23 4 5 6 7 22 21 20 19 18 8 9 10 11 12 17 16 15 14 13 1. Power Button 12. Disk Slot 13. Power Indicated LED 2. Program Button 3. Channel +/- Button 14. IR Remote Sensor 15. SD Slot 4. Volume +/- Button 5. Picture Button 16. Cable Antenna Connector 17. DC 12V Input Jack 6. TV/AV/DVD Button 7. Previous Button 18. AV In/Out Switch 19. Audio Right Jack 8. Play/Pause Button 9. Next Button 20. Audio Left Jack 21. Video Jack 10. Stop Button 11. Eject Button 22.
H. Power Supplies a. Using AC adaptor Connect the supplied AC adaptor. INPUT: AC 100 ~ 240V, 50/60Hz, 0.4A b OUTPUT: DC 12V, 1.7A • Use this unit only the supplied AC adaptor. Use with other AC adaptors may damage the unit. a • Do not touch the AC adaptor with wet hands. Doing so is dangerous, as this could result in an electric shock. • Do not use with a voltage other than the voltage displayed. Improper voltage could cause fire, electrical shock, or damage. b.
After connecting the unit to power, press “POWER” button, and the logo picture will appear on the screen and the LED power indicator located on lower left front of the unit will be light. I. Connections Although this unit has its own screen, you can connect it to an external television set as well. 1. Playing a Video Game 1) Slide the AV in/out switch to the “In” position.
1) Connect the supplied AV (RCA) cables into the Audio L+ R and video jack on the left side of the unit following the corresponding colors: (AudioLeft= White, Audio Right= Red, Video=yellow). 2) Connect the supplied AV cables on the other end to your TV. Match the cable by color code. J. Receiving TV Programs 1. Press “DVD/TV/AUX” until the word “TV” appears on the top right. 2. Press “AUTO”, the unit will search TV channels automatically. 3.
L. Playing DVDs DVD Playback 1. Press “DVD/TV/AUX” until the word “DVD” appears on the top right of the screen.; 2. Insert the disk in the right side of the unit with label facing to you. Then the disk will be pulled into the unit and play will begin automatically. DVD discs will usually show a menu to choose from. Use the navigation buttons on the remote control. Highlight the desired menu item and press the ENTER button to activate it. This starts the playback of the selected item.
Display a. During playback press the ‘DISPLAY’ button to display the current Title Number (1), the total Number of Titles (2), the current Chapter Number (3), the total Number of Chapters (4), and the Playing elapsed Time for the title (5). Title, Chapter Number, and Time Screen Display Press “DISPLAY” a second time, the heading content will be changed to the on shown below.
DVD Camera Angles During playback of a disc, press ‘ANGLE’ to display the available angles for discs containing multi-angles*. Press ‘ANGLE’ to select another angle, then press again to exit and return to the normal viewing angle. The angle display will disappear automatically if the ‘ANGLE’ button is not pressed again within 3 seconds. *NOTE: Not all discs contain this feature. Skip & Search Press , to playback the beginning of the previous or next chapter (DVD) or audio track (CD).
Repeat Modes a. During playback press ‘REPEAT’ constantly to see the repeat mode shown below. Repeat Modes Chapter: Repeat the current chapter Title: Repeat the current title All: Repeat all chapters and titles Off: Resume normal playback Change Soundtrack Language During DVD playback press the AUDIO button to select a different audio language (if the DVD disc contains several audio languages).
(if available). Press MENU again to resume playback in the same scene, where you first pressed MENU. Connecting Headphones You can connect one set of headphones with a 3.5 mm jack to the earphone socket on the left side of unit. Plug the jack into the socket which will then disconnect the built in speakers. CAUTION: When using headphones be careful with your hearing . Adjust the volume to comfortable levels before using the headphones. Using headphones with excessive volume may cause damage to your hearing.
1. Press the or button to choose a folder from the folder list on the left side of the screen. 2. Press ENTER to select the highlighted folder. The songs available under the folder will be listed. 3. Use or button to choose a song from the list. Press ENTER to select and begin playback of the highlighted song. 4. Use the ( NEXT ) button to move to the next song. Press the (PREVIOUS) button to move to the beginning of the previous song. [-------- -----]--------.MP3 01.--------02.--------03.
O. Setup System Setup Page 1) With no disc inside the player, press ‘SETUP’ to display the Main screen of the Setup Menu on the screen and “SYSTEM SETUP” appears. At the sam e time, “ 2) Press the ” is highlighted. Press ‘SETUP’ again to exit the Setup Menu . button, “Screen Saver” is highlighted. 3) Press the or button to select the other menus in system setup page. 4) Press to enter the sub menu. 5) Press the or button to select the sub menu and press the ENTER to confirm your selection.
TV DISPLAY 4:3 PS (Panscan): Select when a conventional TV set is connected. When the wide screen disc is played, it displays pictures cropped to fill your TV screen. The left and right edges are cut off. 4:3 LB (Letterbox): Select when a conventional TV set is connected. When the wide screen disc is played, the black bands appear at the top and bottom of screen. 16:9 (WIDE): Select when a wide screen TV set is connected. Played in “FULL” size. (Setting the wide screen TV to “FULL” mode is also necessary.
5) Press the or button to select the sub menu and press the ENTER to confirm your selection. 6) Repeat steps 3-5 for other menus. Note: Press to return the previous menu. You can choose Japanese ,English, French ,Spanish, German as audio, subtitle and menu language. *EXIT SETUP: To exit the SETUP PAGE. * Press to return the Setup main menu. Video Setup 1) In Setup menu, Press the or button to select “VIDEO SETUP” and is highlighted. 2) Press the button, “Brightness” is highlighted.
5) Select the parental level you desire using or button for discs with lock-out function or multiple rating levels. These are listed from the lowest level (1 KID SAFE) to the highest level (8 ADULT). Press ENTER to confirm your selection. Note: The level of 8 Adult is the factory default. 6) Enter the “PASSWORD” and input the password you desired. Next time, you could use this new password to open the lock.(Note: 3308 is always effective.) *EXIT SETUP: To exit the SETUP PAGE.
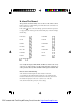
P. Specifications: Model Number: FPE1080 Features UPC number: 0-44476-03140-3 Ver: 00 Display Features Display type Screen Size Aspect Ratio Panel Resolution Brightness Contrast ratio Viewing Angle Backlight life TFT-LCD 8" (diagonal) 4:3 640x480 380Cd/m² 250:1 L/R:65, D:55, U:65 10,000 Hrs TV Reception TV System Channel CATV - UHF/VHF Antenna Impedance Connector type NTSC M 181 channels 75ohm F Audio Maximum Audio Output Total number of speakers 1.
Playback Media Compatibility Audio CD CD-R CD-RW DVD-R DVD-RW DVD-Video Picture CD VCD SVCD SD/MMC YES YES YES YES YES YES YES NO NO YES (512mb max) Playable Format (Codec) MP3 CD-DA VCD 1.1 VCD 2.
Power Requirements Power Source 100-240 VAC 50/60Hz Unit input power Power ON consumption 12VDC 1.7A 13W Dimension (WxHxD) Unit W/stand 10.75 x 8.5 x 4.6 (in) Unit W/O stand 10.75 x 7 x 3 (in) Weight (N.W.) Unit W/stand 3.88(lb) Unit W/O Stand 3.31 (lb) Warranty Parts & Labor 90 day Environment Operating Temperature 41 - 95°F Operating Humidity 30% - 80% *Designs and specifications are subject to change without notice.
90 DAY LIMITED WARRANTY Applies to Audiovox Video Products AUDIOVOX ELECTRONICS CORP. (the Company) warrants to the original retail purchaser of this product that should this product or any part thereof, under normal use and conditions, be proven defective in material or workmanship within ninety (90) days from the date of original purchase, such defect(s) will be repaired or replaced with reconditioned product (at the Company's option) without charge for parts and repair labor.