
Installation Guide

4
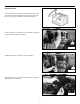
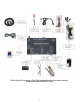
9. USB Update Cable: This is used for map updates. Route the cable from the
module to the glove box for future use as needed. Connect to the Nav module.
10. GPS Antenna: The antenna must be mounted in a location where it has a clear view of the sky. Center of the dash by the glass is
recommended.
NOTE: If reception is poor re-locate to another area and re-test. The GPS antenna cannot be blocked by metal surfaces
and should be visible for best reception.
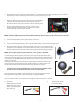
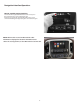
11. Nav activation switch: In Cadillac vehicles with CUE, the nav is activated by pressing the NAV icon on-screen. In other vehicles
the nav will be activated by pressing a set position on the screen or using the included wired switch. If using the switch nd
a proper location for the switch to be mounted and then route the wire to the Nav Module. Note: The switch also allows
switching through the AUX inputs if they are utilized.
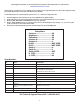
DIP Switch Settings:
Up is OFF; Down is ON for Dip Switches.
12. Check the DIP Switch settings:
Dip 1: UP External RGB input-Not Used
Dip 2: UP Video Input 1 O
Dip 3: UP Video Input 2 O
Dip 4: DOWN High Resolution On for OEM Screen
Dip 5: UP On for OEM Camera, O for after market camera
Dip 6: UP Not used.
Dip 7: UP Up 8” screen, Down for 4” screen
Dip 8: UP Up 8” screen, Down for 4” screen
13. Check to be sure the Map SD Card is installed in the Navigation unit.
Double check all connections, and then reconnect the vehicle battery.