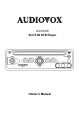
AVD300 SLOT-IN DVD Player Owner’s Manual
A . Welcome Thank you for choosing the AVD300 DVD Player. The AVD300 is designed to optimize the enjoyment of your favorite DVDs in the mobile environment. This DVD Player is constructed to provide years of reliable, trouble-free service. Please read this manual thoroughly prior to operating the player and retain it for future reference. B.
SAFETY PRECAUTION For safety reasons, when changing video media, it is recommended that the vehicle is not in motion, and that you do not allow children to unfasten seat-belts to change video media or make any adjustments to the system. Enjoy your entertainment system but always remember the safety of all passengers remains the number one priority.
. DISC Do not use irregularly shaped discs such as heart or star-shaped discs as they may cause the unit to malfunction. Do not stick paper, tape or glue on the disc. Do not expose the disc to direct sunlight or heat sources such as hot air ducts. Do not touch the surface of the disc. Handle the disc by its edge. Clean the disc by wiping the disc from the center out with a soft lint free cleaning cloth. Remove the disc from the unit and store it in its case after playing.
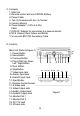
C. Contents 1. Main Unit 2. Remote control with one CR2025 Battery 3. Power Cable 4. Two (2) Brackets with four (4) Screws 5. Owner's Manual 6. Power Adaptor* (4-Pin to 2-Pin) Cable 7. DVRCA * Adaptor for connection to a second monitor 8. RCA Cables ( Red, Yellow, and White) * For use with 8010730 Accessory Cable D. Controls Main Unit (Refer to Figure 1) 1. Power Button 2. Menu Button 3. Previous Button 4. Play & NAV Up, Down, Left, Right Button 5. Next Button 6. Stop Button 7. Video Input Jack 8.
E.
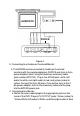
F. Connections MMH56B/T/G REMOTE IR RECEIVER S-VIDEO OUTPUT VIDEO L AUDIO R MONITOR1 MONITOR2 A/V OUTPUT 12VDC INPUT RED SWITCHED 12VDC BLACK GROUND Figure 3 1. Powering Your DVD Player ( Refer to Figure 3) Connect the black wire (-) to the vehicle ground. Connect the red wire (+) to a switched (Accessory) 12VDC source. Plug the other end into the 12VDC input jack on the rear of the unit. 2.
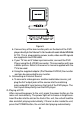
AUDIOVOX DVRCA Figure 4 3. Connecting to an Audiovox Overhead Monitor a. The AVD300 can be connected to Audiovox Overhead monitors with the supplied adaptors (DVRCA and 4 pin to 2 pin power adapter) when using the Audiovox accessory cable (part number 8010730). Plug in the 3 RCA jacks, white (left audio) to white, red (right audio) to red, and yellow (video) to yellow. Connect the 2 pin IR jacks.
Figure 5 b. Connect any of the two monitor ports on the back of the DVD player directly to the Movies To Go headrest hoods Model MMH56 B/T/G. This is plug and play, power, audio, video and IR signals are supplied in one DIN cable. c. If your TV has an S Video input connector, connect the DVD Player using the S-VIDEO connector. This connection will have a better picture. Refer to the owner's manual supplied with the TV to be used. d.
1. Basic Operation POWER EJECT PLAY SLOW PAUSE STOP NEXT PREVIOUS FORWARD REVERSE UP/DOWN/LEFT RIGHT ENTER NUMBERS RETURN MENU REPEAT A-B DISPLAY ANGLE SUBTITLE AUDIO ZOOM SETUP Turn the unit on/off Eject/load the disc Start Playback Play at 1/2, 1/4, or 1/8 times speed Still Picture (1 time) Stop at the present playing point / (2 times) Stop playing Go to the next chapter, track or scene during play back. Go back to the preceding chapter, track or scene during play back.
2. MENU A DVD is divided into sections called titles and chapters. When you play a DVD, a root menu of the disc will appear on the screen of your TV or Monitor. The contents of the menu vary from disc to disc. Press MENU during playing to display the menu, and press ENTER or PLAY to start playing. Some DVDs only allow you to select disc playback options using the DVD menu. 3. DISPLAY (Display contents vary from disc to disc.) 1) PLAYING TIME AND REMAINING TIME a.
c. Press ‘DISPLAY’ the 3rd time to display the Elapsed Time for the chapter. The heading will disappear automatically in about 3 seconds. Chapter Elapsed Time Screen Display d. Press ‘DISPLAY’ the 4th time to display the Remaining Time for the chapter. The heading will disappear automatically after 3 seconds. Chapter Remaining Time Screen Display e. Press ‘DISPLAY’ a 5th time to exit.
Angle Screen Display 3) SUBTITLE During disc playback press ‘SUBTITLE’ to select the subtitle language you desire*, with the current Subtitle Language Number (1) and the total Number of Subtitle Languages (2) displayed. If there are multiple languages press ‘SUBTITLE’ again to select another subtitle language. To turn subtitles OFF, press the ‘SUBTITLE’ button until ‘SUBTITLE OFF’ is displayed. The Subtitle display will disappear automatically if the ‘SUBTITLE’ button is not pressed again within 3 seconds.
4) AUDIO During playback press ‘AUDIO’ to select the audio language you desire*, with the current Audio Channel Number (1) and the total number of Audio Channels (2) displayed. Press AUDIO again to select another audio language. The audio display will disappear automatically if the ‘AUDIO’ button is not pressed again for 3 seconds. Audio Language Screen Display *Some DVDs only allow access to this function through the DVD menu. 5) ZOOM During playback press ‘ZOOM’ to enlarge the picture by 1.
6) A-B REPEAT a. During playback press ‘A-B’ to set the Starting Point A. A-B Repeat Starting Point Screen Display b. Press ‘A-B’ to set the Ending Point B and the player will repeatedly play the part between Point A and Point B. A-B Repeat Ending Point Screen Display c. Press ‘A-B’ a 3rd time to Cancel A-B Repeat. Normal play back will resume from Point A.
7) REPEAT a. During playback press ‘REPEAT’ once to repeatedly play the current chapter. Chapter Repeat ON Screen Display b. During playback press ' REPEAT' again to repeatedly play the current title. Title Repeat ON Screen Display c. During playback press 'REPEAT' a 3rd time to cancel the repeat playback function and resume normal play back. The repeat display will disappear automatically if the ‘REPEAT’ button is not pressed again for 3 seconds.
4. PLAYING AUDIO CDS When playing an audio CD, the DISPLAY Banner appears automatically. It displays the current track and the amount of the time for that track playing, the total amount of time on the disc and the current time running on the disc. Press the DISPLAY button on the remote to display the DISPLAY Banner. The options below show you what happens when you press the DISPLAY button. a.
c. Press ‘DISPLAY’ three times and TOTAL ELAPSED appears along with the current track playing and the total time that the CD has been playing. TOTAL ELAPSED 00:00:00 CDDA 01 TOTAL ELAPSED Screen Display d. Press ‘DISPLAY’ four times and TOTAL REMAIN appears along with the current track playing and the amount of time remaining on the CD. TOTAL REMAIN 00:00:00 CDDA 01 TOTAL REMAIN Screen Display e. Press ‘DISPLAY’ a fifth time and “OFF” will appear momentarily then disappear.
5. PLAYING MP3 DISCS MP3 is a format for storing digital audio. An audio CD-quality song can be compressed into the MP3 format with very little loss of quality, while taking up much less space. CD-R discs that have been encoded in MP3 format can be played on your DVD player. SELECTING FOLDERS AND SONGS When an MP3 disc is inserted in the player, the SMART NAV screen will appear automatically. The SMART NAV screen is used to change folders and songs as well as display Disc TIME and TITLE Information.
3) USING THE REPEAT FEATURE The default mode for the Repeat feature is OFF. Pressing REPEAT consecutively changes the repeat options: • REP-ONE- repeats the songs that is playing. • FOLDER REP- repeats the folder that is playing. • FOLDER- turns off repeat and returns to regular play mode. 4) SELECTING A PLAY MODE You can choose what order the songs will play on a disc temporarily. The FOLDER play mode is the default. To access the play mode options, press STOP if the disc is playing.
5) PROGRAM PLAY To use the program play option, you must create a playlist of songs in the order you want them to play. Note: Once you begin adding songs from a folder to create your play list, you cannot add songs from a different folder. a) Choose the PROG-END option from the PLAY MODE then press Enter to change the option to PROGRAM, PO. b) Add songs to the program list by highlighting the song you want to program and pressing ENTER once the song is highlighted.
a) Press ‘DISPLAY’ once, and “CHAPTER ELAPSED” will appear along with the amount of time the song has been playing. The of actual amount of time the disc has been playing, will be displayed on-screen. CHAPTER ELAPSED 00 : 01 : 32 .. MP3 MP3 MP3 MP3 MP3 TIME ELAPSED Screen Display b) Press ‘DISPLAY’ a Second time and “CHAPTER REMAIN” will appear along with the amount of time left in the song that is playing. The amount of time remaining will be displayed on-screen. CHAPTER REMAIN 00 : 01 : 32 ..
6. SETUP (The contents vary from disc to disc.) Press ‘SETUP ‘to display the Main screen of the SETUP Menu on the screen. Press ‘SETUP ‘again to exit the SETUP Menu and the unit will resume it’s last playback or stop mode. Main SETUP Menu Screen 1) Select ‘GENERAL SETUP’ using the UP/DOWN buttons, then press ‘ENTER’ to enter the GENERAL Setup screen. General SETUP Menu Screen a. Select TV DISPLAY using UP/DOWN, and then press RIGHT to enter the submenu.
* WIDE: When the player is connected to a wide screen TV, a wide picture is shown on the full screen. b. Select ‘ANGLE MARK’ using UP/DOWN, and then press the RIGHT button to enter the submenu. Choose Angle Mark on or off using the UP/DOWN and then press ENTER to confirm the setting. Press the LEFT button to return. ANGLE MARK Screen Display * ON: The screen will show angle mark. (If angle option is available) * OFF: The screen will not display the Angle Mark. c.
d. Select ‘MAIN PAGE’ using UP/DOWN, and then press ENTER to return to the main page. 2) When there’s no disc inside the player, select ‘PREFERENCES’ using UP/DOWN, and then press ‘ENTER’ to enter the preferences page. AUDIO Preference Screen Display a. Select ‘AUDIO’ using UP/DOWN, and then press ‘RIGHT’ to enter the submenu. Select the audio language you desire using UP/DOWN, and then press ‘ENTER’ to confirm the setting. Press LEFT to return. b.
c. Select ‘DISC MENU’ using UP/DOWN, and then press ‘RIGHT’ to enter the submenu. Select the Disc Menu Language you desire using UP/DOWN, then press ‘ENTER’ to confirm the setting. Press ‘LEFT’ to return. DISC MENU Preference Screen Display Note: Language and subtitle selection is only available for discs that are recorded in the above listed languages. If not, the player will play and display on the screen the original recorded language contained in the disc. d.
PASSWORD VERIFY Input Screen Display Enter a 4 digit password, then press ‘ENTER’ to confirm the parental level setting. NOTE: For 1st time use, the default password is 3308. e. Select ‘PASSWORD’ using UP/DOWN, and then press RIGHT to enter the submenu. PASSWORD CHANGE Screen Display Press ‘ENTER’ to enter the Password Change Page. Input the Old Password or the Default Password, the New Password, and the Confirmed New Password. Press ‘ENTER’ to confirm the change.
NOTE: The Default Password is 3308. This password is always effective even after you have selected your own password and changed it. To avoid others from using the default password to set the parental level and change the password, you can record this default password in another area and delete it from this manual. Some discs can be limited depending on the age of users while some discs can not. f. Select ‘DEFAULTS’ using UP/DOWN, and then press RIGHT to enter the submenu.
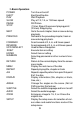
I. Specification Compatible with disc format DVD / CD / MP3 Signal format system NTSC DVD Video format Horizontal 720 pixel, vertical 480 pixel (NTSC) Video output 1.0 Vp-p/75 Ohm Audio output 1.8 V to 2.
12 MONTH LIMITED WARRANTY Applies to Audiovox Mobile Video Products AUDIOVOX ELECTRONICS CORP. (the Company) warrants to the original retail purchaser of this product that should this product or any part thereof, under normal use and conditions, be proven defective in material or workmanship within 12 months from the date of original purchase, such defect(s) will be repaired or replaced with reconditioned product (at the Company's option) without charge for parts and repair labor.
For Customer Service Visit Our Website At WWW.audiovox.com Product Information, Photos, FAQ’s Owner’s Manuals © 2003 Audiovox Electronics Corp., 150 Marcus Blvd., Hauppauge, N.Y.