AVDINPC Installation and Operation Manual AVDINPC APP LAUNCH Power FF VOL TAP MUTE VOL TAP NEXT SEL STOP PLAY DVD/CD/MP3/WMA PLAYER PREV REW 40G HD Audiovox Electronics Corporation 150 Marcus Boulevard Hauppauge, NY 11788 Technical Assistance: 1-800-645-4994 www.Audiovox.com © 2005 Audiovox v.
AVDINPC INTRODUCTION Features • • • • • • • • • • • • • • 40 GB Hard Drive 512 MB DDR RAM 2
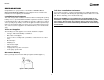
AVDINPC PREPARATION Toll-Free Installation Assistance Congratulations on your purchase of the Audiovox AVDINPC Mobile Multimedia DVD/CD/MP3/WMA personal computer. Please read all of the instructions before beginning the installation. If you require assistance, contact Technical Support at 1-800-323-4815 from 8:30 a.m. to 7:00 p.m. EST Monday through Friday and from 9:00 a.m. to 5:00 p.m. EST on Saturday. (U.S.A. and Canada only.
AVDINPC INSTALLATION The unit has threaded holes in the chassis side panels which may be used with the original factory mounting brackets of some Toyota, Nissan, Mitsubishi, Isuzu, Hyundai and Honda vehicles to mount the computer to the dashboard. Please consult with your local car stereo specialty shop for assistance on this type of installation. 1. Remove the existing factory radio from the dashboard or center console mounting.
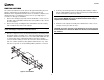
AVDINPC WIRING Wiring Connections 1. 2. 3. 4. 5. 6. 7. 8. 9. 10. 11. 12. 13. 14. 15. 16. 17. 18. 19. 20. 4 PS/2 Mouse PS/2 Keyboard VGA LAN (RJ-45) USB 1/USB 2 S-Video RCA Video Printer COM Port MIC In Line Out Line In AC Adapter (Purchased Separately) – Only use an AC adapter with the following specifications: Output – 12V, 4.3A; Input – 100-240V~1.
AVDINPC Replacing the Fuse When replacing a fuse, be sure to use the correct type and amperage to avoid damaging the computer. The AVDINPC uses one 5 amp ATO fuse. Reconnecting the Battery When wiring is complete, reconnect the battery negative terminal.
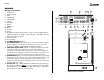
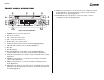
AVDINPC FRONT PANEL OPERATION 6 8 9 15. PREV: Press this button to execute the “Previous” command in various media applications. The Prev button also functions as the “Channel Down” button in TV related applications. 14 AVDINPC APP LAUNCH Power 3 12 FF VOL 5 4 16. PLAY/PAUSE: Press this button to execute the “Play” or “Pause” commands in various media applications.
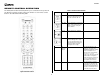
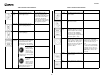
AVDINPC REMOTE CONTROL OPERATION Table 1: Remote Control Functions The RSC (Remote Stick Controller) allows you to control the mouse pointer in 16 directions using the joystick control. The function of each remote control button is described in the following table. Icon Figure 5: Remote Control 8 Name Basic Functions Power Press this button to turn the PC on. Press and hold more than 2 seconds to turn the PC off. App.
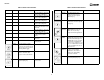
AVDINPC Table 1: Remote Control Functions Table 1: Remote Control Functions Icon Name Basic Functions Multi-Median 1 Press this button to change the current media to My Music. 2 Press this button to change the current media to My Movie. 3 Press this button to change the current media to My Photo. 4 Press this button to change the current media to My DVD. 5 Press this button to stop the current media and return to the Main View. 6 Press this button to change the current media to My TV.
AVDINPC Table 1: Remote Control Functions Icon Name Space/ Select Shift + Tab Basic Functions This button functions like the keyboard [Space] key. Table 1: Remote Control Functions Multi-Median Icon Press this button to add or remove the media file in the current playlist in Media Folder/ File View. This will not delete the media file, but will just exclude the file from the playlist. You an add the media file back to the playlist at any time. Name Basic Functions L.
AVDINPC Table 1: Remote Control Functions Icon Name Basic Functions Table 1: Remote Control Functions Multi-Median Icon Name Basic Functions Multi-Median REW Press this button to execute the “Rewind” command in various media applications. Press this button to execute the “Rewind” command. Press this button to execute the “Fast Forward” command in various media applications. Press this button to execute the “Fast Forward” command. VOL + Press this button to increase the PC system volume.
AVDINPC USING THE MULTI-MEDIAN SOFTWARE Multi-Median is designed to help you enjoy music, movie and photo media files and allows you control your multimedia devices (DVD player, television, digital camcoder or digital camera) using only the remote controller. Please read this section of the manual in full before using your Multi-Median software. • Setting: Customize Multi-Median through “Setting” menu. Please refer to “Changing Program Settings” on page 14 for instructions.
AVDINPC Table 2: Media Folder Icons The selected folder is green. Press the Enter button to view the files in this folder. When media inside the folder is playing, the folder is red. Inside the folder, the file currently playing is outlined in red. Media File View Figure 7: Media Folder View While in “Media Folder View”, press Enter to view the contents of that folder in “Media File View”. The icons in Table 2 indicate the status of the media folder.
AVDINPC the remote control. You can also control playback of recorded video or record the video as a movie file to your HDD using the Play, Pause, F.FWD, and REW buttons on the remote control. Media Preview Media Preview shows the title, sequence number in the playlist, current playing time, and the preview screen for the selected media file. Internet Radio View Internet Radio View shows the internet radio station according to its genre.
AVDINPC Movie Use the Movie menu option to change the background image of the Movie view or to modify the brightness, contrast, saturation and hue. You can also change the aspect ratio, size, position, sync, font, color, bold, outline and shadow properties of the subtitle, remove previous bookmark positions, and change the repeat and shuffle settings.
AVDINPC USING THE IMON REMOTE MANAGER Use the joystick to select the program you’d like to activate, then press in on the joystick (the Enter button) to select it. The Remote Manager group of programs allows you to control various Windows system commands using your remote control. You can run the screensaver directly, turn off the monitor, set timers, enter keyboard characters and perform other useful commands using your remote control.
AVDINPC Monitor Resolution Changer Select ABS to enter an exact time or REL to enter a time relative to the current time. You can also use the keyboard arrow keys to enter the time. After entering the timer settings, press the timer button again to activate the timer for the specified time. The Timer Indicator changes to indicate the time that the SLEEP/ALARM function will begin (see Table 3). iMON Monitor Resolution Changer allows you to change your monitor resolution using the remote control.
AVDINPC 2. From the “iMON Manager“ window, click the Setup button. The “Setup iMON” window appears. Use the remote control joystick to select characters. For buttons with multiple characters, press in on the joystick to select the second or third options. Press the arrow keys to move to the next or previous field. When finished, press the OK button to return the input characters to the application.
AVDINPC Setting Customized Windows Commands 5. When the “Setup iMON” window appears, click Yes to register the program in the launcher. You can use the “Customized Windows CMD” tab to assign Windows system commands that are not covered under the “Windows CMD” tab. Use the same method explained in “Assign Functions to the Remote Control” on page 19. Assign Functions to the Remote Control You can customize many of the remote control buttons to perform different functions in each registered program.
AVDINPC Table 4: Remote Indicator Icons Indicates the usage of the remote RSC joystick as a mouse Indicates the usage of the remote RSC joystick as a keyboard Figure 18: iMON Option Window • The following common options can be modified: • Common • All-time control mode - Select a registered function to run automatically. This is the same as selecting a program using the Application Launcher. • IR signal indicator on desktop - Determine how the Remote Indicator will display on the desktop.
AVDINPC L.I.S. 2 CONTROL CENTER • All functions of L.I.S can be managed easily from the Control Center. By default, the L.I.S. Control Center will run automatically when the computer is turned on. Because the program has so many features, please review the instructions carefully. CG Builder: User can create a unique symbol mark or logo with the CG builder. Table 5: Specifications L.I.S. 2 Introduction Controller L.I.S. 2 USB 1.1/2.0 support The L.I.S.
AVDINPC Navigating the Control Center • • To see the extracted menu, hover the mouse pointer over the control center icon, located on the task bar, and right-click. The “Lost in Space” menu (Figure 19) appears. • • • Winamp: Display the graphic analyzer through the Winamp plug-in. WMPlayer: Display the graphic analyzer screen through the Windows Media Player plug-in. OS/System: Display system and O/S information. E-mail: Check user-defined POP3 E-mail accounts. Exit: Close the L.I.S. Control Center.
AVDINPC Auto User A.F.C (Fan Controller) Use this feature to order items according to priority, control each display interval per second, and modify the information that appears in the Control Center window. The user can control each 4-Channel fan with the L.I.S Control Center. Figure 22: A.F.C. (Fan Control) Window To specify A.F.C. User Control: 1. Click the plus (+) sign to the left of A.F.C. (Fan Controller) to view the A.F.C. Action option. Figure 21: Auto User Window To add a new item: 1.
AVDINPC Figure 24: Time Window Figure 23: Message Alarm Display Time & Date Selection: Choose from three possible display formats. Display Text: Modify the text that appears before the Date/Time and change the horizontal alignment. To set a message alarm: 1. Select the date that you want the alarm to go off. 2. Select the hour and minute of the day. R.T. Clock 3. Enter up to two lines of text to display when the alarm sounds.
AVDINPC In this screen (Figure 25), you can adjust the Refresh time from 1-10 and customize the display text. Cpu/Ram The Cpu/Ram option shows the usage rate of the CPU and Memory (see Figure 26). Figure 27: MBM (Motherboard Monitor) Window The user can specify the type of data he wants received from the MBM. If the MBM is installed properly, the voltage and temperature will be displayed on the L.I.S screen. Winamp Figure 26: Cpu/Ram Window When Winamp is playing, L.I.S.
AVDINPC If you want the graphic analyzer to be displayed on the L.I.S screen automatically when Windows Media Player is sensed, please refer to “Auto User” on page 23. To add the visualization plug-in for Windows Media Player, perform the following steps: 1. Open Windows Media Player plug-in from the pop-up menu.) The “Winamp Preferences” window appears. 2. Select Tools > Options from the menu. 3. In the Options window, click the Visualizations tab. 4. Click the Add button to browse for the plugin. 5.
AVDINPC OS/System Use the OS/System feature to select information on the operating system and related systems. Figure 32: L.I.S. e-Mail Window • Figure 31: OS/System Window Select any relevant information by checking the boxes for desired items. To adjust the display time, use the navigation bar on the right side of the window to scroll to the bottom of the window until “Display Time Set” appears. Drag the button on the bar to adjust the time. • e-Mail L.I.S.
AVDINPC Figure 33: CG Logo File Builder Window You can design a custom logo or symbol by clicking inside the squares to create an image. The result is displayed in the “Display View Box” at the bottom of the screen (see Figure 33).
AVDINPC PLAYNOW! Setting PlayNow! to Automatically Load During boot-up, hit the DEL key to enter the BIOS setup menu. Once in the setup menu, select the etBIOS Configuration submenu. Set [Boot from etBIOS] to [Enabled]. Now, PlayNow! will be launched every time the PC turns on or reboots. To bypass PlayNow! under this configuration, hold down the Scroll Lock key during boot-up to load the next available boot device instead.
AVDINPC TROUBLESHOOTING 30
AVDINPC SPECIFICATIONS Back Panel I/O: • 1 PS2 mouse port • 1 PS2 keyboard port • 1 Parallel port • 1 RJ-45 LAN port • 1 Serial port • 2 USB 2.0 ports • 1 VGA port • 1 RCA port (SPDIF or TV out) • 1 S-Video port • 3 Audio jacks: line-out, line-in and mic-in; can be switched to 6 channel output BIOS: PlayNow!, 4Mbit flash memory CEA Power Ratings Power Output: 18 watts RMS X 4 channels into 4-ohms @ < 1% THD+N Signal to Noise Ratio: 70dBA below reference.
AVDINPC 12-MONTH LIMITED WARRANTY U.S.A: Audiovox Corporation, 150 Marcus Blvd., Hauppauge, NY 11788, 1800-645-4994 CANADA: Call 1-800-645-4994 for location of warranty station serving your area.