DV -K286N-SJ (AUDIOVOX) 98.5.4. 99.12.
DV -K286N-SJ (AUDIOVOX) 98.5.4. 99.12.10 10:9 AM ˘ ` b Safety information CAUTION RISK OF ELECTRIC SHOCK DO NOT OPEN CAUTION: TO REDUCE THE RISK OF ELECTRIC SHOCK, DO NOT REMOVE COVER (OR BACK). NO USER-SERVICEABLE PARTS INSIDE. REFER SERVICING TO QUALIFIED SERVICE PERSONNEL.
DV -K286N-SJ (AUDIOVOX) 98.5.4. 99.12.10 10:9 AM ˘ ` c Safety information, continued harzard. Periodically examine the cord, and if its appearance indicates damage or deteriorated insulation, have it replaced by your service technician.
DV -K286N-SJ (AUDIOVOX) 98.5.4. 99.12.10 10:9 AM ˘ ` d Safety information, continued 13 Power Lines- An outside antenna system should not be located in the vicinity of overhead power lines, other electric light or power circuits, or where it can fall into such power lines or circuits. When installing an outside antenna system, extreme care should be taken to keep from touching or approaching such power lines or circuits as contact with them might be fatal.
DV -K286N-SJ (AUDIOVOX) 98.5.4. 99.12.10 10:9 AM ˘ ` 1 Contents Overview of the equipment ...............................................................................................................................1 Front panel . . . . . . . . . . . . . . . . . . . . . . . . . . . . . . . . . . . . . . . . . . . . . . . . . . . . . . . . . . . . 1 Front panel display . . . . . . . . . . . . . . . . . . . . . . . . . . . . . . . . . . . . . . . . . . . . . . . . . . . . . . 2 Back panel . . . . . . . .
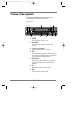
DV -K286N-SJ (AUDIOVOX) 98.5.4. 99.12.10 10:9 AM ˘ ` 1 Overview of the equipment This section summarizes the buttons, controls, and terminals that you will use with your VCR. Front panel 1 POWER 3 2 STOP/EJECT POWER RECORD 5 4 VCR TIMER REC REW PLAY/PAUSE FF CH/TRACKING 10 1 2 3 4 5 6 7 1 9 8 7 6 POWER Press to turn the VCR on or off. STOP/EJECT Press to stop the VCR and to eject a video cassette. Cassette compartment Insert a video cassette into this slot.
DV -K286N-SJ (AUDIOVOX) 98.5.4. 99.12.10 10:9 AM ˘ ` 2 Overview of the equipment, continued 8 Remote sensor This receiver receives a signal from your remote control. Do not block it. 9 Display panel Displays information to assist you in operating the VCR successfully. 10 ▼CH/TRACKING▲ Press the up and down buttons to change the channel or to adjust the tracking during playback. Front panel display POWER RECORD VCR TIMER 1 POWER Indicates that the VCR Power is on.
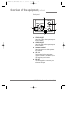
DV -K286N-SJ (AUDIOVOX) 98.5.4. 99.12.10 10:9 AM ˘ ` 3 Overview of the equipment, continued Back panel 2 ANT. IN 3 VIDEO AUDIO IN RF OUT 1 3 CH. 4 OUT 5 4 1 2 3 4 5 3 VIDEO IN/OUT Attach the VCR’s video input/output at these terminals. AUDIO IN/OUT Attach the VCR’s audio input/output at these terminals. Antenna terminal Attach an antenna or cable system at this terminal. CH. 3-4 Set this switch to the appropriate channel (channel 3 or channel 4) for VCR output at your location.
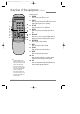
DV -K286N-SJ (AUDIOVOX) 98.5.4. 99.12.10 10:9 AM ˘ ` 4 Overview of the equipment, continued Remote control 1 REMOTE CONTROLLER 2 3 4 5 6 7 8 9 2 POWER 1 1 2 3 4 5 6 7 8 9 INPUT 0 TV/VCR 100 12 13 P/S PLAY REW FF STOP CLEAR DISPLAY CM SKIP 3 11 – CH/TRK + REC/OTR SPEED MENU 10 14 15 16 17 4 5 6 7 8 9 10 ✔ • Objects between the remote control and VCR will block the path of the remote control beam. 11 POWER Press to turn your VCR on or off.
DV -K286N-SJ (AUDIOVOX) 98.5.4. 99.12.10 10:9 AM ˘ ` 5 Overview of the equipment, continued 12 –CH/TRK+ 13 14 15 16 17 Press to change the channel (channels stored in memory only) or to adjust the tracking. P/S Press to pause video tape playback for temporarily still picture. Each press of the button advances the picture one frame. FF Press during stop mode to quickly advance video tape. STOP Press to stop tape movement. CM SKIP Press during playback mode to skip commercials or program segments.
DV -K286N-SJ (AUDIOVOX) 98.5.4. 99.12.10 10:9 AM ˘ ` 6 Overview of the equipment, continued Installing the remote control batteries 1 Open the battery compartment on the back of the remote control. ✔ • Do not mix different types of batteries, or mix an old and a new battery. • Remove and replace weak batteries. Weak batteries can leak and damage your controller. Dispose of batteries properly; never throw them into a fire. 2 Install two AA size batteries as shown.
DV -K286N-SJ (AUDIOVOX) 98.5.4. 99.12.10 10:9 AM ˘ ` 7 Connecting your VCR You must connect your VCR to an external antenna or cable system. Next you will connect the VCR to the television. Follow the directions below to make these connections. You will normally only make one of the connections shown below, not all of them. Connecting an antenna to the VCR • If your antenna ends in a single coaxial lead, press or screw the cable onto the ANT. IN terminal on the back of your VCR. ANT.
DV -K286N-SJ (AUDIOVOX) 98.5.4. 99.12.10 10:9 AM ˘ ` 8 Connecting your VCR, continued VCR ANT.IN • If your antenna system has two sets of twin 300-ohm leads, purchase a combiner (available at electronics stores). Place one set of twin leads underneath the screws on the combiner and tighten the screws. Do the same with the other set of twin leads. Press the cable from the combiner onto the ANT. IN terminal on the back of your VCR. VCR ANT.
DV -K286N-SJ (AUDIOVOX) 98.5.4. 99.12.10 10:9 AM ˘ ` 9 Connecting your VCR, continued • If you have a coaxial terminal for VHF signals and twin lead terminals for UHF signals, you need an adapter(Not supplied) as shown below: TV . VHF 3 CH. 4 • If you have twin lead terminals for all signals, you need an adapter(Not supplied)like this: TV . 3 CH. 4 If your TV does not have Audio/Video inputs, you have finished connecting your VCR to your TV.
DV -K286N-SJ (AUDIOVOX) 98.5.4. 99.12.10 10:9 AM ˘ ` 10 Connecting your VCR, continued 3 Connect an audio cable to the AUDIO OUT terminal on the back of the VCR. TV . . . 3 CH. 4 4 Connect the other end of the audio cable to the AUDIO IN terminals on the TV. If you have a stereo TV, connect only the white (left) terminal. TV . . 3 CH. 4 Connecting a cable system If your cable set-up is not described below, please contact your cable company for more information.
DV -K286N-SJ (AUDIOVOX) 98.5.4. 99.12.10 10:9 AM ˘ ` 11 Connecting your VCR, continued • If your cable system requires you to use a converter box for all channels, connect the incoming cable to the IN terminal on the converter box. Connect another cable between the OUT terminal on the converter box and the ANT. IN terminal on the VCR. Keep your VCR tuned to channel 3 or 4 and change channels using the converter box. ANT.
DV -K286N-SJ (AUDIOVOX) 98.5.4. 99.12.10 10:9 AM ˘ ` 12 Setting up your VCR Once you have connected your VCR and put batteries in the remote control, you are ready to use the VCR. Before you start, however, you must be certain to do the following: • • Turn on the television. Tune the television to channel 3 or 4 (whichever channel you selected when connecting the VCR). Turning the VCR on 1 Press POWER on the remote control. You can also press POWER on the VCR’s front panel.
DV -K286N-SJ (AUDIOVOX) 98.5.4. 99.12.10 10:9 AM ˘ ` 13 Setting up your VCR, continued Setting the clock The clock displays the current time and is used for timer recording. Therefore, it is important to set the time and date accurately. If you are setting the clock for the first time, or if a power failure has erased the clock settings, the clock will display --:--. 1 Press MENU to display the menu. 2 Press 2 to select Clock Set and press 1 to select Time and Date Set.
DV -K286N-SJ (AUDIOVOX) 98.5.4. 99.12.10 10:9 AM ˘ ` 14 Setting up your VCR, continued 6 Press MENU to save the settings and exit from the Time and Date Set menu. 7 Press MENU repetedly to exit the menu system and return to normal viewing. Selecting cable or antenna viewing You must set the viewing mode for your VCR, choosing either CABLE (cable system connection) or ANTENNA (antenna connection). Make your selection based upon how you connected your television (UHF/VHF antenna connection).
DV -K286N-SJ (AUDIOVOX) 98.5.4. 99.12.10 10:9 AM ˘ ` 15 Setting up your VCR, continued 2 Press 3 to select Channel Set. CHANNEL SET 1 Auto Channel Search 2 Add/Remove Channels 3 Signal Type : CABLE Press MENU to exit ✔ 3 • Detect Automatically ;A strong cable or antenna signal in your area may cause Auto Detect to mis-detect. If this should happen, select 1 or 2 for the system you have.
DV -K286N-SJ (AUDIOVOX) 98.5.4. 99.12.10 10:9 AM ˘ ` 16 Setting up your VCR, continued 5 Press CLEAR to erase the channel. ADD/REMOVE CHANNELS Channel 06 is now REMOVED. Press DISPLAY to add Press MENU to exit 6 When you are finished removing channels, press MENU three times to exit from the menus. Adding channels to memory If you have removed a channel from memory, you can easily add it back again. To add channels: 1 Use 0-9 to tune to the channel you would like to add.
DV -K286N-SJ (AUDIOVOX) 98.5.4. 99.12.10 10:9 AM ˘ ` 17 Using video cassettes ✔Audio-visual material may include works of copyright which must not be recorded without authorization of the copyright owner. ✔If you insert a video cassette without a safety tab into the VCR: • During the timer recording process, “TIMER” will blink on the display panel and the VCR will automatically eject the cassette.
DV -K286N-SJ (AUDIOVOX) 98.5.4. 99.12.10 10:9 AM ˘ ` 18 Watching recorded programs To watch a program recorded on a video cassette tape: •Turn on the television. •If your television is connected to: – an antenna, set the viewing mode to “ANTENNA.” – a cable system, set the viewing mode to “CABLE.” •Turn the television to your VCR channel (either 3 or 4). •Insert a video cassette. Playing a video cassette If the video cassette has no safety tab(e.g.
DV -K286N-SJ (AUDIOVOX) 98.5.4. 99.12.10 10:9 AM ˘ ` 19 Watching recorded programs, continued Rewinding the video cassette To rewind the video cassette: 1 Press STOP if the VCR is currently playing. 2 Press REW. The video cassette will rewind at high speed without picture and sound. Adjusting the picture The Digital Auto Tracking System automatically adjusts the tracking to obtain the best possible picture. To manually adjust the tracking during playback, press –CH/TRK+.
DV -K286N-SJ (AUDIOVOX) 98.5.4. 99.12.10 10:9 AM ˘ ` 20 Recording programs You have three options for recording TV programs: Manual, Timer, and One touch recording. Preparing to record a program (manual or timer) ✔ See “Selecting cable or antenna viewing. “p.14, for information on setting the viewing mode. ✔ Press P/S if you would like to momentarily stop the recording. Press REC/OTR to resume recording.
DV -K286N-SJ (AUDIOVOX) 98.5.4. 99.12.10 10:9 AM ˘ ` 21 Recording programs, continued Timer recording ✔Timer recording allows you to record up to eight one year in advance. Once you have set the timer for timer recording, the VCR will turn on, record the program you selected, and then shut off automatically. There are four timer modes: One time, Daily, Weekdays, and Weekly 1 Be certain to do the tasks in the section, “Preparing to record a program,” as shown on previous page.
DV -K286N-SJ (AUDIOVOX) 98.5.4. 99.12.10 10:9 AM ˘ ` 22 Recording programs, continued 8 Use 0-9 to enter the recording start time. ✔See page 17 for information, about tape speed. Understanding tape speed options will ensure that you are able to completely record a program without running out of tape and that you are able to record programs with the level of picture quality you desire.
DV -K286N-SJ (AUDIOVOX) 98.5.4. 99.12.10 10:9 AM ˘ ` 23 Recording programs, continued Reviewing timer programs If you want to review the timer programs that you set up: 1 Press MENU to display the menu. 2 Press 1 to select Timer Recordings. TIMER RECORDINGS 1 Make a New Program 2 Review/Cancel Programs Press MENU to exit 3 Press 2 to select Review/Cancel Programs.
DV -K286N-SJ (AUDIOVOX) 98.5.4. 99.12.10 10:9 AM ˘ ` 24 Recording programs, continued 3 Press 2 to select Review/Cancel Programs. Press MENU to cycle the programs. PROGRAM1 (ONE TIME) Channel 06 Cable Start Time 04:30 AM End Time 05:30 AM Start Date 07/10/ 00 Sat Tape Speed EP Press CLEAR to cancel Press MENU for next prog 4 When the program contents to be erased is displayed, press CLEAR to cancel it. 5 Press MENU repeatedly to return to normal viewing.
DV -K286N-SJ (AUDIOVOX) 98.5.4. 99.12.10 10:9 AM ˘ ` 25 Using advanced features Searching a cassette tape for programs (indexing) ! • If two recordings overlap, the index mark for the second program will be erased. Therefore, when you use the index feature to find the second program, the VCR will skip over it . • If you record multiple programs in one recording session, the VCR will only find the index mark that was placed on the video cassette tape when the recording session began.
DV -K286N-SJ (AUDIOVOX) 98.5.4. 99.12.10 10:9 AM ˘ ` 26 Using advanced features, continued ✔ The following information about video cassettes and the tape counter will help you use the go-to search feature: • When you insert a video cassette, the counter always resets to zero. •The counter does not operate when a blank video cassette or a blank portion of a video cassette is played. •If the tape is rewound beyond 0:00:00, the tape counter will display a negative time count.
DV -K286N-SJ (AUDIOVOX) 98.5.4. 99.12.10 10:9 AM ˘ ` 27 Using advanced features, continued Switch the VCR to TV or VCR mode automatically This feature controls whether the TV/VCR switch changes automatically to the VCR mode when the VCR is turned on. 1 Press MENU to display the menu. 2 Press 4 to choose Preferences. 3 Press 2 to switch between ON and OFF. - Select ON if you want the VCR to switch to the VCR mode when the VCR is turned on or a cassette is inserted. This only applies if you connect the ANT.
DV -K286N-SJ (AUDIOVOX) 98.5.4. 99.12.10 10:9 AM ˘ ` 28 Using advanced features, continued ✔ Use the tape counter to note the current location of playback on the video cassette. • To display the tape counter, press DISPLAY. The tape counter will replace the clock. Press DISPLAY to return to the clock display. • To reset the tape counter, press CLEAR and the time counter will be rest to 00:00 anywhere on a tape. See “Searching with the tape counter (goto search),” p.
DV -K286N-SJ (AUDIOVOX) 98.5.4. 99.12.10 10:9 AM ˘ ` 29 Using advanced features, continued Duplicating video cassettes tape with another VCR You can duplicate a video cassette tape if you connect a second VCR to this VCR. Connecting another VCR to this VCR Make all connections before turning on the power. Be sure to press INPUT on the recording VCR. PLAYBACK VCR RECORDING VCR OUT ANT. IN IN ANT. IN VIDEO VIDEO AUDIO IN L R AUDIO 3 CH. 4 RF OUT RF OUT 3 CH.
DV -K286N-SJ (AUDIOVOX) 98.5.4. 99.12.10 10:9 AM ˘ ` 30 Using advanced features, continued ! • It is recommended that the tape speed be set to the SP mode on the recording VCR for best results. • Unauthorized recording of copyrighted television programs, films, video tapes and other materials may infringe on the rights of copyright owners and be contrary to copyright laws.
DV -K286N-SJ (AUDIOVOX) 98.5.4. 99.12.10 10:9 AM ˘ ` 31 Glossary AFT: Automatic fine tuning, a circuit that automatically adjusts TV reception to optimum condition. CABLE: Cable television. EP: Extended play, the slowest recording speed. Designed to store the maximum amount of program material on a single video cassette. There is some degradation in picture/audio quality. Index Search: A feature of this VCR that automatically records an index each time recording begins.
DV -K286N-SJ (AUDIOVOX) 98.5.4. 99.12.10 10:9 AM ˘ ` 32 Troubleshooting Your AUDIOVOX VCR is designed to give you trouble-free performance for many years. If you have a problem with your VCR, try the solutions listed below. If the suggestions listed below do not solve your problem, contract your AUDIOVOX dealer or an authorized AUDIOVOX service center. You can also call AUDIOVOX directly at 1-800-688-3135. The front panel display is blank. Make sure the VCR is plugged in.
DV -K286N-SJ (AUDIOVOX) 98.5.4. 99.12.10 10:9 AM ˘ • ` 33 side of the remote sensor center and no more than 23 feet from the VCR. Make sure there is no obstruction between the remote control and the VCR. Timer clock does not work. • Make sure the VCR is plugged in and receiving power. • If the unit has been without power for some period of time, you must reset the clock and all your timer programs. Video cassette won’t go into the cassette compartment.
DV -K286N-SJ (AUDIOVOX) 98.5.4. 99.12.10 10:9 AM ˘ ` 34 Specifications System Video signal Channel coverage VHF output signal Video Input: Video line in Output: Video line out Signal to noise ratio Horizontal resolution Audio Input: Audio line in Output: Audio line out Frequency response Signal to noise ratio Audio distortion VHS NTSC color VHF Channel 2-13 UHF Channel 14-69 CATV Channels A1-A5, A8, A-W, W+1-W+84 Channel 3 or 4 (selectable) Phono-type connector 1.0V (p-p) 75 ohms unbalanced, sync.
DV -K286N-SJ (AUDIOVOX) 98.5.4. 99.12.