AXDVD1 DVD PLAYER OWNER’S MANUAL 128-9004
TABLE OF CONTENTS SAFETY INFORMATION……………………………………………………..4 FEATURES .................... ……………………………………………………..5 CONTENTS........................…………………………………………………..5 DISC NOTES………………………………..................……………………..6 Handling and Cleaning………………………………………...………………….........6 Disc Cleaning .............. ………………………………………...………………….........6 DVD Region Code ....... ………………………………………...………………….........6 INSTALLATION……………………………………………..............………..7 Remove Screws Before Installation ………………………...………………….....
TABLE OF CONTENTS CD/MP3/VCD Operation ....…………………………………………..…………....…..19 USB and Memory Card Operation ............................................................. ...…..19 System Setup ..... ……………………………………………………..…………....…..20 DVD Setup .......... ……………………………………………………..…………....…..20 System Setup Menu ...........................................................................................20 Language Setup .................................................................................................
Thank you for choosing the AXDVD1 DVD Player. The AXDVD1 is designed to optimize the enjoyment of your favorite DVDs in a mobile environment. This DVD player is designed to provide years of reliable, trouble-free service. Please read this manual thoroughly prior to operating the DVD player and save it for future reference. SAFETY INFORMATION CAUTION: Use This Product Safely. Before attempting to connect or operate this product, please read the following instructions.
FEATURES z z z z z z z z z z z Compatible with PAL and NTSC. This DVD player can play discs recorded in either PAL or NTSC format. Left/Right stereo analog audio outputs for connection to an existing head unit aux inputs. Video output is composite video. Supplied remote control provides multi-function operation such as (multi-language audio-track/subtitle, multi-angle, etc.), Supports Playback Control functions such as: Play, Pause, Stop, Fast Forward Playback, Fast Reverse.
DISC NOTES y To get the optimum use out of the DVD player, make sure you read this section completely. Handling and Cleaning y Dirt, dust, scratches and warped discs may cause the DVD player to malfunction. y Do not place stickers on discs. y A disc should always be kept in its case when not in use to prevent damage. y Do not place discs in the following places: 1. Direct sunlight. DVD Region Code 2. Dirty, dusty and damp areas. The DVD player is preset to a region code 3. Near car heaters.
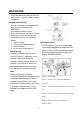
INSTALLATION the vehicle ACC and Battery wiring. Failure to do so can result in damage to the vehicle if a short circuit develops between the vehicle connection point and the mobile video product. REMOVE SCREWS BEFORE INSTALLATION Before installing the unit, please remove the two transport screws. Take out screw before installation. y y The unit should be installed in a horizontal position with the front end up at a convenient angle, but not more than 300.
INSTALLATION 1. Powering your DVD player (Refer to the Connections illustration) Connect the black wire (-) to the vehicle ground. Connect the red wire (+) to a switched (Accessory) 12VDC source. Connect the yellow wire to a Battery (Constant +12VDC) connection. Plug the other end into the 12VDC input jack on the back of the DVD player. 2. Remote IR Receiver (Refer to the Connections illustration) Plug the 1/8” plug on the remote IR cable into the IR IN jack on the back of the DVD player. 3.
CONNECTIONS Video connections to a monitor can be done with RCA-type video connections. As a precaution, be sure to turn off the power of the DVD player and the monitor(s) before making any connections. Audio connections can use either the coaxial connector (digital audio) or the RCA type connectors (analog audio).
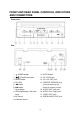
FRONT AND REAR PANEL CONTROLS, INDICATORS AND CONNECTORS Front panel: Rear panel: 1. POWER button 2. (Play/Pause) button 3. MODE button 4. Disc Slot 5. WW button 6. XX button 7. Reset button 8. USB and Memory Card insert cover 9. AV IN jack 10. Remote Sensor 11. EJECT button 12. DC 12V IN jack 13. DC 12V OUT jack 14. REMOTE SENSOR jack (Used to connect the external remote sensor) 15. AUDIO OUT Left jack 16. AUDIO OUT Right jack 17. VIDEO OUT jack 18.
REMOTE CONTROL FUNCTIONS Rear panel: Remote Control 1. MUTE Press this button to mute the audio. Pressing the button again restores the audio to the previously set volume. 2. POWER Press this button to turn on the DVD player on and off. 3. 0-9 Allows the user to enter the numbers 0-9 for selection of the tracks, titles, chapters and setting the password.
REMOTE CONTROL FUNCTIONS 4. SUB-T Press this button to display and select the subtitle language in DVD mode. Each time the button is pressed, the subtitle language changes. 10. ZOOM Press this button to enlarge or reduce the picture size when playing a DVD disc. Pressing this button once enlarges the picture two times the normal size, twice enlarges the picture 3 times the normal size, three times enlarges the picture 4 times the normal size.
REMOTE CONTROL FUNCTIONS 15. EJECT Press this button to eject a disc. 16. A-B Press this button to repeat a specific section of a disc. Press this button to mark down the starting point (A) and press it again to mark down the ending point (B). Press this button a third time to cancel A-B repeat and resume normal playback. 17. REPEAT Press this button while viewing a DVD allows a chapter, title, or the entire DVD to be repeated. Press this button a fourth time turns the repeat function off. 18. .
REMOTE CONTROL FUNCTIONS Remote Control Initial use Initial Use When purchased, the remote control has a battery installed with a Pull Tab to prevent battery discharge. Remove the Pull Tab before attempting to use the remote. Battery Replacement 1. Remove the battery holder. 2. Insert one CR2025 battery into the battery holder. Be sure to observe the correct polarity. 3. Align the battery holder with the remote control and insert the holder. Push the holder in until it clicks.
OPERATION BASIC OPERATION Mode selection Press the MODE button on the front panel or MODE on the remote control to select the desired operating mode such as DVD, AV IN, USB memory device, or SD card. Turning the DVD player on/off Press the POWER button on the front panel or POWER button on the remote control to turn the DVD player on. When the DVD player is on, press the POWER button on the front panel or POWER button on the remote control to turn the DVD player off.
OPERATION DVD OPERATION continued Skipping tracks Pressing the XX/WW buttons on the remote control or / buttons on the front panel during playback will skip to the next/previous track. Fast forward/fast reverse Press the NEXT XX or the PREV WW buttons on the front panel or buttons on the remote control during playback to skip to the next or previous chapter/track. Press and hold it to activate fast forward function. Pressing the button again will fast forward at rates of 2X, 4X, 8X, and 20X normal speed.
OPERATION DVD OPERATION continued Repeat function The Repeat function has 4 options: Chapter, Title, Repeat All or Off. Move cursor to the Repeat function and press ENTER. The Repeat default is Off. During zoom mode, press W/X buttons to move the picture to the left/right, and press the S/T buttons to move the picture up/down. Multi-subtitle language function Press the SUB-T button on the remote control during playback. Each time the button is pressed, the subtitle language will change.
OPERATION DVD OPERATION continued Goto Function Press the GOTO button on the remote Program play In program play mode, you can play tracks in a desired sequence. Press the PROG button on the remote control and the following menu will be displayed. control and the following screen will be displayed : Use the W/X buttons to select a screen item. Use the numeric buttons to input a specific Title, Chapter or Time of the DVD disc to access directly. Press the ENTER button to confirm.
OPERATION button on remote control to confirm. The Tracks will be played in the order they were programmed. d) If you want to clear the program, press the PROG button on the remote control. Use the W/X, S/T cursor buttons to select CLEAR on the screen and press the ENTER button. CD/MP3/VCD OPERATION Note: For VCD2.0 discs when the PBC function is activated the Repeat, Random, A-B Repeat, Program and GOTO functions are unavailable.
OPERATION SYSTEM SETUP MENU SYSTEM SETUP When you access the setup menu, you will see the system menu below: The System Setup menu allows you to personalize the DVD player settings to your preference. DVD SETUP In DVD mode, while the disc is playing or stopped, press SETUP button on the remote control to enter setup menu. The following menu will appear: a. TV SYSTEM: Changes the TV SYSTEM format to NTSC, PAL or AUTO. b. AUTO PLAY: Turns the function ON and OFF.
OPERATION SYSTEM SETUP continued AUDIO SETUP Using the X button select the audio setup menu. The following menu will appear: g. DEFAULT: This item allows a user to restore all the factory default settings except the settings for the Password, Setup Page and Ratings. LANGUAGE SETUP Using the X button select the language setup menu. The following menu will appear: a. AUDIO OUT: Changes the characteristics of the audio output signal. The choices are: SPDIF/OFF, SPDIF/RAW and SPDIF/PCM. b.
OPERATION VIDEO SETUP continued SPEAKER SETUP Using the X button select the speaker setup menu. The following menu will appear: b. CONTRAST: Adjusts the brightest highlights level in the picture. Use the X button to select the adjustment scale. Use the S/T buttons to select a level value and press the ENTER button to confirm your selection. c. HUE: Adjusts the tint balance level in the picture. Use the X button t o select the adjustment scale.
OPERATION DIGITAL SETUP continued Note: The displayed information is varies according to the type DVD discs. b. DYNAMIC RANGE: Used to adjust the dynamic range between 1/8, 2/8. 3/8, 1/2, 5/8, 3/4, full. c. DUAL MONO: Adjusts the audio output signal to stereo, mono L, mono R, and mixed mono. Last Memory The Last Memory function allows you to stop DVD playback and the DVD player will memorize the location on the DVD disc where play back was stopped.
TROUBLESHOOTING The remote control is out of it’s operating area. Make sure the remote control is within the operating area. The DVD player stops working when a USB device or memory card is inserted into the DVD player. The connected USB device or the memory card is probably not a certified one. The DVD player cannot play an uncertified USB device or memory card.
SPECIFICATIONS GENERAL Power Supply Requirements 12 Volts DC, Negative Ground Line Out Video Output Compatible Discs Signal System Operating Temperature Dimensions 2.0Vp-p 1 Vp-p 75 Ohm unbalanced DVD/VCD/CD PAL/NTSC 0~35°C LXWXH 6.25” X 6.12” X 2” 158.75mm X 155.44mm X 50.8mm Note: Specifications are subject to change without notice.
12 MONTH LIMITED WARRANTY Applies to Audiovox Mobile Video Products AUDIOVOX ELECTRONICS CORP. (the Company) warrants to the original retail purchaser of this product that should this product or any part thereof, under normal use and conditions, be proven defective in material or workmanship within 12 months from the date of original purchase, such defect(s) will be repaired or replaced with reconditioned product (at the Company's option) without charge for parts and repair labor.
NOTES 27
© 2011 Audiovox Electronics Corp., 150 Marcus Blvd., Hauppauge, N.Y.