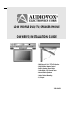
LOW PROFILE DVD/TV/SPEAKER PHONE OWNER’S/INSTALLATION GUIDE - DVD Player & 10.
Introduction Record model number and serial number in the space provided below. Refer to these numbers whenever you call upon your Audiovox dealer regarding this product. Model No. INFORMATION This equipment generates and uses radio frequency energy and if not installed and used properly; that is, in s trict acc ordan ce with th e manufactu rer’s instructions, may cause interference to radio and television reception.
Important Safety Instructions 1. Read Instructions - All the safety and operating instructions should be read before the product is operated. 2. Retain Instructions - The safety and operating instructions should be retained for future reference. 3. Heed Warnings - All warnings on the product and in the operating instructions should be adhered to. 4. Follow Instructions - All operating and use instructions should be followed. 5. Cleaning - Unplug this product from the wall outlet before cleaning.
Important Safety Instructions 13. Power-Card Protection - Power-supply cords should be routed so that they are not likely to be walked on or pinched by items placed upon or against them paying particular attention to cords at plugs, convenience receptacles, and the point where they exit from the product. 14. Protective Attachment Plug - The product is equipped with on attachment plug having overload protection. This is a safety feature.
Important Safety Instructions D. If the product does not operate normally by following the operating instructions. Adjust only those controls that are covered by the operating instructions, as an improper adjustment of other controls may result in damage and will often require extensive work by a qualified technician to restore the product to its normal operation. E. If the product has been dropped or damaged in any way. F.
Important Safety Instructions 1) Unplug the unit before cleaning. Do not use liquid cleaners or aerosol cleaners. Use a damp cloth for cleaning. 2) Use only Audiovox approved accessories. 3) Do not install this video product where it is likely to be exposed to water. 4) Do not obstruct the slots and openings in the cabinet. They are provided for ventilation and are necessary to ensure reliable operation of the unit and to protect it from overheating.
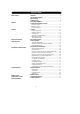
Table Of Contents Before You Begin Installation Operation Remote Control Functions Modes of Operation Using the Remote Control Functions Using the Setup Menu Definition of Terms Troubleshooting Check List Technical Specifications Introduction..................................................................................... 2 Important Safety Instructions............................................................ 3 Table of Contents .................................................................
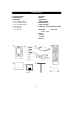
Included in this kit 1. VE1040 DVD/TVPhone 2. Mounting Template 3. Hardware Bag A. 3/4” Mounting screws (4) B. 1-1/4” Mounting screws (4) C. 1-1/2” Mounting screws (4) D. 3/4” Spacer (4) E. 1/2” Spacer (4) F. 1/4” Spacer (4) 4. AM Antenna 5. Manual 6. Telephone Jack 7. FM Dipole Antenna 8. Remote Control Unit 9. Battery, size AAA(2) 10.
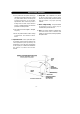
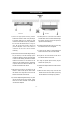
Under Cabinet Installation FRONT VIEW SIDE VIEW 1) Choose an appropriate mounting location underneath a cabinet or shelf. Close proximity to an electrical outlet and a TV antenna or cable connection will facilitate a neat, easy installation. Do not mount the VE1040 above a range or oven. Be sure that the location chosen will provide adequate acces s to the electrical connection on the rear of the unit before continuing.
Front Panel Controls 1. O N / O F F : Power ON /OFF and Standby Condition (Time Display). 2. ENTER : Enters the desired function during the DVD Mode. 3. S E T : Confirms selection of TIME, ALARM, ALARM-Tone, TV-Mode or Menu item. Navigation ON/OFF button in DVD play mode. 4. MODE : Selects the TV, FM, AM, AV1, AV2, and DVD functional modes. 5. T/F : Selects Timer mode when playing a DVD (MP3, CDDA). 6. TEL : Selects to the Hands-Free PSTN SpeakerPhone function. 7.
Rear Panel Controls 1) 75 OHM ANTENNA CONNECTOR - Allows the VE1040 to be connected to 75 ohm external coaxial antenna. 2) FM ANTENNA - Allows the VE1040 to be connected to a 75 ohm external coaxial antenna for the reception of FM broadcast signals. 3) AM ANTENNA - Allows the VE1040 to be connected to an external antenna for the reception of AM broadcast signals. 4) AUDIO LINE OUT - External 8 ohm Speaker (Earphone) Connect stereo output jack. (Adapted to 8 ohm Only).
LCD Control Functions 1 MENU Button - When pressed, the LCD control MENU is displayed. 2 SEL Button - Highlights the menu item to be changed using the UP (▲) / DOWN (▼) buttons. 3 UP (▲) Button - Scrolls upward through menu items, also adjusts selected item in upward (increase) direction. 4 DOWN (▼) Button - Scrolls downward through menu items; also adjusts selected item ; in downward (decrease) direction.
Operation CHANNEL TUNING SET UP In addition to normal broadcast reception of VHF and UHF channels, if you are a Cable TV subscriber, your new TV is capable of receiving many unscrambled Cable channels without the use of a converter box. When set to broadcast TV, it receives CH2-CH69. When set to one of the CATV modes (STD, HRC, or IRC) it receives CH1-CH125. NOTE: Most cable companies broadcast in STD Mode. POSITIONING THE SCREEN Pivot the screen forward until a comfortable viewing angle is reached.
Operation DEACTIVATING THE ALARM 1) Press the SET button twice to enter the alarm mode. 2) Press the T/F button once. The time indication disappears from the Vacuum Flourescent Display(VFD) and a series of dashes will appear ( : — : - indicating the alarm Deactivated mode. 3) Press the POWER button. The alarm is now deactivated. NOTE : The set times will be stored in memory and can be reactivated whenever desired by performing steps 1) - 3) of the DEACTIVATING THE ALARM procedure.
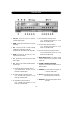
Remote Control Functions (1) OPEN/CLOSE (2) POWER (3) DVD (4) TV (5) AM/FM (6) A/V (7) Digit 0 -9 Select (8) ENTER (9) CLR (10) TEL (11) MUTE (12) VOL+/(13) STOP (14) PLAY (15) FUNCTION UP/DOWN Select (16) PREV.
Remote Control Functions DVD MENU (1) OPEN/CLOSE : Press this button to Open and Close the disc tray. (2) POWER : Press this button to turn power On and Off. (3) DVD : Press this button to select DVD mode of operation. (6) A/V : Press this button to select external A/V source 1 or 2. (7) 0 ~ 9 : For direct selecting a chapter(or track) and for password Input. (8) ENTER : Press this button will cause the chapter (or track) change to occur immediately.
Modes Of Operation SETTING THE CABLE TV MODE 1) With power off, press the SET button three times to enter the cable configuration mode. AIR appears on the display . Then press the 1 preset to button switch from broadcast TV(VHF or UHF) to cable TV.(CAbl will appear on the VFD.) 2) Press the SET button again to display the cable system mode (Standard, Irc, Hrc). 3) Press the 1 preset button to select the cable mode(Std/Irc/Hrc) 4) When the desired mode is reached, press the ON/OFF button.
Using the Remote Control Functions Inserting and Ejecting the Disc 1. When the tray opens, insert the disc properly with the label facing up. 2. As the tray closes, playback is automatically executed. * Discs playable through DVD player - DVD, CD, CD-R, CD-RW with MP3. Playback and Stop 1. To temporarily stop playback, press the STOP button once. The Player memorizes the exact position where it was stopped, and it will resume playback again from that position.
Using the Remote Control Functions Repetitive Playback—To Repeat a Specific Section. 1. Pressing the REPEAT button once, the current chapter or track will be replayed repetitively (CHPTER REPEAT ON). 2. Pressing the button twice, he currently playing title or CD will be played repetitively (TITLE REPEAT ON). 3. Pressing the button three times, the repeat function will be turned off (REPEAT OFF). * In case of the MP3 disc, Press the REPEAT button to change the PLAY MODE.
Using the Remote Control FunctionS Viewing the Setup Menu 1. Pressing the SETUP button will display the setup menu. This allows the user to select DVD options (Languages, Display, Audio and Parental). 2. To return to a previous screen, press the SETUP button. Viewing the Playback Time, Title and Chapter Status 1. Pressing the DISPLAY button will allow the user to see the title and chapter number, and the elapsed time of the currently playing disc on the upper part of the screen. 2.
Using The Setup Menu Using the setup menu allows the user to select the play mode settings. To use the SETUP menu : 1. Press the SETUP button to display the main menu. 2. Use the ▲ or▼ buttons to highlight the desired menu item. 3. Press the ENTER ( ↲) button to display the sub-menu. 4. Each sub-menu item provides a number of option items to its right. Use the ▶ buttons to enter the option item menu. Then use the ▲ or▼ buttons to highlight the desired option item for selection. 5.
Using The Setup Menu GENERAL SETUP TV DISPLAY : Select the aspect ratio of the playback picture. NORMAL/PS : Pan & scan display.(DEFAULT) NORMAL/LB : Letterbox display WIDE : Widescreen display TV TYPE : Selects the type of televison. MULTI : Outputs the original image signal of PAL or NTSC recorded into title.Only select this option when user’s TV supports both system. NTSC : Modifies the original image signal to NTSC system before playing images (Default).
Using The Setup Menu SPEAKER SETUP DOWNMIX LT/RT : Selected only when the amplifier has Dolby Pro Logic support. STEREO : Selected when listening to general stereo sound. DOLBY DIGITAL SETUP OP MODE LINE OUT : Line out mode, with digital dialog normalization Default. RF REMOD : RF remodulation mode, with heavy compression and digital dialog normalization. DUAL MONO : Reproduction mode, used only when the input consists of two independent audio channels (1/1 mode).
Definition Of Terms DEFINITION OF TERMS Title Definition DOLBY DIGITAL As a form of medium for compressed digital sound recording, it corresponds with the 5.1 channel surround sound system; this system has rear stereo channels, and separates the woofer channels completely which enables the users to enjoy the best digital experience. TITLE The largest playback unit of images or music recorded in DVD. Each title has a title number that simplifies the song selecting process.
Troubleshooting Check List When the power does not turn on TROUBLESHOOTING CHECKLIST * Check if the power cord is securely connected to the rear of the unit. * Check if the batteries of the remote control unit are not depleted. When the disc fails to play * Check if the disc is inserted properly into tray. * Check if the disc has viewing restriction selected. * Check if the disc is of the proper regional code. * Not all discs are playable in the DVD.
Troubleshooting Check List When the remote control doesn’t work. * Check if the distance/angle from the player is not too far or acute, or whether there are objects in between the player and the remote control. * Check if the batteries are discharged. When the setup menu of the product does not operate. * The setup menu only operates according to the specific manufacturing properties of the DVD disc.
-27 -
Ⓒ