CDM-8450 ENG/FRH Cover10-31 2003.11.4 3:27 PM Page 1 REV.00 BM 5U010000298 Owner’s Manual MANUEL D’UTILISATION La sécurité d'abord: l'appel est lancé! Les fournisseurs de ser services vices sans fil vous rappellent que la prudence au volant doit être tre votre priorit priorité en tout temps 5155 Spectrum Way ¥ Unit 5 ¥ Mississauga, Ontario Canada L4W5A1 800.465.9672 ¥ www.audiovox.
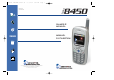
TX-65BBM1104 2003.11.5 10:58 AM Page 1 AUDIOVOX CDM-8450 Tri Mode Digital CDMA2000 1X Handheld Portable Telephone In today’s fast paced world, it has become a necessity to have immediate access to real time information. Your communications tools must provide you with this access anywhere at anytime. With that in mind, Audiovox developed the CDM-8450, a tri-mode bar type handset with a 4096 color STN display.
TX-65BBM1104 2003.11.5 10:58 AM Page 2 TABLE OF CONTENTS CHAPTER 1 BEFORE USING YOUR PHONE .........7 Inside the Package .................................................8 Handset Description ..............................................9 Function Keys.......................................................10 Display Indicators.................................................11 Using the Battery..................................................13 Installing the Battery ..................................
TX-65BBM1104 2003.11.5 10:58 AM Page 4 TABLE OF CONTENTS TABLE OF CONTENTS Voice Privacy.......................................................29 Location...............................................................29 Call History..........................................................30 Phone Book.........................................................30 Speaker Mode.....................................................30 VR Mode................................................................
TX-65BBM1104 2003.11.5 10:58 AM Page 6 TABLE OF CONTENTS CHAPTER 6 VOICE MAIL AND TEXT MESSAGES ...95 Two-Way SMS.......................................................96 Message Indicators.............................................96 Received Message Notification ..........................96 Checking Messages ............................................97 Checking Received Voice Mail Message............97 Checking Received Text Message......................97 Sending Text Messages....................
TX-65BBM1104 2003.11.5 10:58 AM Page 8 Chapter 1 BEFORE USING YOUR PHONE Please read and fully understand this manual before using your phone. This chapter addresses your phone, its keys, display icons, and the charging and proper use of the battery. Once you have read this chapter, you can move on to the basic and advanced features of your phone.
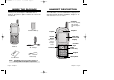
TX-65BBM1104 2003.11.5 10:58 AM Page 10 INSIDE THE PACKAGE HANDSET DESCRIPTION Thank you for purchasing the CDM-8450 wireless handset. The phone’s giftbox contains all of the items listed below. The CDM-8450, a tri-mode CDMA2000 1X digital phone with data and web browsing capabilities, weighs 3.1 oz. and measures 4.3” x 1.8” x 0.7”. Antenna For best call quality, fully extend the antenna during the call. Standard Battery Earpiece Earjack Volume Button Adjusts the earpiece and ringer volume.
TX-65BBM1104 2003.11.5 10:58 AM Page 12 FUNCTION KEYS SEND KEY: Press to make or receive a call. Press and hold to turn on VR mode. END KEY: Terminate a call or to return to the initial page. Press and hold to turn the power on/off. NAVIGATION KEY: In Idle Mode-Press up to access the Web, down to access the Download, right for Event and left for the Phone book. Inside the menu-Within a menu, use to scroll through menu options.
TX-65BBM1104 2003.11.5 10:58 AM Page 14 DISPLAY INDICATORS USING THE BATTERY INSTALLING THE BATTERY Speakerphone Phone is in speakerphone mode. 1. Remove the battery cover. Voice Memo 2. Insert the bottom of battery into groove at bottom of the handset. New voice memo has been made. Answering machine Phone is in answering machine mode. 3. Press in the top of the battery until it clicks. New Downloads Appears when contents is downloaded. Schedule Appears when either an event or an alarm is set.
TX-65BBM1104 2003.11.5 10:58 AM Page 16 CHARGING THE BATTERY POWER CONNECTION CHARGING THE BATTERY NOTE: 1. Plug the AC charger into a standard outlet. 2. With the battery installed, plug the other end of the AC charger into the bottom of your phone. 1. It is more efficient to charge the battery with the handset off. 2. The battery must be connected to the phone in order to charge it. 3. Battery operating time gradually decreases over time. 4.
TX-65BBM1104 2003.11.5 10:58 AM Page 18 BATTERY INFORMATION Use only manufacturer approved batteries. Never use a damaged or worn out battery. Use the battery only for its intended purpose. Never expose the battery terminals to any other metal object. This can short circuit the battery. Chapter 2 Avoid exposure to temperature extremes. A phone with a hot or cold battery may temporarily not work (or charge), even if the battery is fully charged.
TX-65BBM1104 2003.11.5 10:58 AM Page 20 USING THE MENU USING THE PHONE TURNING THE PHONE ON USING THE MENU 1. Press and hold , until the “Power On” logo appears and the tone sounds. 1. To access the menu in the idle mode, press [MENU]. ● To select a logo, refer to page 73 for more details. (Setting>Display>Animation) for more detail. ● If “PASSWORD” appears, the phone is locked. To unlock, enter your 4-digit password. NOTE: The default password is the last 4 digits of your phone number.
TX-65BBM1104 2003.11.
TX-65BBM1104 2003.11.5 10:58 AM Page 24 MENU SUMMARY SETTING u 1 : Sounds 2 : Display 3 : Security 4 : Roaming 5 : Location 6 : Airplane Mode 7 : Others 8 : Phone Info. 1 : Volume 2 : Ringers 3 : Alerts 4 : Roam Ringer 5 : Tone Length 1 : Animation 2 : Greeting 3 : Backlight 4 : Contrast 5 : Clock 1 : Lock Phone 2 : Change Lock 3 : Special #’s 4 : Erase PBook 5 : Reset Phone 1 : Set Mode 2 : Force Analog 3 : NAM Setting 1 : Call Answer 2 : Auto Answer 3 : Language 4 : Speaker Mode 5 : Data Svc.
TX-65BBM1104 2003.11.5 10:58 AM Page 26 BASIC FUNCTIONS BASIC FUNCTIONS PAUSE FEATURE ANSWERING A CALL You can dial or save a phone number with pauses for use in the automated systems where you need to enter a credit card number, a social security number, and so on. This feature will be convenient when you are linked to ARS (Advanced Record System). 1. To answer a call, press any key except . , or ● In the Settings menu, you can select either “Any Key” or “Send Key” to answer a call.
TX-65BBM1104 2003.11.5 10:58 AM Page 28 BASIC FUNCTIONS BASIC FUNCTIONS CALL WAITING FUNCTION ADJUSTING VOLUME Notifies you of another incoming call when you are on the phone by making a beep sound and displaying the caller’s phone number on the screen. Adjusts the volume of the ringer, key beep and speaker. 1. To answer another call while on the phone, press . This places the first call on hold. To switch back to the first caller, press again.
TX-65BBM1104 2003.11.5 10:58 AM Page 30 FUNCTIONS DURING A CALL FUNCTIONS DURING A CALL These menu items are available while you are on a call. To display menu options during a call, press [MENU]. SEND MY PHONE # MESSAGING 1. Press Automatically transmits your phone number to a pager during a call without manually entering the number. 1. To transmit your phone number during a call, press [MENU] . [SMS] Key.
TX-65BBM1104 2003.11.5 10:58 AM Page 32 FUNCTIONS DURING A CALL CALL HISTORY Enables you to review the call history while on a call. 1. Press [MENU] . PHONE BOOK Enables you to review your phonebook while on a call. 1. Press [MENU] Chapter 3 MEMORY FUNCTION . SPEAKER MODE Activates the speakerphone while on a call. 1. Press [MENU] . 2. The phone returns to normal (speaker phone off) after ending or call or when the phone is turned off and back on.
TX-65BBM1104 2003.11.5 10:58 AM Page 34 TEXT INPUT METHODS STORING PHONE NUMBERS The phone book stores up to 300 entries. ENTERING CHARACTERS 1. Enter phone # and press For convenient entry of memory location names and text messages, your phone offers several text input methods: [OK]. 2. Choose “Add New Entry” or “Add Existing Entry”. Press [OK] to select. 3. The Phone # will appear next to a list of icons. The name of the icon is displayed above the list.
TX-65BBM1104 2003.11.5 10:58 AM Page 36 TEXT INPUT METHODS T9TM PREDICTIVE TEXT MODE [T9TMABC] To choose T9TM mode, press [MODE] then choose [T9TMABC]. This mode predicts the words you are entering using a built-in dictionary. With T9TM predictive text input, you press each key only once for each letter. The chart below outlines how to use T9TM text input. TEXT INPUT METHODS 1. Press each key once for each letter of the word you are writing. ● To write John with the English dictionary selected: 1.
TX-65BBM1104 2003.11.5 10:58 AM Page 38 SPEED DIALING TEXT INPUT METHODS NUMERIC MODE [123] ONE-TOUCH/TWO-TOUCH DIALING Numeric mode allows you to add a number to your entry/message. To select numeric mode, press [MODE] then select [123]. Ideal for frequently dialed numbers, this feature allows phone book entries to be dialed via the keypad with only one or two key presses. SYMBOL MODE [SYM] ONE-TOUCH DIALING: Select symbol mode allows you to add various symbols to your entry.
TX-65BBM1104 2003.11.5 10:58 AM Page 40 CALL HISTORY In idle mode, you can access call history by pressing [MENU] . Displays information about the 10 most recently dialed numbers. 1. To see a list of the 10 most recently dialed calls, press [MENU] . If the number is already stored in your phone book, only the name appears. If the number is not stored, only the phone number appears. NOTE: 3. Press Press [OK]. Call details include date, time and phone number.
TX-65BBM1104 2003.11.5 10:58 AM Page 42 CALL HISTORY CALL HISTORY MISSED CALLS CALL TIMES Displays information of the 10 most recently missed calls. Checks the talk time and manages your calls within the limit you set. The five timers include: 1. To see a list of the 10 most recently missed calls, press [MENU] . If the number is already stored in your phone book, only the name appears. If the number is not stored, only the phone number appears. LAST CALL Displays talk time of last call. 1.
TX-65BBM1104 2003.11.5 10:58 AM Page 44 CALL HISTORY CALL HISTORY HOME CALLS ACCUMULATED CALLS To display talk time of all calls made within Home area: To display talk time of all incoming and outgoing calls, excluding web access calls: 1. Press [MENU] and the message “Not Intended for Billing Purposes” appears for 5 seconds. 2. Use the Navigation Key to view the time of the following items: ● Voice, Data/Fax, Web 3. To reset the timer, press [RST]. To return to the previous page, press 1.
TX-65BBM1104 2003.11.5 10:58 AM Page 46 PHONE BOOK PHONE BOOK The phone book stores up to 300 entries, each of which can be assigned to a group. Entries can be retrieved by name, phone number or group. BY GROUP FIND 2. Select one of the following groups (Family, Friends, Work, Etc., All) with [OK]. 1. Press [MENU] . BY NAME Retrieves an entry by group, voice name, name and number, and calls by simply pressing . 1.
TX-65BBM1104 2003.11.5 10:59 AM Page 48 PHONE BOOK PHONE BOOK EDIT PHONE BOOK EDIT GROUP ADD NEW ENTRY Adds, changes and deletes groups. Adds a new entry. ADD NEW GROUP 1. To add a new entry to the phone book, press [MENU] . 1. To add a new group, press [MENU] A maximum of seven groups is allowed. 2. To enter a name or number, use the Navigation Key to select the phone book field. 2. Input a new group name. 3. To save it, press 3. To save the entry, press [OK].
TX-65BBM1104 2003.11.5 10:59 AM Page 50 PHONE BOOK MY PROFILE CLEAR GROUP 1. To delete an existing group, press [MENU] Saves your personal information. . 2. Use the Navigation Key to select, then delete the group. Press again to confirm. ● Family, Friends, Work, Etc., All 3. To delete it, press 4. Press PHONE BOOK [OK]. [OK] again to confirm it. 1. Press [MENU] to review and edit your personal information as follows.
TX-65BBM1104 2003.11.5 10:59 AM Page 52 MOBILE WEB CONNECTING TO THE INTERNET You can use your phone to browse the Internet if you have obtained phone Internet service from your service provider and if over-the air Internet access is available in your area. 1. Press [MENU] . Chapter 4 SETTINGS 2. Follow the procedures for “Chapter 8 INTERNET BROWSER” on page 113. This chapter addresses customizing your phone by adjusting backlighting, volume, ring tones and other user-friendly features.
TX-65BBM1104 2003.11.5 10:59 AM Page 54 DOWNLOADS With your CDM-8450, you have access to a wide variety of downloadable ringers and screen savers. While each type of download involves a different file type, the basic method for accessing and downloading files is the same. GAMES You can play a variety of entertaining and graphicallyrich games on your phone. New games are easy to download and play. MY DOWNLOADS 1. Press [MENU] . 2. Select “My Downloads” and press [OK].
TX-65BBM1104 2003.11.5 10:59 AM Page 56 DOWNLOADS DOWNLOADS WALLPAPERS APPLICATIONS MY DOWNLOADS MY DOWNLOADS 1. Press [MENU] . 2. Select “My Downloads” and press [OK]. The browser will launch and take you to the “Screen Savers” download menu. 1. Press [MENU] . 2. Select “My Downloads”, “Start”, then press [OK]. 3. To start the application, press 3. Use the Navigation Key to select a screen saver you wish to download. 4. From the item information page, select “Buy”.
TX-65BBM1104 2003.11.5 10:59 AM Page 58 DOWNLOADS OTHERS VR MODE Voice Recognition (VR) enables you to place calls and record voice memos using your voice. MY DOWNLOADS 1. Press [MENU] . 1. Press and hold until your phone turns to VR mode. VR Mode Say a name 2. Select “My Downloads” and press [OK]. The browser will launch and take you to the “Others” download menu. 3. Use the Navigation Key to select an item you wish to download. 4. From the item information page, select “Buy”.
TX-65BBM1104 2003.11.5 10:59 AM Page 60 VR MODE VR MODE VOICE MEMO CANCEL 1. Press and hold mode. until your phone turns to VR 2. Say “Voice Memo” and instructions will appear and you will hear “Please record it at the tone”. 3. To stop recording, press NOTE: Press 1. Press and hold mode. until your phone turns to VR 2. To exit VR mode or return to the standby mode, say “Cancel.” [STOP]. to pause, then press [OK] to resume. 4.
TX-65BBM1104 2003.11.5 10:59 AM Page 62 VS MENU VS MENU VOICE MEMO ERASE ALL This feature is the same as the one described page 58, except you need to press the keypad to access voice memo in these instructions. 1. When you have at least 1 saved voice memo, press [MENU] . 2. To erase a voice memo, press RECORD VOICE MEMO 1. Press [MENU] 3. Press . 2. “Record voice memo?” will appear. Press to begin recording. [OK] . [OK]. CALL ANSWER Sets and operates the answering machine. 3.
TX-65BBM1104 2003.11.5 10:59 AM Page 64 VS MENU VOICE COMMAND WAKE-UP Trains the VR with the following categories of control words: YES/NO 1. Press VS MENU Use the Wake-Up to train or untrain the VR with the control word, wake up. 1. Press [MENU] . 2. Select one of the following options with the Navigation Key, then press [OK]. LIST WORDS : Displays the list of control words in the Yes/No set. Select a control word from the list then press [OK]. Either train, untrain or view its status.
TX-65BBM1104 2003.11.5 10:59 AM Page 66 VS MENU VS MENU VOICE DIAL LIST [SPKR] VOICE DIAL Lists, adds and erases voice tags in a phone book entry. 1. Press [MENU] . 2. Press [or ] to list [or list on spkr] a voice dial. Select one memo from the list. ADD VOICE DIAL 1. Press [MENU] EDIT : Retrain / Voice Setting / Clear PLAY : Voice tag play. . 3. To play a voice tag, press 2. Press to add a voice dial. Select “Select Group Name” (Family, Friends, Work, etc., All), then press [OK]. 3.
TX-65BBM1104 2003.11.5 10:59 AM Page 68 VS MENU VS MENU VOICE ALERT VOICE SETTING Sets the voice alert service. Customizes the voice service menu. ON/OFF UNTRAIN ALL 1. Press [MENU] 1. Press . 2. Select “On” or “Off” then press [OK]. [MENU] . 2. Select “Yes” or “No” then press [OK]. HFK MODE RECORD 2. Record voice alert. HFK stands for Hands-Free Car Kit. With this function, you can activate and utilize the VR feature when the phone is in hands-free car kit. PLAY 1. Press 1.
TX-65BBM1104 2003.11.5 10:59 AM Page 70 SETTING SETTING Customizes your phone and optimizes performance through a variety of settings. KEY To adjust keypad tone: 1. Press [MENU] . SOUNDS 2. Adjust the keypad tone with the Navigation Key. Sets Volume, Ringers, Alerts, Roam Ringer and Tone Length. VOLUME 3. To save, press Controls the Ringer, Voice Call, Key and Messages volume. RINGER To adjust Ringer volume: 1. Press [MENU] . 2.
TX-65BBM1104 2003.11.5 10:59 AM Page 72 SETTING SETTING RINGERS ALERTS Ringer types help you identify incoming calls and messages: Allows you to set an alert that sounds when any handset changes occur. VOICE CALL 1. Press [MENU] SERVICE CHANGE Sounds an alert when leaving a service area and entering a roaming service area. 1. Press [MENU] . . 2. Select “With Caller ID” or “No Caller ID” then press [OK]. 2. Select “Off” or “On”, then press 3. Select “Default” or “Downloads”, then press 4.
TX-65BBM1104 2003.11.5 10:59 AM Page 74 SETTING SETTING LOW SIGNAL ALERT Sounds an alert when you encounter low signal strength during a call. 1. Press [MENU] . 2. Select “Off” or “On”, then press [OK] to save it. ON/OFF TONES Allows you to activate/deactivate the Power On/Off tones. 1. Press [MENU] . 2. Select “Off” or “On”, then press [OK] to save it. ROAM RINGER [MENU] . 2. Select “Distinctive” or “Normal”, then press to save it. [OK] ● Distinctive : Sounds a different ringer type.
TX-65BBM1104 2003.11.5 10:59 AM Page 76 SETTING SETTING BACKLIGHT POWER ON 1. Press [MENU] . 2. Select Default to choose a pre-installed display or Downloads to choose a display you have downloaded to your phone. 3. To save it, press 1. Press [MENU] . 2. Select one of the following options; Off, 5 sec, 10 sec, 20 secs, Always On. [OK]. POWER OFF 1. Press [MENU] . 2. Select Default to choose a pre-installed display or Downloads to choose a display you have downloaded to your phone. 3.
TX-65BBM1104 2003.11.5 10:59 AM Page 78 SETTING SETTING CONTRAST SECURITY To adjust the display contrast: Prevents the unauthorized use of the handset and only allows access to certain features to those who have the password. 1. Press [MENU] . 2. Adjust the LCD contrast for better view. ● Level (1-7) 3. To save, press LOCK PHONE Prevents others from using your phone without permission. When locked, the menu cannot be accessed without password. [OK]. CLOCK 1.
TX-65BBM1104 2003.11.5 10:59 AM Page 80 SETTING SETTING CHANGE LOCK ERASE PBOOK To change your 4-digit password: To erase all phone book entries: 1. Press 1. Press NOTE: 2. Press [MENU] then enter “Password”. The default password is the last 4 digits of your phone number. for “Change Lock”. 3. Enter a new password then press NOTE: 2. Press [OK]. 4. Enter the new password again then press [MENU] then enter “Password”. The default password is the last 4 digits of your phone number.
TX-65BBM1104 2003.11.5 10:59 AM Page 82 SETTING SETTING ROAMING NAM SETTING SET MODE Enables Auto NAM (Number Assignment Modules) or manually selects a NAM. To select the Preferred System: 1. Press [MENU] AUTO NAM Automatically switches phone to proper NAM when you have multiple NAM registrations. 1. Press [MENU] . . 2. Select one of the following options: ● Home only : Only within your home area or home affiliated area.
TX-65BBM1104 2003.11.5 10:59 AM Page 84 SETTING SETTING LOCATION OTHERS To determine whether or not the network system can detect your position: CALL ANSWER 1. Press [MENU] . 2. Read the message, then press 1. Press [OK]. 3. Select “Location On” or “Location Off”. ● Location Off – Your location will be hidden from network & application except 911. ● Location On – Your location is now available to the network. 4. To save, press To select an answer mode: [OK]. [MENU] . 2.
TX-65BBM1104 2003.11.5 10:59 AM Page 86 SETTING HEADSET 1. Press SETTING DATA SVC. [MENU] . 2. Select one of the following options: ● Off / 5 Secs / 10 Secs / 18 Secs 3. To save, press 1. Press [OK]. [MENU] . 2. Select one of the following connection modes: LANGUAGE Selects the language in which letters are displayed on screen. 1. Press CONNECTION Selects a connection mode based on the handset usage. [MENU] . 2. Select “English” or “French”. 3.
TX-65BBM1104 2003.11.5 10:59 AM Page 88 SETTING SETTING PHONE INFO S/W VER. PHONE NUMBER Displays the software version of your phone. Displays the phone number of your phone. 1. Press 1. Press 2. To return to the previous page, press [OK] or [BACK]. [MENU] . [MENU] . 2. To return to the previous page, press [OK] or [BACK]. BROWSER VER. MSID Displays the browser version of your phone. Displays the MSID (mobile serial ID number) of your phone. 1. Press 1. Press 2.
TX-65BBM1104 2003.11.5 10:59 AM Page 90 KEY GUARD Locks your phone and prevents unauthorized use. Phone can only be used after inputting the password. KEY GUARD 1. Press [MENU] . 2. Select “On” or “Off”. 3. To save, press [OK]. Chapter 5 SUPPLEMENTARY FUNCTIONS This chapter addresses supplemental functions including the schedule, calculator, clock and stopwatch features.
TX-65BBM1104 2003.11.5 10:59 AM Page 92 ALARM SCHEDULE Sets an event and reminds you of that event. ALARM NEW EVENT You can set up to 3 alarms. 1. To display the calendar, press [MENU] . 2. Move the Navigation Key to choose a date in the calendar then press [OK]. 3.1. To set a time for an event, press ● To delete the existing one, press ● Choose one of the following on the first line: On time, 10 Mins before, 30 Mins before, 1 Hour before, No alarm.
TX-65BBM1104 2003.11.5 10:59 AM Page 94 WORLD CLOCK CALCULATOR CALCULATOR WORLD CLOCK Allows you to use the CDM-8450 as a calculator to perform basic mathematical functions (addition, subtraction, multiplication, division). Provides of the time in a specific preprogrammed city. 1. Press 2. Select a city. [MENU] . 2. Follow the instructions below to calculate (8*6)/4-2.5 ● Input 8. Move the Navigation Key leftward. Input 6 and press the Navigation Key. Move it rightward.
TX-65BBM1104 2003.11.5 10:59 AM Page 96 STOPW ATCH STOPWATCH Simultaneously times up to six different events. To operate the stop watch: 1. Press [MENU] Chapter 6 . 2. To measure a time period. ● To start the stopwatch, press [START]. ● To pause it, press ● To resume it or [RST/BACK] to return to the previous page, press . [STOP]. 3. To time up to six events at once: ● To start, press [START]. ● To stop a time period and continue measuring another one, press [CONT].
TX-65BBM1104 2003.11.5 10:59 AM Page 98 TWO-WAY SMS CHECKING MESSAGES Your CDM-8450 features Two-Way Short Message Service (SMS). This feature sends and receives text messages through your phone. Voice mail notification is also supported. CHECKING RECEIVED VOICE MAIL MESSAGE 1. Press [MENU] or for “Voice Mail”. MESSAGE INDICATORS 2. The number of voice mail messages currently waiting in your mailbox appears. To access your voice mailbox, press .
TX-65BBM1104 2003.11.5 10:59 AM Page 100 SENDING TEXT MESSAGES EDIT MESSAGE SENDING NEW TEXT MESSAGES 1. Press or [MENU] SENDING TEXT MESSAGES 1. To change the text message, press . 2. Input a new phone number then press [NEXT]. ● You can look it up from the phone book by pressing [PB]. 3. Input a new text message then press . 2. Input a new text message, then press [NEXT]. PRIORITY [NEXT]. ● To change the input mode, press . ● To change from lowercase to uppercase, press .
TX-65BBM1104 2003.11.5 10:59 AM Page 102 INBOX INBOX INBOX MENU FORWARD Manages received text messages. 1. To forward the text message, press 1. Press : : : : : : [MENU] or 3. Press 2. Input the phone number of the person you are sending the message, then press [NEXT]. . Urgent New Msg(not read) Urgent read Msg New Msg (not read) Old Msg (already read) Lock (unread and locked) Lock (already read and locked) 2. Select a message then press The message is displayed. 3.
TX-65BBM1104 2003.11.5 10:59 AM Page 104 OUTBOX OUTBOX OUTBOX MENU ERASE Manages sent text messages or messages waiting to be sent. 1. To erase a text message, press 1. Press : : : : : : : : : : [MENU] or 2. When you see “Erase this message?”, press [YES]. . Auto resend Auto resend lock Failed to send Failed and locked Not sent Not sent and locked Sent Sent lock Saved by call Saved by call lock 2. Select a message then press The message is displayed. 3. Press SAVE ADDRESS 1.
TX-65BBM1104 2003.11.5 10:59 AM Page 106 WEB ALER TS FILED WEB ALERTS 1. Press [MENU] FILED or 2. To select “GoTo”, press . To select “Erase Message”, press The text message will be displayed. •[ •[ •[ V ] : Read Message. ] : Unread Message. ] : Displays that text remains. • GoTo : Connecting Selected Site. • Erase : Erase Selected Message. Manages saved messages from the Inbox/Outbox. . 1. Press [MENU] or . . 2. Select a message and press The message is displayed. 3. Press [OK]. [OPTS].
TX-65BBM1104 2003.11.5 10:59 AM Page 108 SETTINGS ERASE ALL ERASE MESSAGES SETTINGS MENU Erases all the messages from the Inbox, Outbox or Filed folder. Manages messaging features through various functions. 1. Press 1. Press [MENU] or [MENU] or for “Settings”. . SAVE SENT MESSAGES 2.1. To erase all the inbox messages, press . Saves every sent message. ● Erases entire inbox or old inbox. 2.2. To erase all the outbox messages, press 2.3. To erase the filed messages, press . . 2.
TX-65BBM1104 2003.11.5 10:59 AM Page 110 SETTINGS SETTINGS ALERT ENTRY MODE Enables phone to alert you of an incoming message. Sets an Entry Mode as the default mode. For example, the T9 mode indicator will appear if T9 is the default mode. 1. Press . 2. Select “Ringer”, “Vibrate”, “Silent”, “Ringer & Remind”, or “Vibrate & Remind”. ● The Ringer & Remind or Vibrate & Remind rings or vibrates every 2 minutes to remind you of an incoming message. They will be cleared when any key is pressed. 3.
TX-65BBM1104 2003.11.5 10:59 AM Page 112 SETTINGS TIME DISPLAY 1. Press . 2. Select “Local Time”, “U.T.C Time” or “Arrival Time”. 3. Press Chapter 7 [OK]. RETRY TIME Select the time duration for which the handset retries sending the message. 1. Press MAKING AN EMERGENCY CALL . 2. Select “3Mins”, “5Mins”, “10Mins”, “30Mins”. 3. Press [OK]. EDIT VOICE C.B Edits the Callback number of your voice mail. 1. Press . 2. Input the Callback number then press [OK]. 3.
TX-65BBM1104 2003.11.5 10:59 AM Page 114 EMERGENCY CALLING This 911 feature puts the phone in the Emergency Call Mode when you dial the preprogrammed emergency number, 911. It also operates in the lock mode and in out of service areas. 911 IN LOCK MODE The 911 call service is available even in the lock mode. 1. Enter “911” and press . Chapter 8 INTERNET BROWSER 2. The call connects. 3. The phone exits the Lock Mode for 5 minutes. ● When the call ends, the phone returns to the Lock Mode.
TX-65BBM1104 2003.11.5 10:59 AM Page 116 INTERNET BROWSER With the Internet on your CDM-8450, you will be able to browse full-color graphic versions–not just text versions–of your favorite Web sites, making it easier than ever to stay informed while on the go. Check sports scores, trade stocks, and shop all from your phone. LAUNCHING THE WEB To launch the Web: 1. Press or SCROLLING As with other parts of your phone's menu, you'll have to scroll up and down to see everything on some Web sites.
TX-65BBM1104 2003.11.5 10:59 AM Page 118 INTERNET BROWSER INTERNET BROWSER 4. Select “Mark Site”. GOING BACK ● To go back one page, press key on your phone. Note that the key is also used for deleting text (like a BACKSPACE key) when you are entering text. 5. To save the bookmark use your keypad to edit the bookmark title and URL (if necessary) and select “Save”. NOTE: GOING TO A SPECIFIC WEB SITE To go to a particular Web site by entering a URL (Web site address): 1.
TX-65BBM1104 2003.11.5 10:59 AM Page 120 INTERNET BROWSER RELOADING A WEB PAGE 1. Access the menu by pressing and holding the volume up key on the side of your phone. 2. Press for “Reload”. RESTARTING THE WEB BROWSER If the Web browser appears to be malfunctioning or stops responding,you can usually fix the problem by simply restarting the browser. 1. Access the menu by pressing and holding the volume up key on the side of your phone. 2. Select for “Settings”. 3. Select “Restart Browser”.
TX-65BBM1104 2003.11.5 10:59 AM Page 122 INTERNET BROWSER ENDING A WEB CALL It’s important to note that some of the normal ways to end a call won’t work with Web connection calls. You should always close the connection through the application on your computer. Your phone will then return to standby mode.
TX-65BBM1104 2003.11.5 10:59 AM Page 124 SAFETY INFORMATION FOR WIRELESS HANDHELD PHONES Read This Information Before Using Your Handheld Portable Cellular Telephone EXPOSURE TO RADIO FREQUENCY SIGNALS Your wireless handheld portable telephone is a low power radio transmitter and receiver. When it is ON, it receives and also sends out radio frequency (RF) signals. In August 1996, the Federal Communications Commissions (FCC) adopted RF exposure guidelines with safety levels for handheld wireless phones.
TX-65BBM1104 2003.11.5 10:59 AM Page 126 SAFETY INFORMATION FOR WIRELESS HANDHELD PHONES SAFETY INFORMATION FOR WIRELESS HANDHELD PHONES ELECTRONIC DEVICES ELECTRONIC DEVICES Most modern electronic equipment is shielded from RF energy. However, certain electronic equipment may not be shielded against the RF signals from your wireless phone.
TX-65BBM1104 2003.11.5 10:59 AM Page 128 SAFETY INFORMATION FOR WIRELESS HANDHELD PHONES SAFETY INFORMATION FOR WIRELESS HANDHELD PHONES OTHER SAFETY GUIDELINES PRECAUTIONS AND WARNINGS Aircraft Please read and understand all of the Precautions and Warnings contained in this manual before attempting to operate your phone. FCC Regulations prohibit using your phone while in the air. Switch OFF your phone before boarding an aircraft. 1.
TX-65BBM1104 2003.11.5 10:59 AM Page 130 SAFETY INFORMATION FOR WIRELESS HANDHELD PHONES OPERATING PROCEDURES Never violate any of the following Rules and Regulations of the FCC when using your phone. The following offenses are punishable by fine, imprisonment, or both: - Using obscene, indecent, or profane language. - Using the unit to give off false distress calls.
TX-65BBM1104 2003.11.5 10:59 AM Page 132 SAR INFORMATION SAR INFORMATION THIS MODEL PHONE MEETS THE GOVERNMENT’S REQUIREMENTS FOR EXPOSURE TO RADIO WAVES. as described in this user guide, is 0.633 W/kg. (Body-worn measurements differ among phone models, depending upon available accessories and FCC requirements). While there may be differences between the SAR levels of various phones and at various positions, they all meet the government requirement for safe exposure.
TX-65BBM1104 2003.11.5 10:59 AM Page 134 U.S. Food and Drug Administration Center for Devices and Radiological Health Consumer Update on Mobile Phones 1. Do wireless phones pose a health hazard? The available scientific evidence does not show that any health problems are associated with using wireless phones. There is no proof, however, that wireless phones are absolutely safe. Wireless phones emit low levels of radiofrequency energy (RF) in the microwave range while being used.
TX-65BBM1104 2003.11.5 10:59 AM Page 136 guidelines that were developed with the advice of FDA and other federal health and safety agencies. When the phone is located at greater distances from the user, the exposure to RF is drastically lower because a person’s RF exposure decreases rapidly with increasing distance from the source.
TX-65BBM1104 2003.11.5 10:59 AM Page 138 The initial research will include both laboratory studies and studies of wireless phone users. The CRADA will also include a broad assessment of additional research needs in the context of the latest research developments around the world. 7.
TX-65BBM1104 2003.11.5 10:59 AM Page 140 increasing the distance between the user and the RF source will reduce RF exposure. Some groups sponsored by other national governments have advised that children be discouraged from using wireless phones at all. For example, the government in the United Kingdom distributed leaflets containing such a recommendation in December 2000. They noted that no evidence exists that using a wireless phone causes brain tumors or other ill effects.
TX-65BBM1104 2003.11.
TX-65BBM1104 2003.11.5 10:59 AM Page 144 PROTECT YOUR W ARRANTY 12 MONTH LIMITED WARRANTY Read your Warranty carefully, with the special consideration to paragraph seven of the Limited Warranty for your unit. AUDIOVOX COMMUNICATIONS CORP.
TX-65BBM1104 2003.11.5 10:59 AM Page 146 12 MONTH LIMITED WARRANTY 12 MONTH LIMITED WARRANTY (e) Defects in appearance, cosmetic, decorative or structural items such as framing and non-operative parts; WITHIN A PERIOD OF 18 MONTHS FROM DATE OF ORIGINAL PURCHASE. IN NO CASE SHALL THE COMPANY BE LIABLE FOR ANY SPECIAL CONSEQUENTIAL OR INCIDENTAL DAMAGES FOR BREACH OF THIS OR ANY OTHER WARRANTY, EXPRESS OR IMPLIED, WHATSOEVER.