User’s Guide CDM-8910C
WELCOME TABLE OF CONTENTS Thank you for choosing the up-to-date CDM-8910C our new model developed by top researchers to support the CDMA2000 1X system through Qualcomm-manufactured MSM6050 chips and CDMA technologies. This product allows for high speed communication services, such as data services, and a GUI animation menu. Among its many advanced features, the T9 input mode makes it much easier to enter letters.
TABLE OF CONTENTS SEND TEXT MSG. GROUP .................................................................................42 SEND PIX MSG. GROUP ....................................................................................43 ERASE MSG. GROUP.........................................................................................43 MY PHONE # .........................................................................................................43 RECENT CALLS .........................................
TABLE OF CONTENT STATE ...............................................................................................................106 SAVED .....................................................................................................................107 SAVED..................................................................................................................107 QUICK TEXT ............................................................................................................
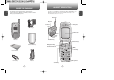
HANDSET DESCRIPTION INSIDE THE PACKAGE C H 1 This package should include all items pictured below. If any are missing or different, immediately contact the retailer where you purchased the phone. This phone is a CDMA2000 1X digital (800 MHz CDMA/AMPS, 1900 MHz PCS) phone with camera. The CDM-8910C weighs 3.7oz. The dimensions are 4.5" x 1.8" x .
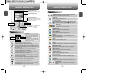
HANDSET DESCRIPTION HANDSET DESCRIPTION Display Indicators C H See page 9 for a list of icons. Text & Graphic area 1 Soft Key Indicators Shows the functions currently assigned to each soft key and displays some icons. Contacts Menu Short Press : Camera Menu. Long Press : Camera Preview. C H Signal Strength - Current signal strength: the more lines, the stronger the signal. Roaming Phone is out of home area.
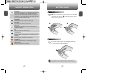
HANDSET DESCRIPTION C H 1 Dormant Indicates your phone is in a dormant state during a data call. Your phone goes to Dormant mode when you have no had any activity on a page for some time - your connection is still active and now you can make and receive calls. BATTERY USAGE BATTERY INSTALLATION C H 1 u Place the battery on the back of the handset and slide into place. v Push the battery down until it locks into place. Data Only Receives an async. call as a voice call.
BATTERY USAGE C H BATTERY CHARGING 1 POWER CONNECTION BATTERY USAGE BATTERY TIMES C H The operating time is subject to your handset usage and configuration. 1 Plug the AC Charger into a standard outlet. 2 Plug the other end of the AC Charger into the bottom of your phone. The battery must be installed on the phone. Battery Capacity TALK TIME STANDBY TIME STD 1000 mAh Up to 3.3 hours Up to 7.9 days These times are for a new battery. Usage and Standby time may decrease over time.
BATTERY HANDLING INFORMATION C H 1 DOs l Only use the battery and charger approved by the manufacturer. l Only use the battery for its original purpose. l Try to keep batteries in a temperature between l l l l l 41ºF (5ºC ) and 95ºF (35ºC). If the battery is stored in temperatures above or below the recommended range, give it time to warm up or cool down before using. Completely drain the battery before recharging. It may take one to four days to completely drain.
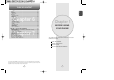
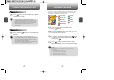
TURNING THE PHONE ON / OFF TURNING THE PHONE ON ACCESSING THE MENU Your phone can be customized via the menu. Each function can be accessed by scrolling with the Navigation Key or by pressing the number that corresponds with the menu item. 1 Press , then your “Power On” logo appears and the tone sounds. C H 2 • To select a logo, refer to page 60 for more details. (Settings>Display>Graphics>Power On) for more detail.
MENU SUMMARY 1. Phone Book C H 2. Recent Calls 2 MENU SUMMARY 6. Settings 1. Find 2. Add New 3. Group 4. Speed Dial 5. Msg. Group 6. My Phone # 1. Ringer Type 2. Volume 3. Alert 1. All Calls 2. Missed Calls 3. Received Calls 4. Dialed Calls 5. Call Timers 1. Last Call 2. All Calls 3. Home Calls 4. Roam Calls 5. Cumulative Calls 6. 1X Packet Counter 1. Received 2. Transmitted 3. Total 3. Messaging 1. Sounds 1. New Text Msg 2. New Pix Msg 3. Voice Mail 4. Inbox 5. Outbox 6. Saved 7. Quick Text 8.
MENU SUMMARY 7. Tools C H 7. Phone Info 1. S/W Version 2. H/W Version 3. Cricket Clicks 1. Voice Memo 1. Record 2. Play 3. Play Speaker 4. Erase All 1. Record 2. Play 3. Play Speaker 4. Erase All 1. Yes 2. No 3. Wake-Up 4. Undo Train All Set Active HFK Mode 2. Voice Dial 2 3. Train Words 4. Voice Setting 8. Utilities 1. Schedule 2. Alarm 3. Memo Pad 1. Add New Plan 2. View Plan 1. Alarm 1 2. Alarm 2 3. Alarm 3 1. Add Memo 2. View Memo 3. Settings 4. Calculator 5. World Clock 6. Stop Watch 9.
BASIC FUNCTIONS BASIC FUNCTIONS SPEAKER PHONE ANSWERING A CALL The speaker phone feature lets you hear audio through the speaker and talk without holding the phone. 1 To answer a call, press any key except or C H 1 To activate the speaker phone in idle, answering or calling modes, press and hold . 2 2 The phone returns to normal (Speaker phone off) after ending a call or when the phone is turned off and back on. , l By pressing , you can select either “Any Key” or “Send Key” to answer a call.
BASIC FUNCTIONS CALLER ID FUNCTION ETIQUETTE Identifies caller by displaying their phone number. If the caller’s name and number are already stored in your phone book, they both will appear. C H BASIC FUNCTIONS Mutes key tones and activates the vibration mode to alert you of an incoming call or message. 1 To turn etiquette mode on/off, press and hold will be displayed to indicate etiquette mode is active. An audible tone sounds when etiquette is turned off. The caller ID is stored in the call history.
DURING A CALL To display menu options during a call, press DURING A CALL [MENU]. MESSAGING Enables you to send a message during a call. C H 1 Press MY PHONE # Displays your phone number. [MENU] 1 Press [MENU] . C H . VOICE PRIVACY 2 MUTE (UNMUTE) The caller cannot hear you or any sounds from your side but you can still hear them. 1 Press 2 Increases security during a call. [MENU] 1 Press [MENU] . . l To deactivate, press [MENU] .
MAKING AN EMERGENCY CALL This 911 feature puts the phone in the Emergency Call Mode when you dial the preprogrammed emergency number, 911. It also operates in the lock mode and out of the service area. 911 IN LOCK MODE C H 2 The 911 call service is available even in the lock mode. 1 Enter “911” and press . Chapter 3 2 The call connects. MEMORY FUNCTION 3 The phone exits the Lock Mode for 5 minutes. l When the call ends, the phone returns to the Lock Mode.
STORING A PHONE NUMBER The phone book stores up to 300 entries. 1 Enter phone # and press [SAVE]. 2 Choose “New Contact” or “Existing Contact”. Press [OK] to select. ENTERING LETTERS, NUMBERS & SYMBOLS The input mode (Alpha editor) will be automatically activated when necessary to enter letters and numbers. As shown below, there are 4 available modes ; Standard input mode (Abc), T9 input mode (T9Word), Numeric mode (NUM), and Symbol mode (Symbols).
ENTERING LETTERS, NUMBERS & SYMBOLS STANDARD INPUT MODE T9 INPUT MODE The T9 input mode incorporates a built-in-dictionary to determine a word based on the entered characters. A word can be entered more quickly by pressing a key once per character. Use the digit keys to enter letters, numbers and characters. 1 Enter letters using the key pad as follows: Key Pad C H 3 1 Time ENTERING LETTERS, NUMBERS & SYMBOLS Repetitions Repetitions Repetitions Repetitions 2 times 3 times 4 times 5 times 1 1 .
ENTERING LETTERS, NUMBERS & SYMBOLS NUMERIC MODE Allows you to enter numbers. 1 Press [Abc] and scroll to the input mode to change to “NUM (Numeric mode)”. 2 To enter a number, press a digit key. C H 3 SYMBOL MODE Chapter 4 MENU FUNCTION Allows you to enter symbols. 1 Press [Abc] and scroll to the input mode to change to “Symbols (Symbol mode)”. C H 4 2 Select symbol you want to enter with the Navigation Key. l Use the Navigation Key to view a different line of symbols.
PHONE BOOK PHONE BOOK Stores up to 300 entries, each of which can be assigned to a group. Entries can be retrieved by name, phone number or group. FIND BY NUMBER Lists contacts numerically so you can quickly find a number. FIND Retrieves an entry by name and calls by simply pressing . You can review all the entries stored in your phone book list or quickly find an entry by entering a name or phone number. Shortcut: From standby mode, press display your internal Phone Book list. 1 Press [MENU] .
PHONE BOOK PHONE BOOK CHANGE GROUP NAME ADD NEW Adds a new entry. 1 Press [MENU] . 1 To add a new entry to the phone book, press [MENU] . 2 Select an existing group name that you have 2 The Contact screen appears. Enter the name of the entry. Press the Navigation Key down to enter information for the other phone book fields. l PHONE BOOK FIELD : Name/Mobile/Home/Office/Pager/Fax/E-Mail/ Wireless Addr./Group/Ringer/Msg.Ringer/Graphic/Memo/ Set Secret. C H 4 5 Press [MENU] to select “Rename”.
PHONE BOOK PHONE BOOK In idle mode, calls can be placed to numbers stored in speed dial by pressing & holding the location number on the key pad. For a 2-digit location number, press the first number, then press and hold the second number. Allows the user to group up to 10 phone numbers. The user can add, change, and delete Msg.Group. SPEED DIAL 1 Press MSG. GROUP [MENU] . ADD NEW MSG. GROUP 1 To add a new group, press [MENU] A maximum of five groups is allowed. .
PHONE BOOK PHONE BOOK SEND TEXT MSG. GROUP 1 Press [MENU] SEND PIX MSG. GROUP 1 Press . 2 Scroll to the group name. Select an existing group name with the Navigation Key. 3 Press [MENU] to select “Send Text Msg.”. 4 Press the Navigation Key down to select the [MENU] . 2 Scroll to the group name. Select an existing group name with the Navigation Key. 3 Press [MENU] to select “Send Pix Msg.”. 4 Input a “Message”, “Subject”, “CC” and “BCC”. Message field. 5 5.1.
RECENT CALLS In idle mode, you can access recent calls by pressing RECENT CALLS [MENU] . MISSED CALLS Displays information about the 20 most recently missed calls. Place a call to a missed call number by simply pressing . ALL CALLS Displays information about the most recent incoming, outgoing and missed calls. 1 To see a list of the 60 most recent incoming, outgoing and missed calls, press [MENU] . If the number is already stored in your phone book, only the name appears.
RECENT CALLS RECENT CALLS RECEIVED CALLS DIALED CALLS Displays information about the 20 most recently answered calls. Place a call to a received call by simply pressing . 1 To see a list of the 20 most recently answered calls, press [MENU] . If the number is already stored in your phone book, only the name appears. If the number is not stored, only the phone number appears. 2 To view incoming call details, press [OK]. Call details include date, time and phone number.
RECENT CALLS RECENT CALLS ROAM CALLS CALL TIMERS Checks the usage time and manages your calls within the limit you set. The five timers include: LAST CALL [MENU] [OK]. ALL CALLS 4 Displays usage time of all incoming and outgoing calls, excluding web access calls. 1 Press [MENU] . l Voice Call l Data/Fax Call . 2 To return to the previous page, press C H 1 Press 2 To view the time of the following items: Displays usage time of last call. 1 Press Displays usage time of roaming calls.
RECENT CALLS CRICKET CLICKS Your phone provides a unique feature -Cricket Clicks- that enables you to download melody ringers, wallpapers, games and more from your network to your phone. Please contact your service provider for the availability of these services or visit MyCricket.com to learn more (https://www.mycricket.com/default.aspx). 1X PACKET COUNTER Checks the log of all kilobyte data transmissions. RECEIVED To show the received kilobyte usage on a user definable interval. 1 Press [MENU] .
CRICKET CLICKS MEDIA GALLERY APPLYING MELODIES/WALLPAPERS IMAGES Downloaded melody ringers apply to several functions including the incoming call alert, new text message alert, alarm clock and scheduler alarm. Downloaded wallpapers apply to the standby mode. GRAPHICS This menu shows the list of downloaded still images. 1 Press [MENU] . CHECKING DATA FOLDER MEMORY Press Downloaded melody ringers, wallpapers and applications are saved to the data folder in your phone. 1 Press [MENU] or .
MEDIA GALLERY SETTINGS Customizes your phone and optimizes performance through a variety of settings. PIX This menu shows the list of photos that have been taken with the camera. 1 Press [MENU] SOUNDS Sets Ringer Type, Volume, Alert, Roam Ringer, Tone Length and Etiquette. . RINGER TYPE Press [MENU] to select 1.Erase, 2.Erase All, 3.Change Title. To select a ringer type for incoming calls: 2 Scroll through the captured pictures to display the picture you want to send and press [SEND].
SETTINGS SETTINGS VOLUME SPEAKER PHONE Controls the Ringer, Key Tone, Voice Call and Speaker Phone volume. 1 Press RINGER Controls the Ringer volume and alerts you to incoming calls in the modes listed in the gray box below. 1 To adjust speaker phone volume: Press [MENU] Navigation Key. Level 1 - 5 (Min- 2 Select one of the following options by C H 4 Silent : Mute the ringer, press (Min).
SETTINGS SETTINGS FADE ETIQUETTE Sounds an alert when entering an area where calls cannot be made due to weak signal strength. To place the phone in Etiquette Mode so all phone sounds are muted: 1 Press [MENU] . 2 Select “Off” or “On” with the Navigation Key and press [OK] to activate it. ON/OFF TONES Allows you to activate/deactivate the power on/off tones. 1 Press C H [MENU] 1 Press [MENU] . 2 Select “On” or “Off” with the Navigation Key. and press [OK] to activate it.
SETTINGS SETTINGS POWER OFF DISPLAY Allows you to customize the display. 1 Press [MENU] . MENU STYLE To select a display menu style: 1 Press 2 Select “Default” with the Navigation Key. [MENU] . 3 Press [SELECT] to activate it. 2 Select “Fold”, “Grid” or “List” with the Navigation Key and press [OK] to activate it. GRAPHICS C H 4 RECEIVED 1 Press [MENU] . To select an LCD display: 2 Select “Default” with the Navigation Key. WALLPAPER 1 Press [MENU] .
SETTINGS SETTINGS GREETING MESSAGE SCREEN SAVER Set the time of Screen Saver and select the images (default or downloaded from Cricket Clicks), then the image will be displayed on the LCD. 1 Press [MENU] To input a personal greeting: 1 Press [MENU] . . 2 The msg field will be highlighted. Press the 2 Select “Time Setting” or “Screen Saver” with the Navigation Key. l Time Setting : Off, 5 Secs, 10 Secs, 20 Secs, 30 Secs. l Screen Saver : Select picture image.(Pix/Multimedia/Images).
SETTINGS SETTINGS BACKLIGHT DATA SVC. Backlights the display, key pad and dimming for easy viewing in dark places. CONNECTION LCD/KEY PAD/DIMMING Choose the connection mode for the usage of your phone. 1 Press [MENU] . 2 Select “LCD”, “Key Pad” or “Dimming” and select one of the following options with the Navigation Key. C H 4 l LCD : 5 Secs/15 Secs/30 Secs/60 Secs/Always On. l Key Pad : 5 Secs/15 Secs/30 Secs/60 Secs/ Always On/Always Off. l Dimming : On/Off. 3 To save, press [OK].
SETTINGS SETTINGS RECENT CALLS SECURITY Prevents unauthorized use of your phone. The following settings can be restricted: Blocks access to Recent Call List. 1 Press [MENU] and enter your password. PHONE LOCK Prevents the phone from being used without entering the password first. 1 Press [MENU] and enter your password. The default password is the last 4 digits of your phone number. 2 Press C H 4 and select “Lock Now”, “Lock On Power Up” or “Unlock”. l Lock Now : Lock the phone now.
SETTINGS SETTINGS CHANGE CODE DATA CALL Restricts a data call from being placed. Changes your 4-digit password. 1 Press 2 Press and select “Allow” or “Restrict” with the Navigation Key. [MENU] and enter your password. l Allow : Allows a data call. l Restrict : Restricts a data call. 3 To activate, press 1 Press [MENU] 2 Press . and enter your password. 3 Enter a new password and press [OK]. [OK]. 4 Enter the new password again and press [OK].
SETTINGS SETTINGS ERASE ALL OTHERS Clears all phone book, downloads, and pix gallery entries from your phone. 1 Press [MENU] and enter your password. ANSWER OPTIONS CALL ANSWER To select an answer mode: 2 Press . 1 Press 3 Press to check “Phonebook”, “Downloads” or “Pix Gallery” and press [OK] to erase all the items in those categories. C H 4 RESET PHONE Resets phone to default settings. 1 Press [MENU] 2 Press . . 2 Select “Any Key” or “Send Key” with the Navigation Key.
SETTINGS SETTINGS AUTO ANSWER LANGUAGE Automatically answers a call after a preset amount of time. Auto Answer only works when the phone is open. Selects the language in which letters are displayed on screen. 1 Press [MENU] . 2 Select one of the following with the Navigation Key. l Off/5 Secs/10 Secs/18 Secs. 1 Press [MENU] . 2 Select either “English” or “Spanish” with the Navigation Key. 3 To activate, press [OK].
SETTINGS SETTINGS TTY MODE SYSTEM Your phone is able to operate with a TTY (Teletypewriter) device in digital mode. This feature is system dependent and may not be available in all areas. 1 Press [MENU] . 2 Select one of the following options (TTY Off / TTY+TALK / TTY+HEAR / TTY Full) with the Navigation Key and press [OK]. LOCATION C H 4 To determine whether or not the network system can detect your position: 1 Press [MENU] . 2 Select “911 Only” or “Location On” with the Navigation Key.
SETTINGS SETTINGS CHANGE NAM PHONE INFO Changes the NAM used by the phone when you have multiple registrations. 1 Press [MENU] S/W VERSION . 2 Select “NAM1-CRICKET” or “NAM2-CRICKET” then press Displays the version of your phone: [OK] to activate it. 1 Press [MENU] . 2 The software version appears. PRL ID 3 Press [OK]. Displays the phone’s PRL (Preferred Roaming List). 1 Press C H 4 [MENU] . 2 To return to the previous page, press H/W VERSION [OK]. 1 Press C H [MENU] .
UTILITIES UTILITIES SCHEDULE 4 Press [SAVE] to save it or return to the calendar. Sets an plan and reminds you of that plan. ADD NEW PLAN 1 Press [CLR] to 5 The date of the plan will be marked on your [MENU] . calendar. VIEW PLAN 2 Use the Navigation Key to choose a date in the calendar and press [OK]. 1 To view the Event List, press 3 C H The date field is highlighted. Press the Navigation Key down to set the alarm options.
UTILITIES UTILITIES DATE SETTING Use the keypad to change or enter the date for the alarm then press [OK]. If Weekly is chosen for the setting, date field becomes a day of the week. Once: Select the single date of the alarm. Daily: Select alarm for same time each day. Weekly: Select “Monday”, “Tuesday”, “Wednesday”, “Thursday”, Friday”, “Saturday”, “Sunday”. Monthly: Select day 1 through 31. Off C H 4 TIME SETTING Use the keypad to set a time for the event and the to select “AM” or “PM” then press [OK].
UTILITIES UTILITIES CALCULATOR STOP WATCH Simultaneously times up to six different events. To operate the stop watch: To access the calculator: 1 Press [MENU] . 1 Press 2 Follow the instructions below to calculate 1. To start the stop watch, press [START]. 2. To pause it, press [STOP]. 3. To resume it or [RESET] to return to the previous page, press [EXIT]. Press 8. Press the Navigation Key to the right. Press 6. Press the Navigation Key to the left. Press 4. Press the Navigation Key down.
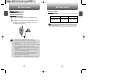
CAMERA CAMERA CAMERA MODE OPTIONS TAKE A PIX Taking pictures with your phone’s built-in camera is as simple as choosing a subject, pointing the lens, and pressing a button. You can activate the Camera Mode and take pictures when the phone is open. When the phone is open and in Camera Mode, several user options are available. TAKING A PICTURE THROUGH THE MENU Press [GALLERY] to enter Review Mode. From there you can view the captured pictures, view a running count of stored pictures and more.
CAMERA CAMERA PIX GALLERY 4 Under “Send To”, enter the email address or Your phone enters Review Mode after taking a picture. 1 Press [MENU] 2 Press [OK] to select a picture. . C H 4 . The picture will come up with the flashing cursor underneath. Enter the message and press [OK]. Press [MENU] to 1. Voice Record, 2. Insert Q.Text, 3. Delete Pix, 4. Insert Sound, 5. Insert Slide or 6. Slide Duration. [MENU] to display the following options : 1.
CAMERA HELP 1 Press C H 4 [MENU] . Use up/down keys to change picture size, left/right keys to change zoom and Side up/down keys control rotation on preview mode. Camera menu provides more settings: 1. SUB LCD: Enable previewing on external LCD. 2. Flash: Provides just enough light to allow pictures to be taken. 3. Self Timer: Set timer to take a self portrait. 4. Add Frames: Choose from 40 different frames to make picture taking fun. 5. IMAGE CONTROLS 5.1 BRIGHTNESS 5.2 IMAGE EFFECT 5.3 CONTRAST 5.
VOICE TOOLS MENU VOICE TOOLS MENU VOICE MEMO VOICE DIAL Voice Memo allows you to record a reminder message that can be up to 60 seconds. To record a memo: 1 Press [MENU] 1 Press to start Tools menu. 2 To enter a voice memo, press 3 1.1. To record a voice memo, press . Instructions will be displayed and you will hear “Please record at the tone.” C H 5 [MENU] to start Voice Tools menu. 2 To enter Voice Dial, press . 1.2. To stop recording a memo, press or [PAUSE/RESUME].
VOICE TOOLS MENU VOICE TOOLS MENU WAKE-UP TRAIN WORDS Train allows you to use Control words to make a call without using the keypad. Use to train or untrain the Voice Recognition with the control words, “Wake-Up”. 1 Press YES Use to train or untrain the Voice Recognition with the control words, “Yes”. 1 Press [MENU] . 2 “Please listen closely to hear instructions” will be displayed and you will hear “Now training control words. Please say the word yes”. 3 Say “Yes”. You will hear “Again”.
VOICE TOOLS MENU Voice Recognition (VR) enables you to place calls using your voice and to record voice memos. VOICE SETTING SET ACTIVE 1 Press and hold Allows the user to activate or deactivate voice dial service. 1 Press VOICE RECOGNITION MODE [MENU] until your phone turns to Voice Recognition mode. . 2 Select “Active Flip” or “Send Key” by If no recorded voice dial, “No entries recorded” message will be displayed. pressing the Navigation Key left or right.
MEMO Chapter 6 VOICE MAIL AND TEXT MESSAGE This chapter addresses Voice Mail and Text Messaging functions including: C H 5 WHEN A NEW MESSAGE ARRIVES VOICE MAIL NEW TEXT MSG NEW PIX MSG C H INBOX 6 OUTBOX SAVED QUICK TEXT ERASE ALL SETTINGS 96 97
WHEN A NEW MESSAGE ARRIVES NEW TEXT MSG To send a new message: 1 The following display appears 1 Press when a new message arrives. [MENU] or . 2 Under “Send To”, input the phone number and press 2 To display the message, press [OK]. By pressing [MENU], you can choose from the following: 1. Find: Search the phone number which is stored in the phone book. 2. Save: Stores the phone number the message was sent to. 3. Msg. Group: Select, all the phone numbers in a group. [READ].
NEW PIX MSG NEW PIX MSG To send a new picture message: 6 To send a message to another person, select 1 Press [MENU] or . 2 Phone goes into camera mode automatically. Take a picture and press [OK]. (Please refer to page 84 for more details on taking a photo.) 3 Under “Send To’, input the phone number and press 4 Under “Message”, input a new text message and press 6 By pressing [MENU], the user can choose from the following: 1.
INBOX INBOX The Inbox manages received text messages. To access: 1 Press [MENU] or . 1 To reply to a received message and include the received message into the message. : Urgent New Msg (not read) : Urgent Read Msg 2 The default call back number is automatically : New Msg (not read) inputted into the Default CB# field. You can scroll to the number and edit it. : Old Msg (already read) : Lock (already read and locked) 3 Under “Insert Signature”, select “On” or “Off”.
INBOX OUTBOX Manages sent text messages or messages waiting to be sent. SAVE TO SAVED 1 To save the text message in your phone. CHECKING SENT TEXT MESSAGES 1 Press SAVE TO QUICK TEXT [MENU] or . : Auto resend : Delivered 1 To save received text msg to “Quick text”. : Fail : Not send : Read *BLOCK SENDER : Sent 1 To block all incoming messages from addresses on block list. 2 2.1. Select a message, then press [OK]. The text message is displayed. LOCK & UNLOCK 2.2.
OUTBOX SAVED EDIT MESSAGE SAVED 1 To send a message to another person. Manages saved messages from the Inbox/Outbox. 1 Press 2 Input a text message and press [MENU] or . . 2 2.1. Select a text message then press 3 Input the phone number and press . 2.2. To erase message, press SAVE TO CONTACT 3 Press 1 To save number to contact. [OK]. The text message is displayed. [ERASE]. [MENU]. 4 If the text message is saved from the “Inbox” menu, this screen will be displayed.
QUICK TEXT ERASE ALL QUICK TEXT ERASE MESSAGES To edit the quick text message you have saved: 1 Press [MENU] or . 2 2.1. Select a message from the list. Press 1 Press or . 2 1. To erase all the inbox messages, press . Old Inbox : To erase all messages already read. (However, the locked Message(s) will not be deleted). Entire Inbox : To erase all messages. [MENU]. 2.2. To add a new quick text message, press [ADD NEW]. To edit the quick text message you have selected, press [EDIT].
SETTINGS SETTINGS Manages messaging features through various features. AUTO ERASE AUTO SAVE Automatically erases inbox/outbox messages when new messages arrive. SAVE SENT MSG 1 Press INBOX [MENU] or . 2 Press . Select either “Off”, “On” or “Prompt” with the Navigation Key. 3 Press 1 Press [MENU] or . 2 Press . Select “Disable” or “Enable” with Navigation Key. 3 Press [OK]. [OK]. OUTBOX PIX RECEIVE MODE 1 Press [MENU] or . 1 Press [MENU] or . 2 Press 2 Press .
SETTINGS SETTINGS DEFAULT CALLBACK REMIND Edits a default callback number so that the recipient can callback or reply. 1 Press [MENU] or 1 Press . 2 Press . Input a callback number, then press or . . Select “On” or “Off” with the Navigation Key. 3 Press [OK]. EDIT SIGNATURE EDIT VOICE CALLBACK [MENU] [MENU] 2 Press [OK]. You can look it up from the phone book by pressing [FIND]. 1 Press Send yourself a message to remember important notes or events. or .
SETTINGS SETTINGS DIRECT VIEW BLOCK OR UNBLOCK If the Direct View is set to on, the user will be able to view the message by pressing the read key. If the Direct View is set to off, the user can view the message by entering SMS Menu-> Inbox. 1 Press [MENU] or . 2 Then press . Select “On” or “Off” with the Navigation Key. ON : Set to read msg without entering inbox in SMS menu. OFF : Set to read msg after entering inbox in SMS menu. 3 Press 1 Press [MENU] or . 2 Then press .
MEMO Chapter 7 SAFETY AND WARRANTY This chapter addresses the safety guidelines and precautions to follow when operating your phone. Before operating your phone, please be aware of all the safety details. This chapter contains the terms and conditions of services and the warranty for your phone. Please review them thoroughly.
SAFETY INFORMATION FOR WIRELESS HANDHELD PHONES Read This Information Before Using Your Handheld Portable Cellular Telephone EXPOSURE TO RADIO FREQUENCY SIGNALS SAFETY INFORMATION FOR WIRELESS HANDHELD PHONES DRIVING SAFETY Talking on the phone while driving is extremely dangerous and is illegal in some states. Remember, safety comes first. Check the laws and regulations on the use of phones in the areas where you drive. Always obey them.
SAFETY INFORMATION FOR WIRELESS HANDHELD PHONES ELECTRONIC DEVICES Most modern electronic equipment is shielded from RF energy. However, certain electronic equipment may not be shielded against the RF signals from your wireless phone. PACEMAKERS The Health Industry Manufacturers Association recommends that a minimum separation of six (6”) inches be maintained between a handheld wireless phone and a pacemaker to avoid potential interference with the pacemaker.
SAFETY INFORMATION FOR WIRELESS HANDHELD PHONES PRECAUTIONS SAFETY INFORMATION FOR FCC RF EXPOSURE WARNING! Read this Information before using Your Handheld Portable Telephone is a high quality piece of equipment. Before operating, read all instructions and cautionary markings on (1) AC Adaptor (2) Battery and (3) Product Using Battery. DO NOT use this equipment in an extreme environment where high temperature or high humidity exists. DO NOT abuse the equipment. Avoid striking, shaking or shocking.
SAR INFORMATION THIS MODEL PHONE MEETS THE GOVERNMENT’S REQUIREMENTS FOR EXPOSURE TO RADIO WAVES. Your wireless phone is a radio transmitter and receiver. It is designed and manufactured not to exceed the emission limits for exposure to radiofrequency (RF) energy set by the Federal Communications Commission of the U.S. Government. These limits are part of comprehensive guidelines and establish permitted levels of RF energy for the general population.
FDA CONSUMER UPDATE U.S. Food and Drug Administration -Center for Devices and Radiological Health Consumer Update on Wireless Phones 1. Do wireless phones pose a health hazard? The available scientific evidence does not show that any health problems are associated with using wireless phones. There is no proof, however, that wireless phones are absolutely safe. Wireless phones emit low levels of radiofrequency energy (RF) in the microwave range while being used.
FDA CONSUMER UPDATE FDA CONSUMER UPDATE The Project has also helped develop a series of public information documents on EMF issues. FDA and the Cellular Telecommunications & Internet Association (CTIA) have a formal Cooperative Research and Development Agreement (CRADA) to do research on wireless phone safety. FDA provides the scientific oversight, obtaining input from experts in government, industry, and academic organizations.
PROTECT YOUR WARRANTY 12 MONTH LIMITED WARRANTY Read your Warranty carefully, with the special consideration to paragraph seven of the Limited Warranty for your unit.
12 MONTH LIMITED WARRANTY In addition, for reference to an authorized Warranty station in your area, you may telephone in the United States (800) 229-1235, and in Canada (800) 465-9672 (in Ontario call 905-712-9299). THE EXTENT OF THE COMPANY’S LIABILITY UNDER THIS WARRANTY IS LIMITED TO THE REPAIR OR REPLACEMENT PROVIDED ABOVE AND, IN NO EVENT, SHALL THE COMPANY’S LAIBILITY EXCEED THE PURCHASE PRICE PAID BY PURCHASER FOR THE PRODUCT.