CDM-8930_BM_050418 2005.4.18 2:21 PM Page 1 AUDIOVOX CDM-8930 Digital CDMA2000 1X Handheld Portable Telephone Thank you for choosing the up-to-date CDM-8930, our new model, developed by top researchers to support the CDMA2000 1X system through Qualcomm-manufactured MSM6100 chips and CDMA technologies. This product allows for high speed communication services, such as web browsing, data & fax services, and a GUI animation menu.
CDM-8930_BM_050418 2005.4.18 2:21 PM Page 2 TABLE OF CONTENTS CHAPTER 1 BEFORE USING YOUR PHONE .........7 Inside the Package .................................................8 Handset Description ..............................................9 Function Keys.......................................................10 Display Indicators.................................................11 Using the Battery..................................................13 Installing the Battery .............................
CDM-8930_BM_050418 2005.4.18 2:21 PM Page 4 TABLE OF CONTENTS TABLE OF CONTENTS Functions During a Call.......................................28 Mute (Unmute) ....................................................28 Speaker Mode.....................................................28 Silent (Silent Quit) ...............................................28 Send My Phone # ...............................................29 Location...............................................................29 Phone Info...
CDM-8930_BM_050418 2005.4.18 2:21 PM Page 6 TABLE OF CONTENTS Display Indicators (Camcorder Player) ...............99 Taking a Picture From the Menu.......................100 Taking a Picture In Idle Mode ...........................100 Camera (Take Picture) .......................................101 Camera (Camcorder) .........................................104 Camera (My Pictures) ........................................106 Camera (My Videos)...........................................
CDM-8930_BM_050418 2005.4.18 2:21 PM Page 8 Chapter 1 BEFORE USING YOUR PHONE Please read and fully understand this manual before using your phone. This chapter addresses your phone, its keys and display icons, and covers the charging and proper use of the battery.
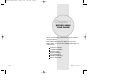
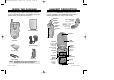
CDM-8930_BM_050418 2005.4.18 2:21 PM Page 10 INSIDE THE PACKAGE This package should include all items pictured below. If any are missing or different, immediately contact the retailer where you purchased the phone. HANDSET DESCRIPTION This phone is a CDMA2000 1X digital phone with Camera capabilities. The CDM-8930 weighs 3.89 oz. and the dimensions are 1.82” x 3.56” x 0.92”.
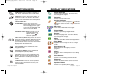
CDM-8930_BM_050418 2005.4.18 2:21 PM Page 12 FUNCTION KEYS DISPLAY INDICATORS SEND KEY: Press to make or receive a call. Press and hold to turn on VR mode. Signal Strength END KEY: Press to turn on the phone, to terminate a call or to return to the initial page. Press and hold to turn off the phone. Roaming NAVIGATION KEY: In Idle Mode -Press up to access the phone book, down to access the messaging menu, right to access the Schedule and left to access the Web.
CDM-8930_BM_050418 2005.4.18 2:21 PM Page 14 DISPLAY INDICATORS USING THE BATTERY Alarm to Schedule INSTALLING THE BATTERY Dormant 1. 1 Place the battery on the back of the handset and slide into place. 2 Push the battery down until it locks into place. Appears when either an event or an alarm is set. Indicates the phone is in disconnection condition while on “Server Connection”. Fax Only Receives a fax call as a voice call. Data Only Receives an async. call as a voice call.
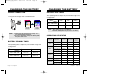
CDM-8930_BM_050418 2005.4.18 2:21 PM Page 16 CHARGING THE BATTERY CHARGING THE BATTERY POWER CONNECTION BATTERY TALK TIMES 1. Plug the AC charger into a standard outlet. The operating time is subject to your handset usage and configuration. Currently Charging DCS PCS AMPS STD 1100 mAh 210 mins 220 mins 103 mins EXT 1700 mAh 310 mins 350 mins 130 mins Charge Complete NOTE: NOTE: 1. Fully charge the battery before using – it is not charged when purchased. 2.
CDM-8930_BM_050418 2005.4.18 2:21 PM Page 18 BATTERY INFORMATION Dos l Only use the battery and charger approved by the manufacturer. l Only use the battery for its original purpose. l Try to keep batteries in a temperature between 41ºF (5ºC ) and 95ºF (35ºC). l If the battery is stored in temperatures above or below the recommended range, give it time to warm up or cool down before using. l Completely drain the battery before recharging. It may take one to four days to completely drain.
CDM-8930_BM_050418 2005.4.18 2:21 PM Page 20 USING THE PHONE TURNING THE PHONE ON 1. Press and hold until your “Power On” logo appears and the melody begins to play. ● If “Password” appears on the display enter your 4-digits password to unlock your phone. ● The default password is the last 4 digits of your phone number. TURNING THE PHONE OFF 1. Press and hold appears. NOTE: NOTE: USING THE MAIN MENU ACCESSING THE MENU Your phone can be customized via the menu.
CDM-8930_BM_050418 2005.4.
CDM-8930_BM_050418 2005.4.18 2:21 PM Page 24 MENU SUMMARY SETTINGS u 1 : Sounds 2 : Display 3 : Roaming 4 : Games/Tools 5 : Location 6 : Security 7 : Airplane Mode 8 : Others 9 : Phone Info.
CDM-8930_BM_050418 2005.4.18 2:21 PM Page 26 BASIC FUNCTIONS BASIC FUNCTIONS PAUSE FEATURE ANSWERING A CALL You can dial or save a phone number with pauses for use in the automated systems where you need to enter a credit card number, a social security number, or other numbers. This feature will be convenient when you are linked to an ARS (Advanced Record System). 1. To answer a call, press any key except or . To enable a call, press . 1.
CDM-8930_BM_050418 2005.4.18 2:21 PM Page 28 BASIC FUNCTIONS BASIC FUNCTIONS CALL WAITING FUNCTION ADJUSTING VOLUME Notifies you of an incoming call when you are on the phone by sounding a beep and displaying the caller’s phone number on the screen. Volume can be adjusted by using the volume control keys on the side of the handset, or by using the menu. 1. To answer another call while on the phone, press . This places the first call on hold. 2. To switch back to the first caller, press again.
CDM-8930_BM_050418 2005.4.18 2:21 PM Page 30 FUNCTIONS DURING A CALL FUNCTIONS DURING A CALL To display menu options during a call, press [MENU]. These menu items are available while you are on a call. SEND MY PHONE # MUTE (UNMUTE) Automatically transmits your phone number to a pager during a call. (Dependent on pager service) The caller cannot hear you or any sounds from your side but you can still hear them. 1. Press 1. Press [MENU] [MENU] LOCATION . ● To deactivate, press [MENU] .
CDM-8930_BM_050418 2005.4.18 2:21 PM Page 32 FUNCTIONS DURING A CALL MAKING AN EMERGENCY CALL CALL HISTORY This 911 feature automatically places your phone in the Emergency Call Mode when you dial the preprogrammed emergency number, 911. It also operates in the lock mode and out of the service area. Displays the Call History menu. 1. Press [MENU] . 911 IN LOCK MODE MESSAGING The “911” call service is available even in the lock mode. Enables you to send a message (SMS) during a call.
CDM-8930_BM_050418 2005.4.18 2:21 PM Page 34 MEMO Chapter 3 MEMORY FUNCTION This chapter addresses numerous functions including saving phone numbers to the internal phone book, entering text and accessing call logs.
CDM-8930_BM_050418 2005.4.18 2:21 PM Page 36 TEXT INPUT METHODS STORING PHONE NUMBERS ENTERING CHARACTERS The phone book stores up to 300 entries. 1. Enter phone # then press then select “Save”. or press [OPTIONS] 2. Choose “New Entry” or “Existing Entry”. To select, press [OK]. 3. The Phone # will appear above a list of icons. The name of the icon is displayed below the list. Use the Navigation Key to choose the type of # you’re adding, as indicated by the icon. To select, press [OK]. 4.
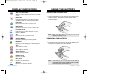
CDM-8930_BM_050418 2005.4.18 2:21 PM Page 38 TEXT INPUT METHODS T9TM PREDICTIVE TEXT MODE [T9Mode] To choose T9TM mode from the Editor screen press [Abc], then choose [T9Word]. This mode predicts the words you are entering using a built-in dictionary. With T9TM predictive text input, you press each key only once for each letter. The chart below outlines how to use T9TM mode. KEY Mode Next Space Shift 1. Press each key once for each letter of the word you are writing.
CDM-8930_BM_050418 2005.4.18 2:21 PM Page 40 SPEED DIALING TEXT INPUT METHODS NUMERIC MODE [Num] SPEED DIAL Numeric mode allows you to add a number to your entry/message. To select numeric mode from the Editor screen press [Abc], then select [Num]. Dials a number simply by pressing and holding its Speed Dial location number. For a 2-digit location number, press the first number then press and hold the second number. To store a number in Speed Dial: SYMBOL MODE [Symbols] 1.
CDM-8930_BM_050418 2005.4.18 2:21 PM Page 42 CALL HISTORY To access Call History from the idle mode, press [MENU] . Displays information about the 60 most recently dialed, missed and received calls. Places a call to a selected number by simply pressing . 1. To see a list of the 60 most recent numbers, press [MENU] . If the number is already stored in your phone book, only the name appears. If the number is not stored, only the phone number appears. NOTE: .
CDM-8930_BM_050418 2005.4.18 2:21 PM Page 44 CALL HISTORY CALL HISTORY INCOMING CALLS MISSED CALLS Displays information about the 20 most recent incoming calls. Place a call to an incoming number by simply pressing . Displays information about the 20 most recent missed calls. Place a call to a missed call number by simply pressing . 1. To see a list of the 20 most recent incoming calls, press [MENU] . If the number is already stored in your phone book, only the name appears.
CDM-8930_BM_050418 2005.4.18 2:21 PM Page 46 CALL HISTORY CALL HISTORY ERASE HISTORY MISSED CALLS Erases individual Call History entries. 1. Press ALL CALLS 2. You will see a message on the display (Erase Missed calls?). 1. Press [MENU] [MENU] . . 2. You will see a message on the display (Erase All calls?). 3. Select [YES] or [NO]. Select “Yes” to erase all missed calls from your Call History list. 3. Select [YES] or [NO].
CDM-8930_BM_050418 2005.4.18 2:21 PM Page 48 CALL HISTORY PHONE BOOK AIR TIME LAST CALL Stores up to 300 entries, each of which can be assigned to a group. Entries can be retrieved by name, phone number or group. Displays talk time of last call. FIND 1. Press [MENU] Retrieves an entry by name or number, and calls the number by simply pressing . From the Standby Screen, you may press as well. . 2. The last call time appears on the display. 3. To return to the previous page, press [OK].
CDM-8930_BM_050418 2005.4.18 2:21 PM Page 50 PHONE BOOK PHONE BOOK NEW ENTRY SPEED DIAL #’S Adds a new entry to the phone book. Please refer to page 34 for an alternate way to add an entry to the phone book. In idle mode, calls can be placed to numbers stored in speed dial by pressing & holding the location number on the key pad. For a 2-digit location number, press the first number, then press and hold the second number. 1. To add a new entry to the phone book, press [MENU] . 1. Press 2.
CDM-8930_BM_050418 2005.4.18 2:21 PM Page 52 PHONE BOOK PHONE BOOK MY PHONE # CHANGE GROUP NAME To display your phone number and service provider: 1. Press [MENU] . Select an existing group name. 1. Press [MENU] . 2. To return to the previous page, press 2. To select “Rename”, press [OK]. 3. Input a new group name. GROUP Allows you to classify phone entries into groups. Existing groups include Personal, Business, Etc. and All. A maximum of seven groups is allowed. ADD NEW GROUP 4.
CDM-8930_BM_050418 2005.4.18 2:21 PM Page 54 MEMO Chapter 4 SETTINGS This chapter addresses customizing your phone by adjusting backlighting, volume, ring tones and other user-friendly features.
CDM-8930_BM_050418 2005.4.18 2:21 PM Page 56 SETTINGS SOUNDS Sets Volume, Ringer Type, Alerts, Roam Ringer and Tone Length. SETTINGS KEY TONE To adjust keypad tone: 1. Press [MENU] . 2. Adjust the keypad tone. VOLUME ● Off/Level1-5 (Min- Controls the volume for Ringer, Key Tone, Voice Call, Messages, Speaker Phone, Power On and Power Off. RINGER Controls the Ringer volume and alerts you to incoming calls in the following modes. 1. Press [MENU] . 2.
CDM-8930_BM_050418 2005.4.18 2:21 PM Page 58 SETTINGS SETTINGS RINGER TYPE SPEAKER PHONE To adjust speaker volume: 1. Press [MENU] . VOICE CALL 1. Press [MENU] 2. Adjust the speaker phone volume. ● Level1-5 (Min- , Max- 3. To save, press [OK]. 2. Select “With Caller ID” or “No Caller ID” then press [OK]. . 2. Adjust the power on volume. 3. To save, press . ). POWER ON To adjust power on volume: 1. Press [MENU] ● Off/Level1-5 (Min- To select a ringer type for incoming calls: , Max- ).
CDM-8930_BM_050418 2005.4.18 2:21 PM Page 60 SETTINGS MESSAGES To select a ringer type for receiving messages: 1. Press [MENU] . 2. Select your desired ringer type. ● Music Bells : Orgel, Turkischer Marsch, Rudolf the Red, Fusion Orchestra, Queen of the Night, Moonight, Csikos Post, The Song of the Spring, Cannon, Chorus, Jazz Minuet, L’arlesienne Suite, Sweet Lullaby, Nocturn, Amazing Grace, Clementine, Fusion, Fantasy, Friends, Picnic. ● SMS Tones : Tone 1~5.
CDM-8930_BM_050418 2005.4.18 2:21 PM Page 62 SETTINGS SETTINGS LOW SIGNAL Sounds an alert when you encounter low signal strength during a call. 1. Press [MENU] . DISPLAY 2. Select “Off” or “On” then press MENU STYLE [OK] to save it. To select a display menu style: ROAM RINGER Sounds a different ringer when you are in a roaming service area. 1. Press [MENU] ● Normal: Sounds the same ringer type as used in home area. ● Distinctive: Sounds a different ringer type when outside home area.
CDM-8930_BM_050418 2005.4.18 2:21 PM Page 64 SETTINGS SETTINGS BACKLIGHT INCOMING CALL 1. Press [MENU] . 2. Select Default to choose a pre-installed display, or Downloads or Saved to Phone to choose a display you have downloaded to your phone. 3. To save it, press Backlights the display and key pad for easy viewing in dark places. 1. Press [MENU] . 2. Select “LCD” or “Key Pad” then select one of the following options. [OK]. ● LCD: 8 Secs/15 Secs/30 Secs/Always On.
CDM-8930_BM_050418 2005.4.18 2:21 PM Page 66 SETTINGS SETTINGS ROAMING GAMES/TOOLS Your Cellular Telephone allows you to control your ability to roam. By using the Roaming menu option, you can determine which signals your cellular telephone accepts. BACKLIGHT 1. Press 1. Press [MENU] . 2. Select one of the following options: ● Home Only: Only within your home area or home affiliated area. ● Analog Only: Stays in the analog setting until the hand set is powered on after being powered off.
CDM-8930_BM_050418 2005.4.18 2:21 PM Page 68 SETTINGS SETTINGS MSG ALERT LOCATION Displays the received SMS/Voice mail alert while playing a game. 2. Select “On” or “Off” by pressing the Navigation Key. Your Cellular telephone is equipped with a Location feature for use in connection with location-based services that may be available in the future. The Location feature allows the network to detect your position. Turning Location off will hide your location from everyone except 911. 3.
CDM-8930_BM_050418 2005.4.18 2:21 PM Page 70 SETTINGS SETTINGS SECURITY CHANGE LOCK Prevents unauthorized use of your cellular telephone. The following settings can be restricted: Changes your 4-digit password. 1. Press LOCK PHONE NOTE: [MENU] then enter “Password”. The default password is the last 4 digits of your phone number. Prevents the phone from being used without entering the password first. 2. Press 1. Press 3. Enter a new password then press NOTE: [MENU] then enter “Password”.
CDM-8930_BM_050418 2005.4.18 2:21 PM Page 72 SETTINGS LIMIT USE OUTGOING CALLS Blocks all outgoing calls – except emergency calls – but allows an incoming call to be placed. 1. Press [MENU] then enter “Password”. 2. Press then select “Allow” or “Restrict”. ● Allow : Allows a dialed call. ● Restrict : Restricts a dialed call. 3. To save, press [OK]. CALL HISTORY Blocks access to call history. 1. Press [MENU] then enter “Password”. 2. Press then select “Allow” or “Restrict”.
CDM-8930_BM_050418 2005.4.18 2:21 PM Page 74 SETTINGS SETTINGS ERASE PBOOK RESET PICTURE ACCOUNT To erase all the names and phone numbers in your internal Phone Book: To erase all photo album entries. 1. Press 1. Press NOTE: 2. Press [MENU] then enter “Password”. The default password is the last 4 digits of your phone number. NOTE: 2. Press [MENU] then enter “Password”. The default password is the last 4 digits of your phone number. . . 3.
CDM-8930_BM_050418 2005.4.18 2:21 PM Page 76 SETTINGS SETTINGS RESET PHONE AIRPLANE MODE Resetting the phone restores all the factory defaults, including the ringer types and display settings. The internal Phone Book, Call History, Scheduler, and Messaging are unaffected. When your cellular telephone is in Airplane Mode, it cannot send or receive any calls or access online information. In this mode you may still use the phone’s other features such as Games and Voice Memos.
CDM-8930_BM_050418 2005.4.18 2:21 PM Page 78 SETTINGS SETTINGS OTHERS AUTO ANSWER CALL ANSWER Automatically answers a call after a preset number of rings. An ideal setting for the hands-free car kit. Auto Answer only works when the Headset or Hands Free Kit is connected the phone: To select an answer mode: 1. Press [MENU] . 2. Select “Any Key” or “Talk Key”. ● Any Key: Press any key to answer an incoming call except , and . ● Talk Key: Press only to answer a call. 1.
CDM-8930_BM_050418 2005.4.18 2:21 PM Page 80 SETTINGS SETTINGS LANGUAGE VOICE SETTING Selects the language in which letters are displayed on screen. To answer calls when your cellular telephone is connected to an optional hands-free car kit: 1. Press 1. Press [MENU] . 2. Select either “English” or “Français”. 3. To save, press [OK].
CDM-8930_BM_050418 2005.4.18 2:21 PM Page 82 SETTINGS SETTINGS LANTERN PHONE INFO. To use for easy viewing in dark places or emergency. VERSION 1. Press Displays the (Phone Number/Software Ver/PRL/ Hardware Ver/Decimal ESN/Hex ESN/MSID/ Browser Ver/Browser Name/MCL Ver) version. [MENU] . 2. Select a time Lantern option (10 Secs, 15 Secs, 30 Secs, 60 Secs). 1. Press 3. To save, press NOTE: [MENU] . [OK].
CDM-8930_BM_050418 2005.4.18 2:21 PM Page 84 MEMO Chapter 5 SUPPLEMENTARY FUNCTIONS This chapter addresses supplemental functions including the schedule, calculator, clock and stopwatch features.
CDM-8930_BM_050418 2005.4.18 2:21 PM Page 86 VOICE SVC Voice Recognition (VR) enables you to place calls using your voice and to record voice memos. 1. Press and hold until your phone turns to Voice Recognition mode. 2. “Please say the name after the prompt tone” will be displayed and you will hear “Name please”. NAME 1. Press and hold until your phone turns to Voice Recognition mode. 2.
CDM-8930_BM_050418 2005.4.18 2:21 PM Page 88 VOICE SVC VOICE SVC VOICE DIAL TRAIN WORDS Voice Dial allows you to call a person by simply saying their name. To access Voice Dial: Train allows you to use Control words to make a call without using the keypad. 1. To start Voice Tools menu, press YES 2. To enter a voice dial, press [MENU] . . 3. 1.1.To record a voice dial, press . The phone book list will be displayed alphabetically. Select a name then press .
CDM-8930_BM_050418 2005.4.18 2:21 PM Page 90 VOICE SVC SCHEDULE WAKE-UP Sets a schedule and reminds you of that event. Use to train or untrain the Voice Recognition with the control word, “Wake-Up”. ADD NEW PLAN 1. Press 1. Press [MENU] 3. Say “Wake-up”. You will hear “Again”. Say “Wake-up” again. You will hear “Training word successful”. UNDO TRAIN ALL Undo Train All erases all “trained” words. [MENU] . . 2.
CDM-8930_BM_050418 2005.4.18 2:21 PM Page 92 MEMO PAD SCHEDULE 4. Press [SAVE] to save it or the calendar. [CLR] to return to Your phone includes an internal memo pad that can be used to compose and store reminders and notes. 5. The date of the shedule will be marked on your calendar. ADD MEMO VIEW PLAN 1. Press 1. Press [MENU] . 2. Move the Navigation Key to choose an event and press [OK] or [ERASE]. Press [OPTIONS], then select “Add Plan” or “Erase All” using the Navigation Key.
CDM-8930_BM_050418 2005.4.18 2:21 PM Page 94 MEMO PAD ALARM SETTINGS You can set up to 3 alarms. To select memo pad background image: 1. To display alarm entries, press 1. Press 2. Select one of the entries using the Navigation Key. To set a new alarm, choose alarm 1, 2 or 3. To edit an existing alarm, select that alarm. Press . [MENU] . 2. Select “Drop”, “Sky”, “Snow”, “Candy”, “Pattern” or “White”, then press [OK]. [MENU] . 3. Press the Navigation Key down to select alarm options.
CDM-8930_BM_050418 2005.4.18 2:21 PM Page 96 ALARM CALCULATOR RINGER SETTING To set a “Ringer” press [OPTIONS], then select “Change” or “Default” using the Navigation Key. To save it press . 1. Press [MENU] MESSAGE SETTING Using the keypad input an alarm message then press . [SAVE]. Input 8. Move the Navigation Key to the right. Input 6 then press the Navigation Key to the left. Input 4 then press the Navigation Key down. Input 2 then press to input (.). Press 5.
CDM-8930_BM_050418 2005.4.18 2:21 PM Page 98 STOP W ATCH Simultaneously times up to six different events. To operate the stop watch: WORLD CLOCK To display the time and date in pre-programmed cities: 1. Press 1. Press [MENU] [MENU] . . 2. Select a city. 2. To measure a time period. 1. To start the stop watch, press or [START]. 2. To pause it, press or [STOP]. 3. To resume it, press . Press [RESET] to return to the previous page. 3. The world map appears with the city, its date and time.
CDM-8930_BM_050418 2005.4.18 2:21 PM Page 100 CAMERA (USE CAMERA) CAMERA (USE CAMERA) Taking pictures with your phone’s built-in camera is as simple as choosing a subject, pointing the lens, then pressing a button. You can activate the Camera Mode and take pictures when the phone is open.
CDM-8930_BM_050418 2005.4.18 2:21 PM Page 102 CAMERA (USE CAMERA) TAKING A PICTURE FROM THE MENU 1. Press [MENU] (Open flip 90 degree) 1. Press [MENU] (Open flip 90 degree) or or Capture then . . 2. Point the camera lens at your subject. You can check the picture framing through the main display screen. 2. Point the camera lens at your subject. You can check the picture framing through the main display screen. 3. To take the picture, press [CAPTURE]. CAMERA ( TAKE PICTURE) , , or 3.
CDM-8930_BM_050418 2005.4.18 2:21 PM Page 104 CAMERA ( TAKE PICTURE) CAMERA MODE OPTIONS To access the camera mode options, press [OPTIONS]. or To access the save to phone options after taking a picture, press or Options [NEXT]. Options ● Self Portrait: To rotate the viewfinder 180 to the LCD. Take a picture of yourself by checking the view on the LCD. (Off/On) ● Flash: To activate the flash function. (Off/Auto Flash/Always On/On This Shot) ● Self Timer: To activate the camera’s timer function.
CDM-8930_BM_050418 2005.4.18 2:21 PM Page 106 CAMERA ( CAMCORDER) 1. Press [MENU] (Open flip 90 degree) or then CAMERA ( CAMCORDER) CAMCORDER MODE OPTIONS . 2. Point the camera lens at your subject. You can check the picture framing through the main display screen. 3.1 Press 3.2 Press Capture [RECORD], , or to take the video. [PAUSE] to pause the video record. 3.3 Press Capture [DONE] or record. or 4.1 To replay video, press to stop the video [REPLAY]. 4.
CDM-8930_BM_050418 2005.4.18 2:21 PM Page 108 CAMERA ( MY PICTURES) 1. Press [MENU] or then . 2. In Review Mode you can view all the pictures you have taken and store selected images in your phone. 3. Select “In Camera” or “Save to phone”. ● In Camera: To store photos you have captured with your camera. ● Save to Phone: To select the folder storing pictures you have downloaded or assigned. 4. Select photo image with the Navigation Key. 5. To send picture message, press [SEND].
CDM-8930_BM_050418 2005.4.18 2:21 PM Page 110 CAMERA (MY VIDEOS) 1. Press [MENU] or then . CAMERA ( ONLINE ALBUMS) 1. Press [MENU] or then . 2. In Review Mode you can view all the videos you have record and store selected images in your phone. 2. Select a picture from your online Picture Mail. 3. Select “In Camera” or “Save to phone”. 3.1. To access online “Picture Mail” options, press [OPTIONS]. ● In Camcorder: To store video you have captured with your camera.
CDM-8930_BM_050418 2005.4.18 2:21 PM Page 112 CAMERA ( ONLINE ALBUMS) 4.1. To access your online Albums Uploads options, press [OPTIONS]. ● New Album: To create a new album. Enter a new album name then press . ● Album Info: To display information on the selected album, such as title, time/date, and number of files. CAMERA ( ACCOUNT INFO) After storing the data [Picture and Other files] on the MMS server, the user can check the downloaded information on the web through their account. 1.
CDM-8930_BM_050418 2005.4.18 2:21 PM Page 114 MEMO Chapter 6 VOICE MAIL AND TEXT, PIC/VIDEO MESSAGES This chapter addresses checking voice mail messages, as well as sending and receiving text, picture messages and video messages.
CDM-8930_BM_050418 2005.4.18 2:21 PM Page 116 WHEN A NEW MESSAGE ARRIVES SEND TEXT MSG TEXT, PICTURE, VIDEO MESSAGE To send a new message: 1. The following display appears when a new message arrives. 1. Press 2. To display the message, press [READ]. VOICE MAIL Displays the number of voice mails and accesses them by pressing . 1. To access your voice mail, press [MENU] . or press . [MENU] or press . 2. Under “Send To”, input the phone number and press .
CDM-8930_BM_050418 2005.4.18 2:21 PM Page 118 PIC/VIDEO MSG PIC/VIDEO MSG 5. Under “Message”, input a message text and press [OK]. To send a new picture/video message: 1. Press [MENU] or press . ● By pressing [OPTIONS], the user can choose from the following: 1. Insert Quick Text: Inserts pre-programmed text into a Text Msg. 2. Save to Quick Text: Saves text you have written to Quick Text. ● Press [ADD OR CHANGE]: Input the message, then press . 2.1. Press for “From My Pictures”.
CDM-8930_BM_050418 2005.4.18 2:21 PM Page 120 WEB ALER TS INBOX The Inbox manages received text messages. To access: WEB ALERTS 1. Press [MENU] or press . 2. Select GoTo, press , then press to connect to the selected site. Press to erase the selected message. 1. Press [MENU] or press 2.1. Select a message, then press The text message is displayed. 2.2. To Erase Message, press . [OK]. [ERASE]. 3. The Web Alert message will be displayed. V : Read Message. : Unread Message. 3.
CDM-8930_BM_050418 2005.4.18 2:21 PM Page 122 INBOX OUTBOX FORWARD 1. To forward the text message, select “Forward”. 2. Input the phone number of the person you are sending the message, then press . Manages sent text messages or messages waiting to be sent. 1. Press [MENU] or press . 3. Input any text message to go along with the forwarded message, then press . 2.1. Select “For Text Msg” or “For Pic/Video”, then press [OK]. The text or pic/video message is displayed. 4.
CDM-8930_BM_050418 2005.4.18 2:22 PM Page 124 OUTBOX SAVED SAVE TO CONTACT SAVED 1. To save number to contact, select “Save to Contact”. Manages saved messages from the Inbox/Outbox. SAVE TO SAVED 1. Press [MENU] or press 1. To save the text message in your cellular telephone, select “Save to Saved”. 2.1. Select a text message then press The text message is displayed. LOCK & UNLOCK 2.2. To erase message, press 1. To lock or unlock the text message, select “Lock & Unlock”. 3. Press 2.
CDM-8930_BM_050418 2005.4.18 2:22 PM Page 126 QUICK TEXT ERASE ALL QUICK TEXT ERASE MESSAGES To view/edit the Quick Text messages: 1. Press 1. Press [MENU] or press . 2.1. Select a Quick Text message from the list. Press [OPTIONS]. 2.2. To add a new Quick Text message, press [ADD NEW]. To edit the Quick Text message you have selected, press [EDIT]. 3. To erase the saved Quick Text message, press [ERASE]. [MENU] or press . 2.1. To erase all the voice mail, press . 2.2.
CDM-8930_BM_050418 2005.4.18 2:22 PM Page 128 SETTINGS SETTINGS Manages messaging features through various features. AUTO ERASE SAVE SENT MSG Automatically erases inbox/outbox messages when new messages arrive. 1. Press [MENU] or press . INBOX 2. Select “Off”, “On” or “Prompt” with the Navigation Key. 1. Press 3. Press [MENU] or press . [OK]. 2. Press . Select “Disable” or “Read Msg” with the Navigation Key.
CDM-8930_BM_050418 2005.4.18 2:22 PM Page 130 SETTINGS SETTINGS MESSAGE LOG RETRY TIME INCOMING LOG 1. Press 1. Press [MENU] or press . [MENU] ● 3 mins/5 mins/10 mins/30 mins. 3. Press 3. To return to the previous page, press EDIT VOICE CB# [OK]. 1. Press OUTGOING LOG [MENU] or press . 2. Press . Displays information on the outgoing messages such as "Sent Msg". 3. To return to the previous page, press [MENU] 3. Press . 2. Press .
CDM-8930_BM_050418 2005.4.18 2:22 PM Page 132 MEMO Chapter 7 DOWNLOADS & INTERNET This chapter addresses using your handset to access the Wireless Internet.
CDM-8930_BM_050418 2005.4.18 2:22 PM Page 134 DOWNLOADS DOWNLOADS Your cellular telephone provides a unique feature -Downloads- that enables you to download games, ringers, screen savers, applications and more from your network to your cellular telephone. Please contact your service provider for the availability of these services. GAMES START DOWNLOADS 1. Press 1. To launch “Downloads” from the standby mode, press [MENU] . 2. Select “Get New” then press [OK].
CDM-8930_BM_050418 2005.4.18 2:22 PM Page 136 DOWNLOADS RINGERS 1. Press [MENU] DOWNLOADS SCREEN SAVERS . 1. Press [MENU] . 2. Select “Get New” then press [OK]. The Mobile Browser will launch and take you to the “Ringers” download menu. 2. Select “Get New” then press [OK]. The Mobile Browser will launch and take you to the “Screen Savers” download menu. 3. Use the Navigation Key to select a ringer you wish to download. 3. Use the Navigation Key to select a Screen Saver you wish to download.
CDM-8930_BM_050418 2005.4.18 2:22 PM Page 138 DOWNLOADS APPLICATIONS 1. Press [MENU] STAR T INTERNET BROWSER ACCESS THE INTERNET . 2. Select “Get New” then press [OK]. The Mobile Browser will launch and take you to the “Applications” download menu. 3. Use the Navigation Key to select a Application you wish to download. 4. From the item information page, select “Buy”. If you have not previously purchased an item, you will be prompted to enter your account password and create your purchasing profile.
CDM-8930_BM_050418 2005.4.18 2:22 PM Page 140 BROWSER MENU BROWSER MENU BROWSER MENU SHOW URL The browser menu lists the actions necessary to operate the browser. Press and hold or press to access the browser menu. ◆ ◆ To display the homepage, press [MENU] . [MENU] To forward to the next page, press [MENU] . BOOKMARKS ◆ To view your “Bookmark List”, press [MENU] . This provides easy website access without entering a URL. SEARCH ◆ To launch a “Google” search, press [MENU] .
CDM-8930_BM_050418 2005.4.18 2:22 PM Page 142 BROWSER MENU SCROLL MODE Sets the mode and scrolling speed for long texts. ◆ To select “Scroll Mode”, press . SEND REFFERER This is the menu for URL sending when users try to connet a new site. ◆ To select “Send Refferer”, press . KEY PRESS TIMEOUT Selects the duration for how long the mobile browsing will wait for acknowledgement after key press. ◆ To select “Key Press Timeout”, press . SECURITY Accesses the security menu and settings.
CDM-8930_BM_050418 2005.4.18 2:22 PM Page 144 SAFETY INFORMATION FOR WIRELESS HANDHELD PHONES Read This Information Before Using Your Handheld Portable Cellular Telephone SAFETY INFORMATION FOR WIRELESS HANDHELD PHONES ANTENNA CARE EXPOSURE TO RADIO FREQUENCY SIGNALS Use only the supplied or an approved replacement antenna. Unauthorized antennas, modifications, or attachments could damage the phone and may violate FCC regulations.
CDM-8930_BM_050418 2005.4.18 2:22 PM Page 146 SAFETY INFORMATION FOR WIRELESS HANDHELD PHONES SAFETY INFORMATION FOR WIRELESS HANDHELD PHONES ELECTRONIC DEVICES ELECTRONIC DEVICES Most modern electronic equipment is shielded from RF energy. However, certain electronic equipment may not be shielded against the RF signals from your wireless phone.
CDM-8930_BM_050418 2005.4.18 2:22 PM Page 148 SAFETY INFORMATION FOR WIRELESS HANDHELD PHONES SAFETY INFORMATION FOR WIRELESS HANDHELD PHONES OTHER SAFETY GUIDELINES PRECAUTIONS AND WARNINGS Aircraft Please read and understand all of the Precautions and Warnings contained in this manual before attempting to operate your phone. FCC Regulations prohibit using your phone while in the air. Switch OFF your phone before boarding an aircraft. 1.
CDM-8930_BM_050418 2005.4.18 2:22 PM Page 150 SAFETY INFORMATION FOR WIRELESS HANDHELD PHONES OPERATING PROCEDURES Never violate any of the following Rules and Regulations of the FCC when using your phone. The following offenses are punishable by fine, imprisonment, or both: - Using obscene, indecent, or profane language. - Using the unit to give off false distress calls.
CDM-8930_BM_050418 2005.4.18 2:22 PM Page 152 SAR INFORMATION THIS MODEL PHONE MEETS THE GOVERNMENT’S REQUIREMENTS FOR EXPOSURE TO RADIO WAVES. Your wireless phone is a radio transmitter and receiver. It is designed and manufactured not to exceed the emission limits for exposure to radiofrequency (RF) energy set by the Federal Communications Commission of the U.S. Government. These limits are part of comprehensive guidelines and establish permitted levels of RF energy for the general population.
CDM-8930_BM_050418 2005.4.18 2:22 PM Page 154 U.S. Food and Drug Administration Center for Devices and Radiological Health Consumer Update on Mobile Phones 1. Do wireless phones pose a health hazard? The available scientific evidence does not show that any health problems are associated with using wireless phones. There is no proof, however, that wireless phones are absolutely safe. Wireless phones emit low levels of radiofrequency energy (RF) in the microwave range while being used.
CDM-8930_BM_050418 2005.4.18 2:22 PM Page 156 guidelines that were developed with the advice of FDA and other federal health and safety agencies. When the phone is located at greater distances from the user, the exposure to RF is drastically lower because a person’s RF exposure decreases rapidly with increasing distance from the source.
CDM-8930_BM_050418 2005.4.18 2:22 PM Page 158 The initial research will include both laboratory studies and studies of wireless phone users. The CRADA will also include a broad assessment of additional research needs in the context of the latest research developments around the world. 7.
CDM-8930_BM_050418 2005.4.18 2:22 PM Page 160 increasing the distance between the user and the RF source will reduce RF exposure. Some groups sponsored by other national governments have advised that children be discouraged from using wireless phones at all. For example, the government in the United Kingdom distributed leaflets containing such a recommendation in December 2000. They noted that no evidence exists that using a wireless phone causes brain tumors or other ill effects.
CDM-8930_BM_050418 2005.4.
CDM-8930_BM_050418 2005.4.18 2:22 PM Page 164 PROTECT YOUR W ARRANTY 12 MONTH LIMITED WARRANTY Read your Warranty carefully, with the special consideration to paragraph seven of the Limited Warranty for your unit.
CDM-8930_BM_050418 2005.4.18 2:22 PM Page 166 12 MONTH LIMITED WARRANTY 12 MONTH LIMITED WARRANTY (e) Defects in appearance, cosmetic, decorative or structural items such as framing and non-operative parts; WITHIN A PERIOD OF 18 MONTHS FROM DATE OF ORIGINAL PURCHASE. IN NO CASE SHALL THE COMPANY BE LIABLE FOR ANY SPECIAL CONSEQUENTIAL OR INCIDENTAL DAMAGES FOR BREACH OF THIS OR ANY OTHER WARRANTY, EXPRESS OR IMPLIED, WHATSOEVER.