Portable DVD / VCD / CD / MP3 Audio and Visual Disc Player Owner’s Manual D1700 1-800-645-4994 Customer Service Article Number03E: 25070PD2700050 128-6169
CAUTIONS REGARDING DVD PLAYER Do not move the player during playback Turn off the power when not using the player During playback, the disc spins at high speed, so do not lift or move the player. Doing so may damage the disc. Depending on the TV reception conditions, stripes may appear on the TV screen when the TV is turned on while the player’s power is on. This is not a malfunction of the player or the TV. If this should happen, turn off the player’s power.
IMPORTANT SAFETY INFORMATION- PLEASE READ FIRST USING AN EXTERNAL POWER SOURCE This product is sold with a power cord appropriate for accessing an external power source. Make sure to use only an appropriate external power source, as indicated on the electricity ratings label. If you are unsure regarding the type of power source in your area, consult an authorized service provider or the local power company.
WARNING SYMBOLS IN THIS MANUAL NTSC / PAL Viewing Area Standards Most of Asia (excluding China) and the Americas use the NTSC broadcasting standard. Europe, Japan and China/Hong Kong use the PAL broadcasting standard. If you use this product in an area using a standard different from your own, simply select the appropriate setting on the PAL / NTSC setting located on the back of the base module and restart the disc player, otherwise the viewing image will be very poor.
Table of Contents: 1. Dear Customer ......................................................... 6 2. Package Contents .................................................... 6 3. Quick Start Guide ..................................................... 8 4. Player Functions .................................................... 10 5. Player Controls ....................................................... 11 6. Remote Control Buttons ......................................... 19 7. System Setting ....................
1 2 Dear Customer: Package Contents Thank you for your purchase of this portable DVD player. This product incorporates the latest digital audio / video (AV) technologies to give you the ultimate in listening and viewing pleasure. Before use, may we recommend you familiarize yourself with the user’s manual. The manual discusses, player operation,the use of remote control,system setup and player maintenance. If you are interested in a specific topic(s), please refer to the Table of Contents.
2. Package Contents Package Contents 11. Rechargeable Lithium Battery Pack 1. DVD Player - one 12. Vehicle Power Adapter 2.AC/DC Power Adapter - one 13. Battery Charger 3. Audio Signal Cable - one 4. Video Signal Cable - one 5. S-Video Signal Cable - one 6. Earphones - one NOTE: 7. Power Cord - one This DVD player can utilize a Digital Optical 8. Wireless Remote Control - one Fiber Signal Cable for improved audio 9. CR 2025 Battery for Remote Control - one signal output.
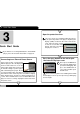
3 . Quick Start Guide 3 Quick Start Guide 8 Open the protective cover The cover opens to a maximum 180 only. Do not try to open it any further. The player’s liquid crystal display (LCD) is located on the reverse side of the cover. Take care not to scratch or mar the screen with sharp objects. Close the cover when the player is not in use. If you want to use rechargeable batteries for this DVD player, please first read the instructions on page 55.
3 . Quick Start Guide Inserting a DVD disc Press the Align the center of the DVD disc with the center hole of the DVD player. Gently press down on the DVD to snap the disc into place. Close the player cover. Make sure that the laser-emitting device is never bumped or contaminated by dust, etc. When the DVD player is not in use, try to keep the cover closed as much as possible to avoid contamination by dust.
6 ¥»¾÷ªº¥\¯à²¤¶ 4. Player Functions 1 4 Player Functions 10 3 5 Multiple DVD Format Compatibility Onboard Two Channel Speakers and Earphone Plug Broad Signal I/O Capabilities This DVD player can play the following disc formats: DVD, VCD , music CD and MP3. The player automatically recognizes the appropriate format, so all you have to do is put in the disc, sit back and enjoy. Two onboard speakers allow you to enjoy this DVD player without cumbersome add-ons.
7 ¥D¾÷ªº¦U³¡¦ì»¡©ú (¤@) 5. Player Controls (1) 1 5 Active Liquid Crystal Display This player is equipped with a 7-inch, 16:9, non-radiation emitting large screen TFT panel.The display delivers colors that are sharp and vivid. Player Controls (1) 2 Turning the “ BRIGHTNESS “button allows you to adjust the brightness level of the LCD screen. 3 2 “ COLOR “Button Turning the” COLOR “button will allow you to adjust the on-screen color balance.
5. Player Controls (2) Player Controls (2) 2 4 3 5 3 1 “ MENU “Button When you push the “ MENU “button longer than 1 second, the player will automatically enter the GUI (Graphical User Interface) mode. For detailed instructions please refer to page 29, Remote Control Buttons. 1 “ ENTER “Button and Direction Selection 12 After pressing “ SETUP “and making relevant selections within this mode, press” RETURN “to return to the next highest level within the mode.
7 ¥D¾÷ªº¦U³¡¦ì»¡©ú (¤T) 5. Player Controls (3) Player Controls (3) 3“ “STOP Button Pressing the stop button will stop play, although the disc will remain in motion. Pressing the button soon after pressing stop will cause the player to pick up at the place just left off (i.e. memory play). Pressing the . button twice will cause play to cease and the memory play function to be disabled. The button is also available on the remote control. Refer to page 25 for relevant instructions.
5. Player Controls (4) 6 14 OPEN Button to open the internal player cover Player Controls (4) Press the “ OPEN “button to open the internal player cover and change discs. Make sure that the cover is kept closed. As long as the cover is open, the DVD player will not start broadcasting. WARNING:Do not over extend the cover to avoid breaking the hinge. 1 6 1. When playing a Disc ( DVD/VCD/CD ), please adjust the volume between” 0 “to” 8 “ to get the best sound performance.
5. Player Controls (5) 7 ¥D¾÷ªº¦U³¡¦ì»¡©ú (¤-) Player Controls (5) In the” INPUT “mode the player will accept inputs from an amplifier, VCR, tape recorder, video camera etc. for broadcast on its onboard LCD screen and speakers. Input signals are given precedence over any disc currently running on the player. 2 Moving the switch either to the left or right will set the player to provide input or output signals (refer to section 1).
5. Player Controls (6) Player Controls (6) 7 ¥D¾÷ªº¦U³¡¦ì»¡©ú (¤») If you press the“ ON/OFF “switch to the right to “ HOLD “position, it will lock the system in place. At this point the player is locked and pressing any key will have no effect on the player. Once the player has been switched on and the protective cover opened, the LCD screen will display a welcome message. This alone consumes significant power.
5. Player Controls (7) 7 ¥D¾÷ªº¦U³¡¦ì»¡©ú (¤C) Player Controls (7) Play Mode LCD Screen 5 6 The Play Mode LCD Screen is located in the front section of the DVD player and programmed to display a variety of display data, including chapter number, play time, repeat mode, battery status, charge mode and so on. When power to the player has been removed, the screen will display “ OFF “(please refer to page 16 for further instructions).
5. Player Controls (7) 7 ¥D¾÷ªº¦U³¡¦ì»¡©ú (¤C) 3 Battery Status This symbol displays the charge level currently remaining in the installed battery. Please refer to the chart on the right to determine reserve levels indicated by each display level. If the battery symbol is flashing this indicates that battery reserves are at 10 percent or less. Recharging is recommended at this point. A battery kept at low reserves for an extended period of time is subject to damage and a shorter life span.
8 »»±±¾¹ªº¦U«öÁ仡©ú 6. Remote Control Buttons 6 Remote Control Buttons The remote control included with this DVD player offers convenience as well as some special functions that can be accessed only through the remote control. Therefore, please take care not to loose or damage your remote. Also, when you take your DVD player out for a spin, don’t forget to pack the remote as well.
6. Remote Control Buttons 8 »»±±¾¹ªº¦U«öÁ仡©ú (Äò) 1 “ POWER “Button This switch turns the player on and off. When player power is off, it is in the wait mode, awaiting instructions from the remote. In wait mode the player consumes only a small amount of power, however, if you don’t plan to play a disc immediately, it is recommended that you pull out the power cord or remove the battery to save power.
6. Remote Control Buttons 8 »»±±¾¹ªº¦U«öÁ仡©ú (Äò) 1 1 “ “ MUTE Key Pressing the “ “MUTE key will activate your player’s mute function. While sound will cease on any played program, normal video images will continue to be broadcast. When the” “ MUTE key is pressed, a MUTE message will appear in the bottom right corner of the viewing monitor. To restore sound, press the “ “ MUTE key once again and a “ “UNMUTE message will then appear on-screen.
6. Remote Control Buttons 22 1. Random (RND): Songs/segments are played in a computer selected random order. 2. Programmed (PRG): Songs/segments are played in a pre-set order. This order may be set by repeatedly entering the chapter (song, segment) numbers. The LCD display on the player can be double-checked to make sure the proper numbers were received. 4 REPEAT Key The following will appear on-screen when you press the “REPEAT” key: OFF This key is used to set a repeat command.
6. Remote Control Buttons 8 »»±±¾¹ªº¦U«öÁ仡©ú (Äò) 1 1 3 2 TITLE Key Pressing the” TITLE “ key brings up the DVD title screen. The majority of DVDs have a selection menu, which allows selection of a title or some pre-set sections. Some DVDs also permit you to select language and sound preferences in this screen. Once you have entered the title screen, follow the instructions to choose your preferences and then press” ENTER “ to confirm choices and close out the screen.
6. Remote Control Buttons 1 Directional Keys These four directional keys permit you to scroll through options in order to make selections. Please refer to page 31 for more detailed instructions. These keys are also necessary to make program play selections once you are in the “ MENU “ screen of a DVD or VCD. Furthermore, pressing the “ GUI “(on-screen display) key will display the options menu on the main monitor screen. Scroll through the menu to set your preferences.
6. Remote Control Buttons 1 PAUSE / STEP Key Pressing the “PAUSE/STEP”key will freeze play at its current position. In the case of a video disc the image will freeze on the screen, with a music CD the sound will stop. Pressing the pause key more than once will advance the image on screen frame by frame. Press the (PLAY) button to resume normal play. Please refer to page 13 for corresponding buttons on the player. 2 STOP Key Pressing the” STOP “key will cause play to cease immediately.
6. Remote Control Buttons 26 1 SHIFT Key 2 ZOOM Key This key must be used in conjunction with other keys. After pressing the” ZOOM “ key, the video image will be enlarged 9 times. At this time, a” ZOOM “message will appear in the upper right corner of the screen. Selecting from 1 through 9 on the remote control will display a full-screen image of one of the 9 sectors identified in the picture below.
6. Remote Control Buttons SHIFT + (Slow Motion) Press the” SHIFT “key and then the “ “ key to switch the player into slow motion mode. Press once for 1/2 speed and twice for 1/4 speed play. This function is valid only for video discs and will not work with audio discs. In slow mode the audio output will be disabled. To cancel slow play, press the “ 1 “key to resume normal speed play. PREV/NEXT Key Pressing the” “or” “keys will cause a CD to skip to the song immediately previous or after the current.
6. Remote Control Buttons 1 Q SURROUND Key Via a virtual surround system the Q surround function produces a 3-dimensional sound effect. When external speakers are configured, you can enjoy full surround sound at home. When pressing this key continuously during play, a Q SOUND ON and Q SOUND OFF message will appear on-screen to inform you the surround sound status. The following image will appear on the TV screen when you press the “ AUDIO SET “key while playing a DVD (refer to page 30).
6. Remote Control Buttons 8 »»±±¾¹ªº¦U«öÁ仡©ú (Äò) 1 GUI (ON SCREEN DISPLAY) Key Clicking the “ GUI “key will bring up the overhead control bar at the top of the screen. This screen allows you to perform many different setting functions. Pressing this key will not stop the play currently in progress, so that you can immediately view the results of changed settings. Please refer to page 41 for more information regarding title screen operations.
8 »»±±¾¹ªº¦U«öÁ仡©ú (Äò) 6. Remote Control Buttons 30 1 AUDIO SET Key Discs come in different formats, but after pressing the “ AUDIO SET “key an image similar to the following will appear on-screen: 1 1 EN 5.1CH OFF Press the or key to move the cursor to the left column and then use the or key to select the language of choice. This function cannot be activated on discs not containing encoded languages.
7. System Setting 7 ON SCREEN MENU / Language Select Pressing the “ SETUP “key on the player or the remote will display the system setting menu on the TV screen under the following two circumstances: 1. The player is powered but not playing a disc. 2. The player contains no disc. System Setting Pressing the “ SETUP ”key (on the player or the remote) once the player is in the stop mode will bring up the full array of system settings and their default values.
7. System Setting 32 ON SCREEN MENU / Language Select 1. GUIDE MESSAGE: [ON / OFF] / Scroll to the Guide Message option, press “ ENTER ”and select if you want this option on or off. When finished press “ RETURN “on the player or remote control to return to the immediately preceding menu level. Or you can press “ SETUP “to complete setting and exit the setup menu altogether. ALL 2. (ON-SCREEN MENU LANGUAGE): [ENGLISH / CHINESE] / Scroll to this option and press” ENTER “.
7. System Setting Select DISC LANGUAGES The second item on the system setting menu is entitled” Set Disc Language “. Use the up or down keys to scroll to this section and press “ ENTER “to enter this setup screen.
7. System Setting Select DISC LANGUAGES 1. AUDIO LANGUAGE: [ORIGINAL / SPANISH / ENGLISH / OTHER] Scroll up or down to the Audio Language selection, then press “ ENTER “Selecting Spanish, English or Other will give that language priority when playing a disc with language options. Also, you may enter a language code to make that language the audio language default choice. Please see the appendix for a complete list of all language codes.
7. System Setting DIGITAL OUTPUT The third item on the system setting menu is entitled “ DIGITAL OUTPUT “Use the up and down keys to scroll to this section and press “ ENTER “to enter this setup screen.
7. System Setting 9 ¨t²Î°ò¦³]©w - ¼Æ¦ì¿é¥X DIGITAL OUTPUT 1. DIGITAL OUTPUT: [BITSTREAM / 2CH, 48KHz, 16BIT PCM] Scroll up or down to the Disk Menu selection, then press “ ENTER “to choose the digital output from the player. If you have an external Dolby AC-3 digital decoder you can select “ Bitstream “. This option supports 5.1 channel surround effects. When you select “ 2CH, 48KHz, 16BIT PCM “, audio is exported through a normal digital signal.
7. System Setting TV ASPECT The fourth item on the system setting menu is entitled “ TV Aspect “ With this menu you have the option to select the 4:3 traditional screen format, or the 16:9 wide-screen format. The player uses 16:9 as default. Use the up and down keys to scroll to this section and press “ ENTER “to enter this setup screen.
7. System Setting 9¨t²Î°ò¦³]©w - ¿ï¾Üµe-±¤ñ¨Ò TV ASPECT 1. WIDE TV - 16:9 Scroll up or down to the Disk Menu selection, then press “ ENTER ”to choose the display screen format. The 16:9 selection delivers a screen picture of a ratio 16 units wide and 9 units high. If you are viewing a wide-screen DVD program on a television with a wide-screen format display, you should choose the 16:9 option. Once set, please press “ RETURN “to select and return to the next menu level.
7. System Setting RATINGS The fifth of the six sections in the “ SETUP “Menu is entitled “ RATINGS “ As some DVDs are not suitable for children to view, an eight-point rating system was established to reflect the level of protection desired. When a DVD is attempted to be played that is rated higher than the value set, the player will issue a warning message on-screen, or, depending on the DVD, automatically halt play.
7. System Setting 40 PBC / VCD PLAYBACK CONTROL The sixth item on the system setting menu is entitled “ PBC “(PBC, VCD Playback Control). This option is only activated for VCD version 2.0 discs. The standard format for VCD is to return to the main menu after each segment has finished playing. If you do not wish to cut off at the end of each segment, you can turn the playback control “ OFF “.
10 ¼½©ñ¤¤³]©w-DVD 8 8. Changing Setting During Play - DVD 01 01 1 2 ON Changing Settings 01 9 20 3 20 1/1 EN 4 5.1ch 5 ON 6 01/01 EN OFF 7 _ _ 8 ON 10 11 During Play (for DVD) Different from system settings you have the option of changing play / language settings for the current disc in play. Pressing the” GUI “ (On Screen Display) button on the remote control will bring the title display menu up on screen.
8. Changing Setting During Play - DVD 4 AUDIO Symbol This field displays the current broadcast language code. 10 ¼½©ñ¤¤³]©w-DVD 8 Press the or key on the player or remote control to go to this field, then press or to make a selection. Press “ ENTER “to confirm and go to another selection topic. Note that if a particular DVD does not support the selected language, this function will not work.
8. Changing Setting During Play - VCD 10 ¼½©ñ¤¤³]©w-VCD Changing Settings During Play (for VCD) 01 20 1 2 OFF 6 1 2 3 20 STEREO 3 4 OFF OFF 4 5 5 8 6 7 Play Time Symbol This field displays the play time of the current VCD program in minutes, seconds format. AUDIO Symbol Pressing the” AUDIO “key and then the or key to switch between two track output (stereo), left speaker only (left), and right speaker only (right) sound.
8. Changing Setting During Play - CD 10 ¼½©ñ¤¤³]©w-CD Changing Settings During Play (for CD) 01 10 1 RND 2 OFF 4 15 4 3 5 OFF 5 6 6 1 2 3 44 TRACK Symbol This field displays the current play track. Press the lect a desired track. and keys to se- Play Time Symbol This field displays the play time of the current CD program in minutes, seconds format. PROGRAM Symbol This field displays whether a programmed play has been set. Press the or key to enable or disable programmed play.
9. Programmed Play(VCD) 11³]©w½sµ{¼½©ñ 9 Programmed Play This player permits programmed play for music CDs and VCDs. You have the option of programming up to 30 different song tracks to be played in the order you prefer. 1. Place the CD or VCD into the player. While in play or after pressing “ “ (STOP) press the” GUI “(On Screen Display) key located on the remote control. The following screen should be displayed: 2. Press the or key to place the cursor over the field.
9. Programmed Play 11 ³]©w½sµ{¼½©ñ(Äò) 5. Press the or key until the cursor is over the word “ Start “ Click on “ ENTER “ to begin the play of songs in the programmed order. 6. If you wish to clear one selection from the program list, select that or key to select “ C “(CLEAR) on the right song and use the side of the screen and press the “ ENTER “ key. This will clear the song from the play list and allow you to add a new one. 7.
12 ¥~±µ¼v-µ³]³Æ 10. Connecting AV Peripherals 10 Connecting AV Peripherals You can connect your player to a wide variety of audio and video peripherals via the output ports located on the right side of the player module. Alternatively, you can configure a similarly wide array of input equipment to route AV signals into your player to utilize its high definition LCD screen and onboard speakers.
10. Connecting AV Peripherals Configuration I: AV Signal Output from AV Jack 48 AV Signal Output AV Signal Input When the” INPUT OUTPUT “switch on the right of the player module is set to “ OUTPUT ” the three AV signal cables can output signals of the currently played program. Connect the AV signal cables and you are ready to export to the following types of peripherals: 1.
10. Connecting AV Peripherals Configuration III: Audio Signal Output from AV Jack Configuration VI: Digital Audio Signal Output When using only the red and white AV signal cables, the player can output dual track high-quality audio signals to at least the following peripherals: 1. Amplifiers AV Signal Output 2. Two-track and reel-to-reel tape recorders 3. Digital magnetic tape recorders (DAT) AV Signal Input Amplifier, Tape Recorder, etc 4.
10. Connecting AV Peripherals 12 ¥~±µ¼v-µ³]³Æ (¿é¤J) Configuration V: AV Signal Input 50 When the “ INPUT OUTPUT “switch on the back side of the player has been switched to” INPUT “the signal cables can accept AV signal inputs from external AV equipment. Connecting the included or separately purchased AV cables to the player will accept inputs from at least the following types of peripherals: AV Signal Input 1. Televisions equipped with AV output jacks 2. VCRs 3.
13³]©w±K½X»P«OÅ@¼h¯Å 11. Setting the Password and Rating 11 Setting the Password and Rating Most DVDs are rated against an 8-point grading level. The player will not permit a disc to be played when the disc is rated at a number higher than that set. A password must be entered when you want to change the rating level currently set. After entering a password you can use it to lock settings and install a view rating level. The correct password must also be entered to disable the currently set rating level.
11. Setting the Password and Rating 52 1. Press the “ SETUP “button on the player or remote control. The menu screen shown here appears on the TV screen: 2. Press the or key to move the cursor over the “ Ratings “field. 3. Press the “ ENTER ”button on the player or the remote control to access the Rating menu as shown here. The cursor will initially be on rating level 8, i.e. no viewing restriction. 4.
11. Setting the Password and Rating 5. Enter numbers directly on the remote control, or use the and keys to select password numbers. Please do not forget this password. XXXX 6. Press” ENTER “to record your password into memory. 7. Press” ENTER “once again to return to the system select menu. Please note that at this time the viewing rating level is still at level 8. 8. Press” ENTER “to re-enter the rating level screen. ____ 9. Use the level 2).
11. Setting the Password and Rating 54 13³]©w±K½X»P«OÅ@¼h¯Å(Äò) A. To enter the “ Remove “option, press” ENTER ”with the cursor over this field. The system will remove the password and no longer check for DVD rating levels. You will see this screen: B. To enter the “ Change Password “option, press “ ENTER “ with the cursor over this field. The ” Set Password “screen appears allowing you to enter a new password. The present password is cleared from the system’s memory. You will see this screen: C.
14 ¦³Ãö©ó¥R¹q¹q¦Àªº¦w¸Ë»P¨Ï¥Î 12 12. Rechargeable Battery Installation and Use battery and the charger are not connected properly or the battery may be defective. Please note that with a completely empty battery the red charging indicator light might take 30 seconds to 1 minute to light . This is nothing to be concerned about. AC Adapter/charger input Rechargeable Battery Installation and Use This DVD player utilizes one set of long-life (Li-lon) or (Ni-MH) batteries.
12. Rechargeable Battery Installation and Use Using and Maintaining your Rechargeable Batteries (1) Please make sure you always use only the AC transformer included with the DVD player to recharge the player batteries. (2) Recharge effectiveness will degrade when environmental temperatures drop below 10 C or exceed 35 C. (3) Please remove battery from the player and store properly if the player is not to be used for an extended period of time.
15 ¨Ï¥Îª`·N¨Æ¶µ»P²©ö«O¾i 13 DVD Precautions and Simple Maintenance Your DVD player is an extremely precise AV broadcast system. Abiding by the following suggestions will help maintain your player in top working order and avoid any safety problems. 13. DVD Precautions and Simple Maintenance Condensation Moving your DVD player from a cold environment to a warm one will often result in moisture condensation. Under such conditions wait at least one hour before using your player.
15 ¨Ï¥Îª`·N¨Æ¶µ»P²©ö«O¾i (Äò) 13. DVD Precautions and Simple Maintenance 58 Dust Display Screen Avoid using your DVD player in windy / dusty conditions, such as on the beach or outdoors during inclement weather. The surface of the display screen is easily scratched. Avoid contact with sharp or hard objects. When not in use, the player screen should be firmly closed. If the screen is soiled, wipe with a soft clean cloth. Do not apply water or any cleaning solvent.
14. Player Specifications DAC: Power: 14 hours of playback time with rechargeable lithium ion battery pack [Depending on functions used (brightness, volume level etc.) ] DC 12V input battery charge adapter. Player Specifications Remote Control: Slim Card IR Remote Control Playing Discs: DVD / VCD (V2.0) / CD / MP3 Dimension Inch(mm): 7.51 (191) (W) x 6.16 (156.5) (D) x 1.
12 MONTH DAY LIMITED WARRANTY Applies to Audiovox Video Products AUDIOVOX ELECTRONICS CORPORATION (the Company) warrants to the original retail purchaser of this product that should this product or any part thereof, under normal use and conditions, be proven defective in material or workmanship within 12 months from the date of original purchase, such defect(s) will be repaired or replaced with reconditioned product (at the Company's option) without charge for parts and repair labor.