® D1710 Portable DVD Player User Manual English 128-6907
Table of Contents FCC and Safety Information .................................................................................. 3 Important Safety Instructions ................................................................................ 4 Cautions .......................................................................................................... 5 DVD Disc Format and TV Format ............................................................................. 6 Remote Control Functions ................
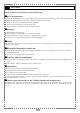
FCC and Safety Information CAUTION: This unit employs a laser. Due to possible eye injury, only qualified service personnel should remove the cover or attempt to service this device. Use of controls or adjustments or performance of procedures other than those specified herein may result in hazardous radiation exposure. NOTE: This equipment has been tested and found to comply with the limits for a Class B digital device pursuant to part 15 of the FCC Rules.
Important Safety Instructions 1. 2. 3. 4. 5. 6. 7. 8. 9. 10. 11. 12. 13. Read these instructions. Keep these instructions. Heed all warnings. Follow all instructions. Do not use this unit near water. Clean only with a damp cloth. Do not block any of the ventilation openings. Install in accordance with the manufacturer’s instructions. Do not install near any heat sources such as radiators, heat registers, stoves, or other apparatus (including amplifiers) that produce heat.
Cautions Please read these precautions before operating this unit. !Power cord protection To avoid unit malfunctions and to protect against electric shock, fire or personal injury, please observe the following. " Hold the plug firmly when connecting or disconnecting the AC power cord. " Keep the AC power cord away from heating appliances. " Never put a heavy object on the AC power cord. " Do not attempt to repair the AC power cord in any way.
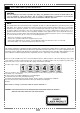
DVD Disc Format and TV Format DVD discs have the material recorded in the PAL and NTSC systems. Refer to the table below to select the correct disc type for the type of connected TV.
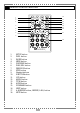
Remote Control Functions 10 1 2 3 4 11 12 13 5 14 15 16 6 7 17 8 9 18 1. 2. 3. 4. 5. 6. 7. 8. 9. 10. 11. 12. 13. 14. 15. 16. 17. 18. SETUP button INFO. button PAUSE button MENU button F.REVERSE button PLAY/SEL. button PREVIOUS button STOP button Number buttons SUBTITLE button LCD button ANGLE button TITLE button AUDIO button F.
Front View 1 2 4 3 3 m¤ m¤ m¤ m¤ 5 6 7 8 9 12 1110 16 15 14 1. 2. 3. 4. 5. 6. 7. 8. 9. 10. 11. 12. 13. 14. 15. 16. 13 LCD screen COLOR Adjustment SPEAKERS BRIGHTNESS Adjustment LCD button SETUP button INFO. button MENU button PAUSE/UP button PLAY/SEL. button F.FWD/RIGHT button STOP/DOWN button NEXT button PREVIOUS button F.BWD/LEFT button OPEN button Note: The screen aspect ratio to 16:9, 4:3, or NORMAL by pressing LCD button several times.
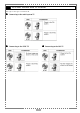
1-1 DVD Playback Hold the disc without touching its surfaces, position it with the printed title side facing up, align it with the guides, and place it in its proper position. 4 Close the disc cover. " " DVD player starts playback automatically if the disc does not have any menus recorded on it. If the disc has one or more titles recorded on it, a menu screen will appear on the screen. NOTE: Proceed with steps 5 and 6 when a menu is available on the disc.
1-1 DVD Playback-continued Fast Forward and Fast Reverse) By the remote control: Chapter 1 Press " " F.BWD or F.FWD during playback. Normal playback can be resumed by pressing PLAY/SEL. The speed of fast forwarding ( x2, x4, and etc) or fast reverse ( x2, x4, and etc.) changes for each press of the F.FWD or F.BWD button. Skipping Ahead or Back to Chapters Skipping Ahead Press NEXT during playback. Skips to the next chapter each time you press the button.
1-2 DVD functions Displaying the time information Press INFO. multiple times to display the title number, chapter number, and other information on the screen. Cancelling the time information Press INFO. a multiple times until the information disappears. Selecting Audio Soundtrack (Language) You can change the audio language from the one selected at the initial settings to a different language. (This feature is operational only with discs that were recorded with multiple audio soundtrack languages).
1-2 DVD functions-continued Viewing From Another Angle Chapter 1 Some DVD discs may contain scenes which have been shot simultaneously from a few number of different angles. For these discs, the same scenes can be viewed from each of these different angles using the ANGLE “ ” button. (The recorded angles vary depending on the disc programmed.) 1 Press ANGLE during playback. 2 Press ANGLE a number of times until the preferred viewing angle is selected.
1-2 DVD functions-continued Playing Kodak Picture CDs and JPEG picture CDs With this DVD player you can view Kodak picture CDs and JPEG pictures for viewing on the screen. pictures in slide show automatically. 2 You can select a picture to view by pressing it’s corresponding number press the number corresponding to the order of the picture. This player will begin to display the slide show from the selected picture. To stop slide show, press the STOP button. PAUSE, NEXT and PREV.
1-2 DVD functions-continued Playing a JPEG picture with MP3 music You can select your favorite JPEG picture to display on the TV screen while playing MP3 music. Chapter 1 1 Load a disc containing MP3 music and JPEG pictures. This portable DVD player starts playing the JPEG pictures in slide show automatically. 2 Press STOP at the picture you like during slide show. At the mean time, you can see the following screen appear.
2-1 Audio CD Playback Preparations Apply power to the unit and connect the headphones. To connect the player to external equipment: " " " Apply power to the TV set and select “Video” as the TV input. Apply power to the stero system if the player has been connected to a stereo system. Slide the AV OUT/IN SWITCH button to AV OUT position. Hold the disc without touching its surfaces, position it with the printed title side facing up, align it with the guides, and place it in its proper position.
2-1 Audio CD Playback-continued Rapid Advance (Rapid Reverse) Using the remote control: Press " " F.BWD or F.FWD during playback. Normal play is resumed by pressing The speed of forward ( x2, button. x4, and etc.) or reverse ( x2, x4, x8, and etc.) changes for every press of the F.FWD or F.BWD button. Skipping Ahead or Back to Tracks Chapter 2 Skipping Ahead Press NEXT during playback to advance to the next audio track.
3-1 Language Setup On Screen Display (OSD) Language Setting Allows you to set various languages for the on screen display (OSD). 1 2 3 4 5 Press SETUP. to select “LANGUAGE SETUP” then press PLAY/SEL. Press / Press / to select “OSD” then press PLAY/SEL. Press / to select the desired language. Press PLAY/SEL. To return to the SETUP MENU screen Select “RETURN” and press PLAY/SEL. To finish the setup operation Press SETUP to exit or select EXIT from SETUP MENU screen.
3-1 Language Setup-continued AUDIO Soundtrack Language Selection [DVD] You can select a preferred soundtrack language among various languages that have been recorded on DVD discs. 1 2 3 4 5 Press SETUP in the stop mode. / to select “LANGUAGE SETUP” then press PLAY/SEL. Press / to select “AUDIO” then press PLAY/SEL. Press / to select a preferred language. Press Press PLAY/SEL. ORIGINAL: The default language of the disc will always be used first.
3-2 Screen Setup SCREEN SAVER Setting To enable the screen saver feature perform the steps below: 1 2 3 4 Press SETUP in STOP mode Use Use Use / . button to select “SCREEN SETUP” and press PLAY/SEL. / button to select “SCREEN SAVER”. / button to select “ON” or “OFF” and press PLAY/SEL. The delay time of the screen saver function is set to 10 minutes. When the player is in STOP mode for 10 minutes the screen saver will activate. Y/SEL.
3-2 Screen Setup-continued TV SYSTEM Setting The player provides “PAL”, “NTSC” and “AUTO” settings for your selection. Video output changes according to the playback disc’s recorded fromat. When connecting this portable DVD player to your TV, set the “TV SYSTEM” from the on-screen display to the format that is compatible with your TV’s system.
3-2 Screen Setup-continued BRIGHTNESS Setting You can adjust the brightness of the video with this setting to provide a comfortable view. Using the BRIGHTNESS Adjustment button: 1. Gently press the BRIGHTNESS Adjustment button, rotate the button in a clockwise or a counter clockwise direction for the desired brightness setting. 2. Rotate the button in a clockwise direction to increase the brightness of the screen. 3.
3-3 Custom Setup Note: “Custom Setup” only works without disc inside this portable DVD player. PARENTAL CONTROL Setting [DVD] A built-in viewer rating setting enables you to lock the videos that you do not want children to view. For example, if you set the player to PG-13, the player will not play the videos rated R, NC-17 or X unless the correct password is entered. 1 2 3 4 Press SETUP in the stop mode. Press / Press / to select “CUSTOM SETUP” and press PLAY/SEL.
3-3 Custom Setup-continued ANGLE MARK Setting[DVD] This player has the capability of displaying the angle mark “ ” on screen when a DVD movie or a certain part of it has multi-angle scenes when the DVD was recorded. 1 2 3 4 Press SETUP in the stop mode. Press / to select “CUSTOM SETUP” and press PLAY/SEL. Press / to select “ANGLE MARK”, and then press PLAY/SEL. Press / to select “ON” or “OFF” and press PLAY/SEL.
3-4 Audio Setup OUTPUT Setting [DVD] This portable DVD player provides two types of audio outputs; 2-channel stereo sound and digital sound output. 1 2 3 4 5 Press SETUP in the stop mode. to select “AUDIO SETUP” and press PLAY/SEL. Press / Press / to select “OUTPUT” and press PLAY/SEL. Press / to select a preferred output setting. Press PLAY/SEL. NOTE: " The digital output connectors are used to output the digital audio track recorded on discs.
4-1 Troubleshooting Before requesting service for the player, check the chart below for a possible cause of the problem you are experiencing. Some simple checks or a minor adjustment on your part may eliminate the problem and restore proper operation. SYMPTOM (COMMON) No power. The player does not start playback when PLAY is pressed. REMEDY · · · · · The player starts playback but stops immediately. No picture. No sound. Distorted sound. No audio at Digital Output.
4-2 Disc Handling and Maintenance Handling Precautions " Hold the disc by the edges " " " " " " so the surface will not be soiled with fingerprints. (A) Fingerprints, dirt and scratches can cause skipping and distortion. Do not write on the label side with a ball-point pen or other writing utensils. Do not use record cleaning sprays, benzine, thinner, static electricity prevention liquids or any other solvent. Be careful not to drop or bend the disc. Do not install more than 1 disc on the disc tray.
4-3 Definition of Terms Angle Recorded onto some DVD discs are scenes which have been simultaneously shot from a number of different angles (the same scene is shot from the front, from the left side, from the right side, etc.). With such discs, the ANGLE button can be used to view the scene from different angles. Chapter Number These numbers are recorded on DVD discs.
90 DAY LIMITED WARRANTY Applies to Audiovox Video Products AUDIOVOX ELECTRONICS CORP. (the Company) warrants to the original retail purchaser of this product that should this product or any part thereof, under normal use and conditions, be proven defective in material or workmanship within 90 days from the date of original purchase, such defect(s) will be repaired or replaced with reconditioned product (at the Company's option) without charge for parts and repair labor.
For Customer Service Visit Our Website At WWW.audiovox.com Product Information, Photos, FAQ’s Owner’s Manuals © 2003 Audiovox Electronics Corp.