D1809PK 8” LCD MONITOR WITH DVD PLAYER
FCC Information This device complies with Part 15 of the FCC Rules. Operation is subject to the following two conditions: (1) This device may not cause harmful interference, and (2) this device must accept any interference received, including interference that may cause undesired operation. In accordance with FCC requirements, changes or modifications not expressly approved by Audiovox Electonics Corp. could void the user’s authority to operate this product.
This power unit is intended to be correctly oriented in a vertical or floor mount position. This class B digital apparatus complies with Canadian ICES-003. Cet appareil numérique de la classe B est conforme à la norme NMB-003 du Canada. WARNING: TO PREVENT FIREOR ELECTRICAL SHOCK HAZARD, DO NOT EXPOSE THIS PRODUCTTO RAIN OR MOISTURE. Notice: This Product incorporates copyright protection technology that is protected by method claims of certain U.S.
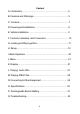
Content A. Introduction .............................................................................. 5 B. Cautions and Warnings .......................................................... 5 C. Contents ....................................................................................7 D. Powering and Installation ........................................................ 8 E. Vehicle Installation ....... ......................................................... 9 F. Controls, Indicators, and Connectors...
A. Introduction Thank you for selecting the D1809PK portable DVD player. The main features include a 8" Screen (16:9 Aspect Ratio) Liquid Crystal Display (LCD) monitor and a DVD player. The unit applies the latest state of the art electronics and is designed for use in hotels, offices home or vehicle. The unit is constructed to provide years of reliable, trouble-free service, and is compact so that you can take it with you anywhere and is designed for quick and easy use.
Attachments Do not use attachments not recommended by the product manufacturer as they may cause hazards. Servicing Do not attempt to service this product yourself as opening or removing covers may expose you to dangerous voltage or other hazards. Refer all servicing to qualified service personnel.
discs according to the disc contents the software producers designed, some playback features may not be available. Also refer to the instructions supplied with the discs. DVD Regional Code Your DVD player has been designed to process regional management information that is stored on DVD discs. The regional code for your player is 1 (The U.S.,U.S. Territories and Canada). Only DVD discs that have regional codes of 1 or ALL (for all regions) can be played by your player.
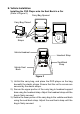
D. Powering and Installation 1. Powering the System Indoors (Refer to Figure 1) Plug one end of the AC to DC adapter into the DC 9-12V jack on the right side of the main unit, then plug the other end into the 100240V AC power receptacle. Figure 1 2. Powering the System in a Car (Refer to Figure 1) Plug one end of the DC power adapter into the DC jack on the unit, then plug the other end into the vehicle‘s DC power socket. 3. Charging the Built-in Battery Slide the Power On/Off Switch to Off position.
E. Vehicle Installation Installing the DVD Player onto the Seat Back in a Car (Refer to Figure 2) Carry Bag Opened Carry Bag Closed Elastic Straps Vehicle Headrest Headrest Strap Seat Back Strap Vehicle Seat Back Figure 2 1). Unfold the carry bag, and place the DVD player on the bag beneath the elastic straps. Ensure that the unit’s corners are secured by the elastic straps. 2). Secure the upper portion of the carry bag to headrest support bars using the headrest strap.
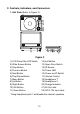
F. Controls, Indicators, and Connectors 1.
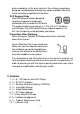
2. Remote Control View (Refer to Figure 4) 1) SETUP Button 2) UP Button 3) PREVIOUS Button 4) ENTER Button 5) REVERSE SCAN/LEFT Button 6) DOWN Button 7) NUMERIC Buttons 8) DISPLAY Button 9) ZOOM Button 10) SUB Button 11) NEXT Button 12) A-B REPEAT Button 13) FORWARD SCAN/RIGHT Button 14) 1/All REPEAT Button 15) STOP Button 16) MENU Button 17) AUDIO Button 18) ANGLE Button 19) PLAY/PAUSE Button Figure 4 G. Loading and Playing a Disc a.
H. Setup Press SETUP button to display the Main screen of the SETUP Menu on the screen. Press SETUP button again to exit the SETUP Menu and the unit will resume it’s last playback mode. 1) Press SETUP button, the ‘GENERAL SETUP PAGE’ will display on screen. Main Setup Menu Screen a) Select ‘TV DISPLAY’ using the DOWN button, and then press ENTER button to enter the submenu. Select the TV display mode on the screen using UP/DOWN button, and press ENTER button to confirm the setting.
b) Select ‘ANGLE MARK’ using the DOWN button, and then press the ENTER button to enter the submenu. Choose Angle Mark on or off using the UP/DOWN buttons and then press ENTER button to confirm the setting. Press the LEFT button to return. Angle Mark Screen Display * ON: The screen will show the angle mark icon. (*If an angle option is available). * OFF: The screen will not display the Angle Mark icon. NOTE: Not all discs contain above features.
d) Select ‘SCREEN SAVER’ using the DOWN button, and then press the RIGHT button to enter the submenu. Choose Screen saver on or off using the UP/DOWN buttons and then press ENTER button to confirm the setting. Press the LEFT button to return. Screen Saver Screen Display *ON: Enables screen saver. *OFF: Disables screen saver. NOTE: The DVD player will enter the Screen Saver mode after approximately five minutes if the same image remains on the screen.
2) Select ‘VIDEO’ by using the LEFT/RIGHT buttons, press ENTER button to enter the VIDEO SETUP PAGE. Video Quality Setup Screen Display a) Select ‘BRIGHTNESS’ by using the UP or DOWN buttons ,then press ENTER button. Adjust the Brightness by pressing the LEFT or RIGHT buttons. To exit Brightness Setting, press ENTER button again. Brightness Screen Display b) Select ‘CONTRAST’ by using the UP or DOWN buttons, then press ENTER button. Adjust the Contrast by pressing the LEFT or RIGHT buttons.
3) Select ‘Password’ using the LEFT or RIGHT buttons, then press the ENTER button to enter the submenu. Password Setup Page Screen Display Press ENTER button twice to enter the PASSWORD CHANGE PAGE. Input the Old Password or the Default Password, the New Password, and the Confirmed New Password. Press ENTER button to confirm the change. Password Change Page Screen Display NOTE: The Default Password is 3308. This password is always effective even after you have selected your own password and changed it.
4) With no disc inside the player select ‘PREFEREN’ using the LEFT or RIGHT buttons, then press ENTER button to enter the PREFERENCES PAGE . Preference Screen Display a) Select ‘AUDIO’ using the DOWN button, then press ENTER button to enter the submenu. Select the audio language you desire using the UP or DOWN buttons, then press ENTER button to confirm the setting. Press LEFT to return.
b) Select ‘SUBTITLE’ using the DOWN button, then press ENTER to enter the submenu. Select the desired subtitle language or SUBTITLE OFF using the UP or DOWN buttons, then press ENTER button to confirm the setting. Press LEFT to return. Preference Subtitle Language c) Select ‘DISC MENU’ using the DOWN button, then press ENTER button to enter the submenu. Select the Disc Menu Language you desire using the UP or DOWN buttons, then press ENTER button to confirm the setting. Press LEFT to return.
d) Select ‘PARENTAL’ using the DOWN button, then press ENTER button to enter the submenu. Parental Preference Screen Display Select the parental level you desire using the UP or DOWN buttons for discs with lock-out function or multiple rating levels. These are listed from the lowest level (KID SAFE) to the highest level (ADULT). Enter a 4 digit password, then press ENTER button to confirm the parental level setting. NOTE: The level of 8 ADULT is the factory default.
I.
J. Menu A DVD is divided into sections called titles and chapters. When you play a DVD, a root menu of the disc will appear on the screen of your TV or Monitor. The contents of the menu vary from disc to disc. Press MENU during playback to display the menu. Some DVDs only allow you to select disc playback options using the DVD root menu. K. Display (Display contents vary from disc to disc.) 1. Playing Time and Remaining Time a.
c. Press DISPLAY button a third time to display the Elapsed Time for the chapter. The heading will disappear automatically in 3 seconds. Tt 01 / 01 Ch 02 / 17 0 : 00 : 00 Chapter Elapsed Time Screen Display d. Press DISPLAY button a fourth time to display the Remaining Time for the chapter. The heading will disappear automatically in 3 seconds. Tt 01 / 01 Ch 02 / 17 0 : 00 : 00 Chapter Remaining Time Screen Display e.
2. Angle During playback of a disc, press ANGLE button to display the available angles for discs containing multi-angles*, with the current angle number (1) and the total number of angles (2) displaying. Press ANGLE button to select another angle, then press it again to exit and return to the normal viewing angle. The angle display will disappear automatically if the ANGLE button is not pressed again within 3 seconds. *NOTE: Not all discs contain this feature. Angle Screen Display 3.
4. Audio During playback press AUDIO button to select the audio language you desire*, with the current Audio Channel Number (1) and the total number of Audio Channels (2) displayed. Press AUDIO again to select another audio language. The audio display will disappear automatically if the AUDIO button is not pressed within 3 seconds. Audio Language Screen Display * Some DVDs only allow access to this function through the DVD menu. 5.
6. A-B Repeat a. During playback press A-B button to set the Starting Point A. A-B Repeat Starting Point Screen Display b. Press A-B button a second time to set the Ending Point B and the player will repeatedly play the part between Point A and Point B. A-B Repeat Ending Point Screen Display c. Press A-B button a third time to cancel A-B repeat and resume normal playback.
7. Repeat a. During playback press 1/ALL button once to repeatedly play the current chapter. Chapter Repeat ON Screen Display b.During playback press 1/ALL button again to repeatedly play the current title. Title Repeat ON Screen Display c. During playback press 1/ALL button a third time to repeat all chapters and titles.
d. Press 1/ALL button a fourth time, to resume normal playback. Repeat Off Screen Display 8. Forward/Reverse Scan a. During playback press uu to scan forward at 2x, 4x, 8x,16x, 32x and normal speed. b. During playback press tt to scan backward at 2x, 4x, 8x,16x, 32x and normal speed. L. Playing Audio CDs When an CD disc is put into the unit, the Menu Screen appears. You can use Up and DOWN button to choose the song you desired. Press ENTER button to play.
1. Using the Repeat Feature The default mode for the Repeat feature is OFF. Pressing 1/ALL button consecutively changes the repeat options: • Repeat one- repeats the track that is playing. • Repeat All - repeats the disc that is playing. • Repeat Off As you toggle through the options, the repeat option changes. The selected repeat option loops repeatedly until you turn it off. 2. A-B Repeat a. During playback press A-B to set the Starting Point A. b.
M. Playing JPEG Files 1) Load a JPEG disc onto the disc tray. 2) A screen showing folders or picture files contain on the disc will be displayed automatically after loading. 3) You can select a picture you desire by pressing UP, DOWN, LEFT, RIGHT and ENTER buttons. 4) Press the DOWN button to rotate the picture clockwise. 5) Press the ZOOM button to enlarge the picture size by 125%,150%, 200% or zoom out by 75%,50% and then return to the original size.
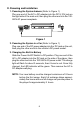
2. Connecting Headphones Simply plug the headphones into either Headphone jack 1 or Headphone jack 2 on the right side of the DVD Player. (Refer to Figure 6) Figure 6 Plugging into Headphone jack 1 will disable the internal speakers. O. Specifications Compatible DISC: DVD/CD Signal system: NTSC Panel size: 8 inch Frequency response: 20 Hz to 20 kHz Video output: 1 Vp-p/75 Ohm, unbalanced Audio output: 1.
P. Rechargeable Built-in Battery The DVD player utilizes a long-life Li-Polymer battery for portability. Li-Polymer batteries feature high storage capacity and low level of degradation. This means the Li-Polymer batteries do not have “Memory Effect” and thus can be recharged regardless of whether the battery is fully or only partially discharged. The battery must be charged at least 8 hours prior to first use.
Q. Troubleshooting PROBLEM No sound or distorted sound SOLUTION • Make sure the DVD player is connected properly. Make sure all cables are securely inserted into the appropriate jacks. Can’t advance through a movie • You can’t advance through the opening credits and warning information that appears at the beginning of movies because the disc is programmed to prohibit that action. The icon ( ) appears on screen The feature or action cannot be completed at this time because: 1.
Troubleshooting (Cont) PROBLEM SOLUTION IR sensor inoperative • Verify that the batteries in the remote are fresh. • Verify that the remote sensor eye is not obstructed. Disc won’t play • Check the type of disc you put into disc tray. This DVD player only plays DVDs and audio CDs. Play starts, but then stops immediately • Your DVD player has been designed to process regional management information that is stored on DVD discs. The regional code for your player is 1 (The U.S.,U.S.
90 DAY LIMITED WARRANTY Applies to Audiovox Video Products AUDIOVOX ELECTRONICS CORP. (the Company) warrants to the original retail purchaser of this product that should this product or any part thereof, under normal use and conditions, be proven defective in material or workmanship within ninety (90) days from the date of original purchase, such defect(s) will be repaired or replaced with reconditioned product (at the Company's option) without charge for parts and repair labor.
© 2009 Audiovox Electronics Corporation Printed in China 128-8576 (V 1.