D1810 PORTABLE 8" LCD MONITOR AND DVD PLAYER 128-6925
Notice: This Product Incorporates copyright protection technology that is protected by method claims of certain patents and other intellectual property rights owned by Macrovision Corporation and other rights owners. Use of this copyright protection technology must be authorized by Macrovision Corporation, and is intended for home and other limited viewing uses only unless authorized by Macrovision Corporation. Reverse engineering or disassembly is prohibited.
A. Introduction Thank you for selecting the D1810 portable DVD player. The main features include a 8" Wide Screen (16:9 Aspect Ratio) Liquid Crystal Dis play (LCD) monitor and a DVD player. The unit applies the latest state of the art electronics and is designed for use in cars, hotels, office, home or anywhere. The unit is constructed to provide years of reliable, trouble-free service, and is compact so that you can take it with you anywhere and is designed for quick and easy installation.
5. Cleaning Unit When cleaning, make sure the system is unplugged from the power source. Do not use liquid cleaners or aerosol cleaners. Use a cloth lightly dampened with water for cleaning the exterior of the system only. 6. Disc Do not use irregularly shaped discs such as heart or star-shaped discs as they may cause the unit to malfunction. Do not stick paper, tape or glue on the disc. Do not expose the disc to direct sunlight or heat sources such as hot air ducts. Do n ot touch the surface of disc.
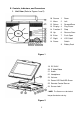
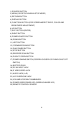
E. Controls, Indicators, and Connectors 1. Unit View (Refer to Figures 1and 2) 10 Source 1 Down 11 Menu 2 Left 12 Return 3 Forward Scan 13 Display 4 Play/Pause 14 Function 5 Stop 15 Up 6 Reverse Scan 16 Enter 7 Push Open 17 Right 8 LCD Cutoff SCAN Switch 18 Power 9 Battery Pack Figure 1 19 DC IN 9V 20 S Video/Video 21 Audio 22 Headphone 26 23 Volume 24 Power LED Red/LED Green 25 Remote Control Sensor 26 Screen Lock * * NOTE: The Screen must be locked into position before closing.
1) SOURCE BUTTON 2) MENU (OR SETUP WHEN IN STOP MODE) 3) RETURN BUTTON 4) DISPLAY BUTTON 5) FUNCTION BUTTON (FOR SCREEN ASPECT RATIO, COLOR AND BRIGHTNESS ADJUSTMENT) 6) UP BUTTON 7) ENT.
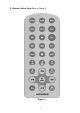
2. Remote Control View (Refer to Figure 3) Prog.
Remote Control Function Description Screen: Change the screen aspect ratio. Angle: Switch to a different angle if the DVD contains angle options. Mute: Mute speakers Setup: System setting Display: On screen display of the current disc status Vol.
F. Loading and Playing a Disc 1. After connecting power to the unit, power on “DVD player” by holding down the power button* for 2 seconds. 2. Open the disc door by pressing “PUSH OPEN”, place a disc into the tray with the label side of the disc facing up. 3. Close the disc door cover of the tray. The unit will load the disc and go to the root menu. Start playback by pressing, “PLAY”. 4. Rotate the VOLUME control to adjust the DVD player’s volume. 5. To stop playing a disc press STOP.
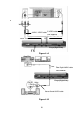
TV White Red Yellow S VIDEO cable AUDIO / VIDEO cable (Not Supplied) Black OR Yellow Player(Right Side) Figure 4.-A Amplifier Fiber Digital AUDIO cable (Not Supplied) Player(Right Side) White Red Stereo Sound AUDIO cable F Figure 4.
H. SETUP Press ‘SETUP’ to display the Main menu of the SETUP Menu on the screen. Press ‘RETURN’ or 'SETUP' to exit the SETUP Menu Figure 5. Main SETUP Menu Screen 1) DISC MENU Select “DISC” using the Left /Right buttons, then press ‘ENTER’ to enter the DISC MENU screen Figure 6.
a). Select ‘AUDIO LANGUAGE’ using the Up or DOWN buttons, then press ENTER to enter the submenu. Select the desired *audio language using the Up or DOWN buttons. Then press ‘ENTER’ to confirm the setting. Figure 7. Audio Language Setting Screen b). Select ‘SUBTITLE’ using the UP or DOWN buttons, then press ENTER to enter the submenu. Select the desired *subtitle language using the UP or DOWN buttons, then press ‘ENTER’ to confirm the setting. Disc Origin Lang Figure 8.
Figure 9. Menu language Setting Screen *Note: Language and subtitle selection is only available for discs that are recorded in the above listed languages. If the selected language is not available, the player will play and display on the screen the original recorded language contained in the disc. d). Select ‘RATING’ using the UP or DOWN buttons, then press ‘ ENTER’ to enter the submenu. Select the desired rating using the UP or DOWN buttons , then press ‘ENTER’.
Figure 10.
NOTE: ADULT is the default setting. 2) VIDEO SETTING Select “VIDEO” using the Left/Right buttons, then press ‘ENTER’ to Enter the VIDEO MENU screen. REMARK: You can set up your Player to work with normal and wide screen televisions. If you are using a wide screen TV, set this option to 16:9 to match the aspect ratio of your TV. When used with a normal TV (4:3 aspect ratio) select the 4:3 Pan & Scan setting.
Figure 12. TV ASPECT Setting Screen b).TV OUTPUT TYPE Note: Model D1810 is NTSC only. Figure 13. TV OUTPUT TYPE Setting Screen 3) DOLBY DIGITAL SETTING Select “DOLBY DIGITAL” using the Left or Right buttons, then press ENTER to enter the submenu.
DOWN buttons, then press ‘ENTER’ to confirm the setting. Dolby Digital Figure 14.
4) DISPLAY SETTING Select “DISPLAY” by using the left or right buttons, then press ENTER to enter the submenu. Figure 15. Display Setting Screen Display a). Select MENU LANGUAGE Note: The system operation MENU LANGUAGE is set on ENGLISH only. b). Select ‘ON SCREEN MESSAGE’ using the UP or DOWN buttons, then press ‘ENTER” to enter the submenu. Select ‘ON’ or ‘OFF’, then press ‘ENTER’ to confirm the setting.
5) OTHER SETTING Select “OTHER” by using the left or right buttons, then press ENTER to enter the submenu. Last Memory YES Figure 17. OTHER SETTING Screen Display a).Select ‘LAST MEMORY’ using the UP or DOWN buttons . Press ENTER to enter the submenu. Select NO or YES by using the UP or DOWN buttons , then press ENTER to confirm. Figure 18. LAST MEMORY Screen Display *NO: The unit will not retain the last position of playback. *YES: The unit will retain the last position of playback in memory.
1.
2. MENU A DVD is divided into sections called titles and chapters. When you play a DVD, a root menu of the disc will appear on the screen of your TV or Monitor. The contents of the menu vary from disc to disc. Press MENU during playback to display the root menu, and press MENU or PLAY to resume playback. Pressing Menu on the front panel when in the stop mode will display the Setup menu. Some DVDs only allow you to select disc playback options using the DVD menu.
r Battery status: When using the battery, the Battery Icon is displayed with color; when using AC, the Battery Icon is displayed in gray. s Charger status: When the battery is connected and charging, the arrow will point up. When the battery is connected and the AC adapter is not, the arrow will point down. 4. ANGLE During playback of a disc, press ‘ANGLE’ to display the available angles for discs containing multi-angles*, with the current angle number displayed.
6. ZOOM During playback press ‘ZOOM’ to enlarge the picture by 2x. Press “zoom” again; the picture will return to normal. ZOOM Figure 22. ZOOM Screen Display 7. A-B REPEAT a).During playback press ‘A-B’ to set the Starting Point A. OFF Figure 23. A-B Repeat Screen Display b).Press ‘A-B’ a second time to set the ending point B and the player will repeatedly play the part between point A and point B. Figure 24.
c).Press A-B a third time to cancel A-B repeat and resume playback from point A. Figure 25. A-B Repeat Cancel Screen Display 8. REPEAT a. During playback press ‘REPEAT’ once to display the current repeat status. Figure 26. Repeat Status Screen Display q b. Press ‘REPEAT’ a second time to repeatedly play the current title. Figure 27.
q c. Press ‘REPEAT’ a 3rd time to repeatedly play the current chapter. Figure 28. Chapter Repeat ON Screen Display q d. Press ‘REPEAT’ a 4th time to repeat all Chapters and Titles. Figure 29. Disc Repeat ON Screen Display e. Press ‘REPEAT’ a 5th time to resume normal playback. 9. Screen display mode You can choose 3 types of Display modes for the built-in screen. Your Player features three Display Modes – Full, Wide and Normal. Full Mode The default Mode is FULL.
Wide Mode When viewing a movie recorded in standard 4:3 format for normal TVs, try this setting. A unique horizontal scaling is used to display the image on the full wide screen, where it would otherwise appear stretched horizontally. Normal Mode When viewed on the player’s wide screen display, movies made for standard televisions (4:3 aspect ratio) will appear stretched horizontally. To solve this problem, use the NORMAL mode to convert the player’s wide screen display to that of a Standard TV. 10.
DVD Slow 1/2 Figure 31. Slow 1/2 Screen Display 11. Program CD Play List a).During CD playback, press Title/Prog. to enter the program list. Use the Up or Down buttons to highlight the desired song, then press Enter to confirm the song in the program list. Then press Title/Prog. To return to playback. Figure 32. CD program list Screen Display 12. Rechargeable Battery Installation and Use The player utilizes a set of long-life Li-ION batteries for portable power supply.
properly. For longer periods of storage, please recharge the battery at least once every two months to maintain the battery in its best condition. Please under no circumstances short out the battery, store the battery in a metal container, or leave the battery in a humid or damp environment. Ideally, store the battery in an airtight container with desiccant or other dehumidifying agent.
Figure 33.
Removing the Battery Pack: (See Fig 34.) 1. First, make sure the player is in the “Stop” mode and that the AC power supply has been disconnected. 2. Press the release tabs on the sides of the battery. 3. Pull the battery pack to disconnect it from the unit. Figure 34.
13. Specifications Disc format: DVD/CD Color system: NTSC Screen size: 8.0" Frequency response: DVD (PCM 96 kHz/24 bits ): 20Hz-44KHz DVD (PCM 48 kHz/16 bits): 20Hz-22KHz CD: 20Hz-20KHz Video output: 1.0Vp-p(at 75ohm) Video S/N: > 35dB Audio output: 2 X 0.5W Audio S/N: > 35dB Power source: DC 9V (Battery) / DC 12V (Car use) / AC 120V 60Hz (Adapter) Power consumption: <12W Operating temperature: 5-35? Operating humidity: 10-75% Dimensions (W x H x D): 8.35" x 1.2" x 6.