Operation Manual PORTABLE DVD PLAYER Model: D705 READ THESE INSTRUCTIONS THOROUGHLY PRIOR TO CONNECTING AND OPERATING YOUR DVD PLAYER. PLEASE RETAIN THIS MANUAL IN CASE YOU NEED IT FOR FUTURE REFERENCE. THE ILLUSTRATIONS AND GRAPHICS IN THE MANUAL ARE FOR REFERENCE ONLY AND SUBJECT TO CHANGE WITHOUT NOTICE.
This page intentionally left blank.
Notice: This Product incorporates copyright protection technology that is protected by method claims of certain U.S. Patents and other intellectual property rights owned by Macrovision Corporation and other rights owners. Use of this copyright protection technology must be authorized by Macrovision Corporation, and is intended for home and other limited viewing uses only unless otherwise authorized by Macrovision Corporation. Reverse engineering or disassembly is prohibited.
Introduction Thank you for selecting the D705 portable DVD Player. The main features include a 7" Screen (16:9 Aspect Ratio) Liquid Crystal Display (LCD) monitor and a DVD Player. The unit applies the latest state-of-the-art electronics and is designed for use in hotels, offices, homes or vehicles. The unit is constructed to provide years of reliable, trouble-free service, is compact so that you can take it with you anywhere, and is designed for quick and easy installation.
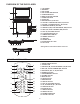
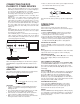
OVERVIEW OF THE DVD PLAYER: 1. LCD SCREEN 2. SPEAKERS 3. DISC COVER 4. DISC COVER OPEN BUTTON 5. CHARGE INDICATOR 6. REMOTE CONTROL SENSOR 7. POWER INDICATOR 8. OK BUTTON 9. NAVIGATION UP (p) BUTTON 10. VOLUME + & NAVIGATION RIGHT (u) BUTTON 11. VOLUME - & NAVIGATION LEFT (t) BUTTON 12. NAVIGATION DOWN (q) BUTTON 1 2 9 11 13 15 3 4 8 10 12 14 16 13. PREVIOUS (9) & FAST BACKWARD (tt) BUTTON 14. NEXT (:) & FAST FORWARD (uu) BUTTON 15. STOP (<) & SOURCE BUTTON 16. PLAY/PAUSE BUTTON (uII) 17.
! After use, disconnect the vehicle power adaptor from both the unit and vehicle DC accessory socket. CONNECTING THE DVD PLAYER TO OTHER DEVICES FUSE REPLACEMENT FUSE When connecting the DVD Player to a TV, ensure that the DVD Player and other devices (TV set and/or amplifier) to be connected to the DVD player are set to OFF. Do not block ventilation holes of any of the equipment and arrange them so that air can circulate freely. Read through the instructions before connecting other equipment.
JPEG PLAYBACK Picture slide shows begin automatically after a CD containing images is loaded into the DVD Player. JPEG images contained in the folders are displayed on the LCD screen. Use the navigation buttons to select the desired folder and then press OK (PLAY/PAUSE) (uII) button to confirm. The files in this folder are displayed and you can select your favorite pictures using the up/down navigation buttons and pressing OK (PLAY/PAUSE) (uII) button to start playback. SEARCH FOR A SCENE 1.
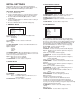
3. VIDEO QUALITY SETUP INITIAL SETTINGS Initial settings allow you to personalize the DVD Player settings to your preference. Once the initial settings are set, they are retained in the DVD Player until modified. Video Setup Page Brightness Contrast Hue Saturation Exit Setup ADJUSTING INITIAL SETTINGS 1. Press the SETUP button. 2. Use the navigation buttons to select the item you want to modify. Use the navigation buttons to perform changes. 3.
DISC HANDLING PRECAUTIONS Hold the disc by the edge so the surface will not be soiled with fingerprints. Fingerprints, dirt, and scratches can cause skipping and distortion. Do not write on the label side with a ball-point pen or other writing utensils. Do not apply benzine, thinner or other liquids that will damage the disc. Be careful not to drop or bend the disc. Install only one disc in the disc tray. Do not try to close the disc tray when the disc is not installed properly.
This page intentionally left blank.
For Customer Service Visit Our Website At WWW.audiovox.